
DIY Fun Halloween Picture Frame Art

Greetings! I am thrilled to share a fun and effortless craft idea with everyone. Today, we will be making a Halloween picture frame art. This craft is interactive and suitable for children to participate in. I will guide you through every step and also provide a list of materials needed. If you are excited, let's begin and have a blast creating!


Black picture frame with Halloween decorations displayed

Craft materials such as ghost sticker, picture frame, paintbrushes, and craft gems

Materials
  • One frame- Any size will work, I'm using 3.75x3.75
  • Halloween felt stickers-I purchased a pack from Dollar Tree
  • Gem strips-You can find these at Dollar Tree and they have a sticky backing to them
  • Adhesive (optional)
  • Acrylic paint-I'm using black and white
  • Scissors
  • Paintbrush
  • Round sponge brush

Applying paint to the picture frame


To begin, take out the paper from the center of the frame. Keep it aside for later use in the craft. 


After removing the paper, use a paintbrush to apply black acrylic paint onto the wooden frame. I applied about two coats of black acrylic paint to my frame and let it dry completely.

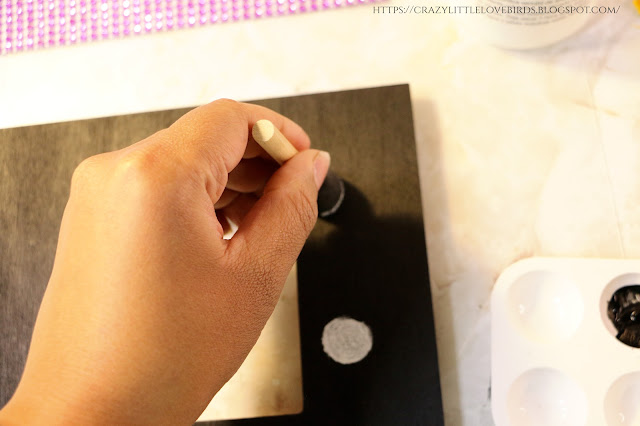
Creating a design on the frame


Next, take a round sponge brush and gently press it onto the frame after applying white paint to the brush.

Adding craft gems


Then, cut four long sections of gem strips using scissors. You can use adhesive or the sticky backing that comes with the gems when adding them to your frame. I added a little adhesive to ensure they were secure.


When applying the gem strips to each side, remove any excess that may hang over the edge with scissors.

Adding stickers to picture frame


Next, determine where you want your felt stickers on the frame. Remove the backing from each sticker and place them onto the frame.

Decorating paper insert


Finally, take the paper insert that was set aside earlier and apply black acrylic paint to it. Allow the paint to dry completely before using white acrylic paint and a smaller paintbrush to add any desired wording or designs. I chose to add the word "Boo" and a few white polka dots.


We've finished making this Halloween picture frame art craft. I hope you enjoyed it as much as I did. For fun, you can take a photo of yourself, a pet, or a child wearing their Halloween costume, add it to the frame, and put it on display.

Thank you for visiting! While you're here, check out these other fun Halloween crafts


Pin Share Save


Comments

  1. This is too stinkin' cute Stephanie! I am not one usually for a lot of Halloween here, but I have been bringing a few things out here and there. It's been a nice change of pace for me.

    ReplyDelete
  2. Cara, thank you so much! While I don't usually make many Halloween crafts, my daughters encouraged me to try this one. I'm glad you enjoyed it! :)

    ReplyDelete
  3. How cute! You sure do shop a lot at Dollar Tree, huh? You should be an affiliate for them :) Thanks so much for linking up at the #UnlimitedLinkParty 127. Pinned.

    ReplyDelete
  4. This is adorable! A great addition t o decor or to make a few as gifts. Featuring when my link party opens!

    ReplyDelete
    Replies
    1. Carol, thank you! ♡ I'm glad you enjoyed the craft.

      Delete

Post a Comment

Thank you for taking the time to leave a comment. Your feedback is greatly appreciated. I strive to respond to every comment and welcome any questions you may have.

Popular posts from this blog

Transform a Plastic Organizer into a Chic Artificial Succulent Hanging Garden

Hello everyone, I hope you're doing well. Today, I want to share a simple decor idea using a Dollar Tree plastic organizer. The organizer I'm using has three compartments.  We will be creating a hanging garden display with faux succulents. If you know me, then you know how much I love succulents.  Honestly, I could decorate every space in my home with them. The best part is that with artificial succulents, I won't have to worry about killing them. I'll provide you with all the details on creating your own hanging garden display, and I'll include a full materials list below. Let's get started! Materials One plastic organizer (I'm using the one with three compartments) Dollar Tree wallpaper sheet Wire Artificial succulents Hot glue Pencil or pen for tracing floral cutters scissors Tracing onto the wallpaper Begin by placing your plastic organizer on top of the wallpaper sheet. Use a pencil to trace around the organizer, but don't worry if you don't tra...

Transforming a Chocolate Box into a Beautiful Hanging Heart

Chocolates always have a way of making things better, don't they? In this project, we'll repurpose a heart-shaped chocolate box into a beautiful hanging heart decoration that you can proudly display for Valentine's Day. I'll provide you with a list of materials needed and guide you through the simple step-by-step process. So, get ready to give your leftover chocolate box a new lease on life! Materials One heart-shaped chocolate box Acrylic paint One sanding block Fabric heart garland (I purchased my fabric heart garland at Dollar Tree) Paintbrush Faux flowers and greenery Hot glue Twine or rope Scissors Floral cutters Prepping the box I used a heart-shaped box for my project, which had raised letters and hearts design. To prepare the box, I used a sanding block to sand down the lettering and design. It was easier than tearing the packaging paper off.  Applying Acrylic paint After sanding down the box and cleaning my workspace, I applied acrylic paint with a paintbrush. ...

Easy Dollar Tree Halloween Floral Creation DIY

Create your own simple Halloween floral arrangement using Dollar Tree supplies with this easy DIY tutorial. Embrace your creativity with this enjoyable and budget-friendly project. Hey everyone! Today, I want to share a simple craft idea using items from Dollar Tree. I recently visited my local store and found a Halloween-themed mini tin pail pack. I already had some foam balls at home, so I knew exactly what I wanted to make. We will create an easy floral decoration that's perfect for Halloween. This craft is quick, and you might already have some materials at home. If you're ready, let's start making the Halloween floral creation! Quick Video Tutorial Materials needed: - Mini tin buckets (I purchased mine at Dollar Tree) - Craft foam balls (smaller size) - Hot glue - Foam flowers (pack found at Dollar Tree) - Mini pumpkins (using mini pumpkin cocktail picks found at Dollar Tree) -Paintbrush Start by removing the handle from the tin pail.  Before attaching the foam ball to...

Archive

Show more

Labels

Show more

All content copyright 2010-2024

I kindly request that my photos and words not be taken or used without my permission. If you have any inquiries, please do not hesitate to contact me. Additionally, for more information regarding this blog, please refer to the disclosure policy tab located above. Thank you.