
Mini Halloween Chalkboards

 Hi everyone! I'm excited to bring you this fun craft. This craft is perfect for Halloween, and you could definitely get your children to help and create as well. We are taking three mini chalkboards and decorating each one using felt stickers, crafts gems, and more! I purchased a pack of these mini chalkboards at my local Target in the Dollar spot. 


Supplies

Assorted craft gems

Paint- Black, white, and orange

Glitter glue, or glitter

Felt Halloween stickers

Wood word tiles--I purchased a pack at Walmart

The ribbon is optional- I decided not to use it, but feel free to use it if you would like

Paintbrush

Hot glue


Start by taking your frames and painting them black. For this craft, you will paint all three of your mini chalkboards black. 


Working with the first design, use hot glue and add on your wood tile letters. 

Next, take one felt sticker and add it to your mini chalkboard. I decided to use a ghost felt sticker on my first design.


After, take your white paint and create a few stripes on your chalkboard. 


Your first design is complete. 


Take your second felt sticker and add it to your second painted mini chalkboard. 


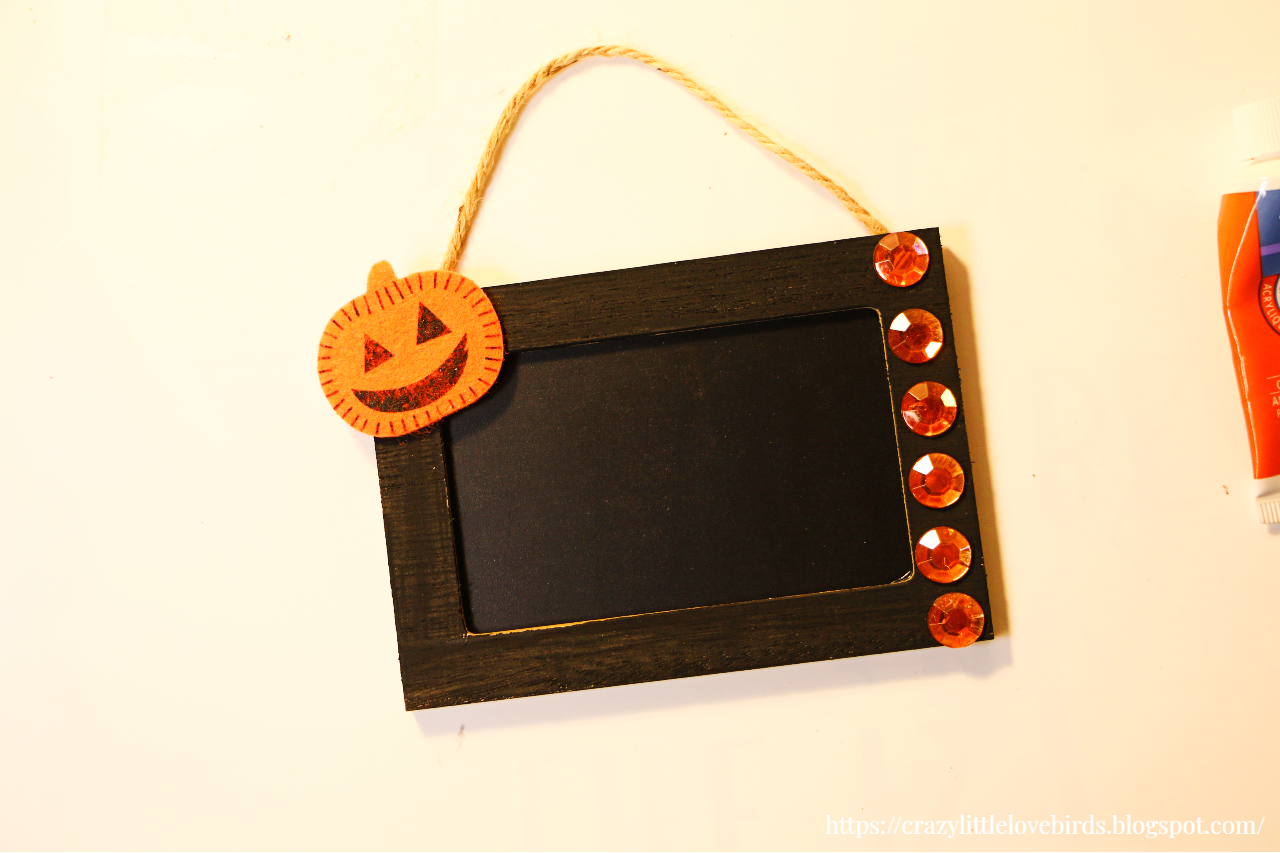
Take a few of your orange craft gems and add them to the front side of your chalkboard. I added my gems on one side of my mini-board.


Next, use your orange paint and begin to add a few dots using your paintbrush. 


Your second mini chalkboard is complete and ready to be displayed. 


For my final board, I decided to create a bat theme mini chalkboard. I added my bat felt sticker onto the top middle section of my board.


Next, I took my clear craft gems and added them to the bottom section of my board.


After, I used my glitter glue and added that to the painted areas of my board.


Your third mini chalkboard is complete. 

These mini chalkboards make cute reminder boards and are perfect for displaying during Halloween.

Thank you so much for stopping by and creating with me. See you soon!


Pin/Save/Share


Comments

  1. Really cute! Thanks so much for linking up at the Unlimited Link Party 81. Pinned.

    ReplyDelete
  2. Adorable! Will make a few for my little grandkids. Please share at Funtastic Friday Link Party--party opens at 9 pm on Thursdays and you can find it on our blog!

    ReplyDelete
    Replies
    1. Thank you! I think your grandchildren will love these. =) I'll be sure to stop by your link party. I appreciate you stopping by. I hope you have a wonderful week.

      Delete
  3. super cute idea. My kids would love to make these with me.

    ReplyDelete
  4. These are too cute! I found you over on Teresa's Keeping it Real's link party. If you get a chance, I'd love to have you come share on Crafty Creators Link Party which is open Thursdays at 6am CST thru Mondays at 11:59pm. You can also share on Happiness is Homemade (Sun-Thurs) & You're the Star Blog Hop (if you don't already share there). Have a great week!

    ReplyDelete
    Replies
    1. Thank you! I'll be sure to visit your Crafty Creators Link Party soon. I appreciate you stopping by. =)

      Delete
  5. These chalkboard signs are adorable! I'd love for you to join us over at the Creative Crafts Linky Party, Stephanie! https://creativelybeth.com/creative-crafts-linky-party/ Every Wednesday through Sunday :)

    ReplyDelete
    Replies
    1. Beth, thank you so much! I'll be sure to stop by and join the link party. :)

      Delete
  6. These are the cutest chalk boards, perfect for small spaces. Thank you for stopping by to Link Up at Oh My Heartsie Girls Wonderful Wednesday. Please stop by and share again this week.

    ReplyDelete
    Replies
    1. Thank you so much! I'll be sure to stop by again.

      Delete
  7. Nice post thank you Renee

    ReplyDelete
  8. Visiting again to say thanks so much for linking up at the #UnlimitedLinkParty 127. Pinned.

    ReplyDelete
  9. Visiting again to say Thanks so much for linking up at the #UnlimitedLinkParty 134. Pinned again. Be sure to bring all your Halloween posts over to my themed party for Halloween, opens on Thursday the 19th :)

    ReplyDelete
    Replies
    1. Dee, thank you. 😊 I'll be sure to come by with my Halloween crafts. Thank you for letting me know.

      Delete
  10. Visiting again to say thanks so much for linking up at #AThemedLinkup 168 for All Things Halloween. Pinned again.

    ReplyDelete
  11. How adorable is this, thank you for sharing.

    ReplyDelete

Post a Comment

Welcome! I love hearing your thoughts and seeing what you’ve been up to. Please leave a comment or ask a question below—I do my best to respond to everyone! To keep the blog comments safe and inspiring, spam will be removed. Thank you for being a part of this blogging space!

Popular posts from this blog

Colorful Summer Flower: Recycled Paper Towel DIY

  Looking to bring a little sunshine into your space without visiting the craft store? This whimsical summer flower decoration makes great use of what you already have—think beads, pom poms, a humble paper towel tube, and a splash of acrylic paint. Bonus: it’s the perfect way to reuse an old frame and welcome summer in style! What You’ll Need: 1 paper towel tube (emptied, of course!) Acrylic paint (I chose a deeper pink) Craft pom poms (yellow makes a great center!) Assorted beads (medium for the stem, smaller for embellishing the petals) Foam letters (for your summer message) A reused frame (square or any shape of your choice) Scissors Hot glue gun Creating your summer flower decoration Cut the Tube and Shape the Petals :  Start by cutting the paper towel tube into four evenly-sized sections. Each section will serve as a petal. You should be left with four rings. Next, flatten each ring, then gently reshape it to form soft ovals. These will mimic delicate flower...

The Crazy Little Lovebirds Link Party 144

Welcome to The Crazy Little Love Birds Link Party #144! I’m so happy you’re here! This is a warm and friendly gathering where you can share your amazing ideas—whether it's tasty recipes, fun family activities, creative crafts, home projects, or any other joyful inspirations. If you love finding new DIY ideas and learning from other bloggers, you’re in the perfect spot! Happy Friday, blogging friends! How was your week? Last week, we celebrated my husband's birthday, and I made an ice cream cake for the occasion. While we were shopping, our youngest daughter found a delicious blend of coffee and cookies and cream ice cream.  It was definitely a hit! Since my husband loves coffee, the combination of coffee flavor with cookies and cream was just perfect. What's your favorite ice cream flavor?   As always, we had wonderful posts shared at last week's party. I took the time to visit every single post, and I always enjoy connecting with all of you. If you missed last week’s p...

The Crazy Little Lovebirds Link Party 143

Welcome to The Crazy Little Love Birds Link Party #143! I’m so happy you’re here! This is a warm and friendly gathering where you can share your amazing ideas—whether it's tasty recipes, fun family activities, creative crafts, home projects, or any other joyful inspirations. If you love finding new DIY ideas and learning from other bloggers, you’re in the perfect spot! Happy Friday! I hope you all had a wonderful week. This week, the girls and I picked up our summer reading registration prizes at the library. Prizes included stickers, journals, and a book of your choice. Does your library have a summer reading program? We've been joining in on ours for a while now.  Today also kicks off the free outdoor concerts, which we may attend.   I hope you all have a wonderful weekend, and as always, thank you for joining the party each week. I love visiting each of your blogs and seeing what you've been up to. I'm excited to share this week's featured posts from party 142.  ...

DIY Tea Tin Planter for Sweet Mint

Today’s tiny DIY win: turning an empty lemon‑ginger tea tin into a planter for a sweet mint plant that needed some love. I cleaned the tin, added drainage, and nestled the mint inside. It instantly brightened up the space — the colors on the tin and the fresh green leaves look so sweet together. I love giving everyday items a second life, especially when they end up this cute. Quick Video Tutorial  I began this little project by cleaning out an empty metal tea container that I had saved. It still held a soft scent of lemon and ginger, and I loved the idea of giving it a second life. Once I washed and dried it, the container felt ready for a new purpose.   Next, I used a finishing nail and a hammer to create a few drainage holes in the bottom of the tin. Since metal containers don’t have natural drainage, this step helps keep the roots healthy and prevents the soil from becoming soggy. Having prepared the container, I carefully removed the sweet mint from its original pot. The ...

DIY Upcycled Peanut Jars

Transform your old peanut jars into stylish, functional containers with these creative and easy DIY upcycling ideas. Learn how to repurpose your peanut jars and give them a new life with practical and decorative uses.   Materials needed: Two  empty peanut containers Two sheets of crafting paper tape scissors Start  by removing the old label on your peanut containers  Next, you'll want to wrap your crafting paper around your container.  If you find that it does not completely cover the container, cut out a single strip to use later. I found it easier to wrap my containers with my craft paper and make the marks I needed before cutting them to size.  Tape your crafting paper into the container and then make necessary cuts to the paper using your scissors. Once this is done, take the last piece of crafting paper that you cut out earlier and place it over the spot that you were unable to cover. Take some clear tape and apply it to the contai...

All content copyright 2010-2026

I kindly request that my photos and words not be taken or used without my permission. If you have any inquiries, please do not hesitate to contact me. Additionally, for more information regarding this blog, please refer to the disclosure policy tab located above. Thank you.