
DIY Easy Succulent Love Sign


Hi everyone! I hope you are all doing well. I decided to work on a simple project that takes little time, and a few materials. Today we are creating an easy succulent love sign.


Materials needed

Black paint

One small round wood sign

paintbrush

Gold sticker design

Succulents

Two strands of vines

Adhesive/Hot glue

Floral snips/ Scissors


Start by applying your black paint to your wooden round sign. I applied paint to the front side of my wood sign, but you can apply paint on both the front and the back of the sign if you choose to do so.

Apply around two coats of your black paint, and a total of four coats if you decide to paint the front and back of your sign.


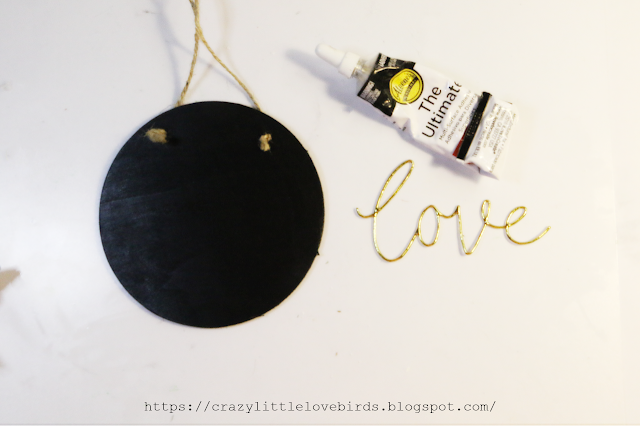
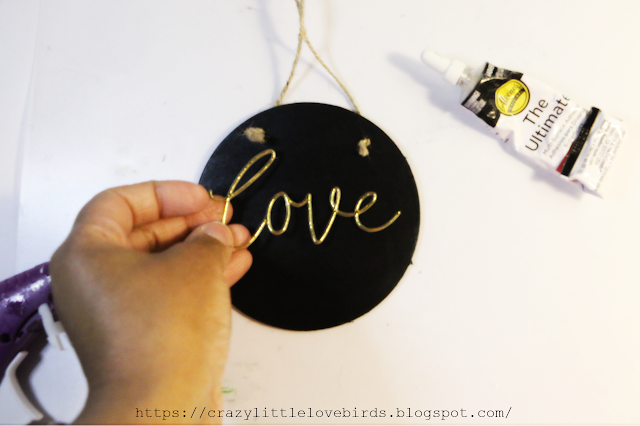
Next, take your love gold sticker, and apply a little adhesive to give it extra hold when placed onto your sign. I did this because I have noticed that the sticky backing on some stickers doesn't hold as well once applied on top of a painted surface.


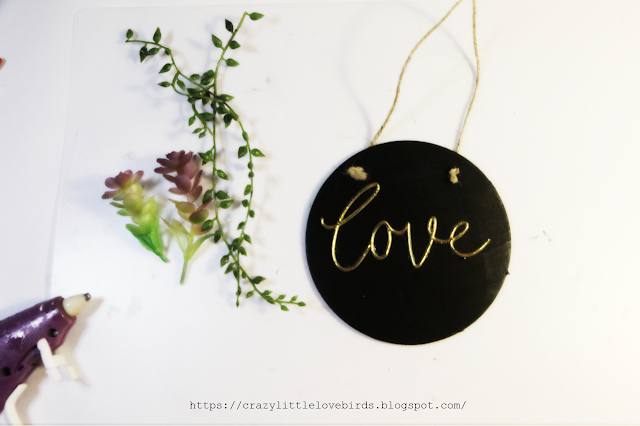
Next, gather your vines, and succulents. Using some floral snips, cut your vine into two medium strands. When cutting your succulents, cut the succulents into smaller sections. 


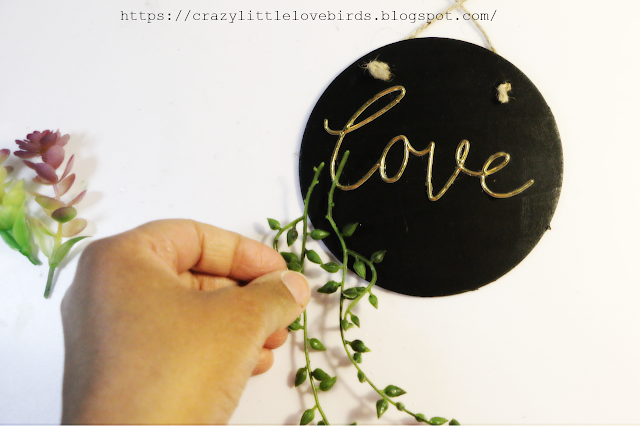
Take your two strands of the vine, and add them to the bottom left-hand side of your sign. Apply a small amount of hot glue, and gently press each vine down. 


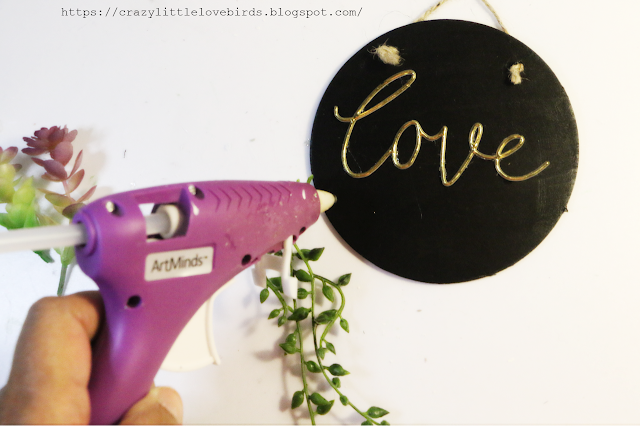
Once you have added on your vines, take your hot glue, and apply your succulent flowers around your vine.


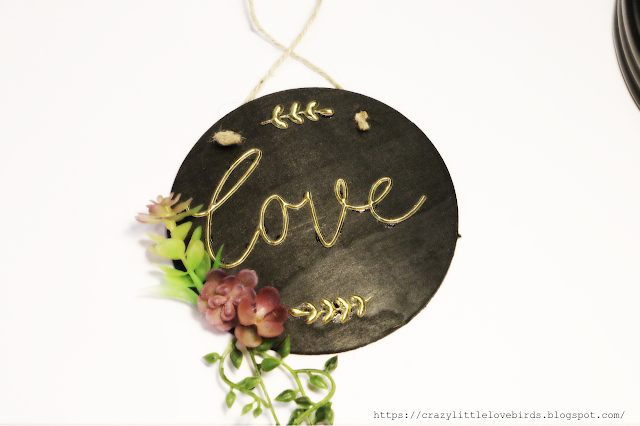
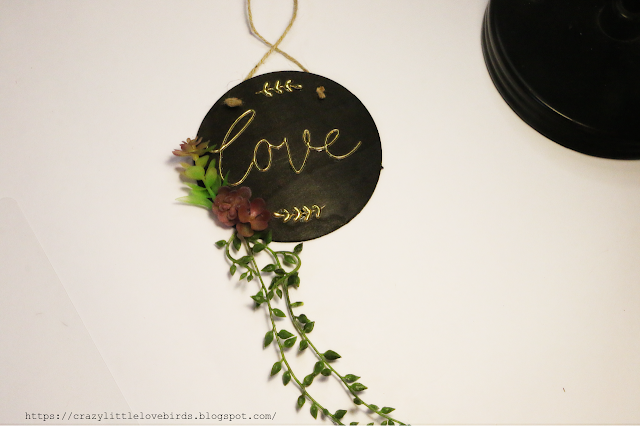
It is optional, but you can add a few extra gold stickers to your sign. I added one on top, and on the bottom as well.

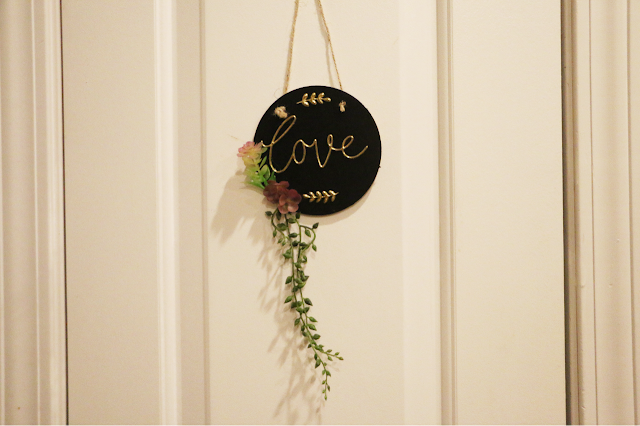
Your succulent love sign is now complete! Thanks so much for stopping by, and be sure to check out my other DIY projects like my, DIY Dollar Tree Wood Crate Vase Holder.


Pin/Share/Save


Comments

  1. I love all the stickers, they are clever, this turned out darling! Shared on Twitter and Pinned!

    ReplyDelete

Post a Comment

Thank you for taking the time to leave a comment. Your feedback is greatly appreciated. I strive to respond to every comment and welcome any questions you may have. ***However, spam or comments that do not offer valuable feedback will be deleted.***

Popular posts from this blog

Succulent Centerpiece using Dollar Tree Items

Looking to add some greenery to your space?  Hello everyone! Today, we’re going to create a quick and simple succulent display using a round baking pan from Dollar Tree. I completed this craft a while ago, but forgot to share it with you. It's an easy project, and all the materials—except for the spray paint—were purchased at Dollar Tree. You can make this lovely decoration in just 10 minutes. Let’s get started on this succulent decoration together! Materials -One baking pan -Spray paint -Stones/rocks -Crushed glass -Artificial succulents -One glass candle holder Start by applying spray paint to the baking pan. I had a bronze color from a previous project, and it would be a great opportunity to use it again. When applying spray paint, make sure to cover the surrounding area and ensure that the space is well-ventilated.  Once you have painted the pan, allow the paint to dry. I used a heating tool to speed up the drying process, but if you prefer, you can let it air dry, which m...

Keeping Blogging Positive: The Do’s and Don’ts of Community Support

The Do’s and Don’ts in a Blogging Community If there’s one thing I’ve learned over the years of blogging, it’s that the community can be one of the best parts of the whole experience — when we’re actually supporting each other. Blogging isn’t just hitting publish and hoping someone reads it. It’s connecting, showing up for one another, and creating a space where everyone feels welcome to share their voice. But let’s be honest: not every corner of the blogging world feels that way. Sometimes people forget that behind every blog is a real person doing their best. So I wanted to put together a simple, down‑to‑earth list of do’s and don’ts — the things that genuinely help build a positive blogging community, and the things that… well, don’t. Nothing complicated, nothing dramatic. Just the kind of common‑sense, supportive habits that make blogging more enjoyable for all of us. The Do’s: How We Can Lift Each Other Up Do show support in ways that feel natural to you Support doesn’t have to b...

The Crazy Little Lovebirds Link Party 134

🌼 Welcome to The Crazy Little Love Birds Link Party #134! I’m so happy you’re here! This is a warm and friendly gathering where you can share your amazing ideas—whether it's tasty recipes, fun family activities, creative crafts, home projects, or any other joyful inspirations. If you love finding new DIY ideas and learning from other bloggers, you’re in the perfect spot! Happy Friday! I want to thank everyone who joined the party last week. I truly enjoyed visiting with you and reading your posts.  A special thanks to those who took the time to comment on my latest post about our adventures; your comments really made me smile.  Next week, our oldest daughter turns 15. I can’t believe how quickly time flies! I am so grateful for the opportunity to strengthen our mother-daughter relationship and to create even more memories together as the years go by. If you missed the last party, just click here to revisit the post: The Crazy Little Lovebirds link party #133 Congratulations t...

The Crazy Little Lovebirds Link Party 133

🌼 Welcome to The Crazy Little Love Birds Link Party #133! I’m so glad you’re here. This weekly gathering is a cozy space to share your inspiring creations—delicious recipes, family‑friendly blog posts, creative crafts, DIY home décor projects, and other uplifting ideas that spark joy. If you love discovering new DIY inspiration, home projects, and creative content from fellow bloggers, you’re in the right place. Hi everyone! I hope you are all doing well. We had a wonderful time during our staycation, and you can read about it in my post titled " Lately: Things That Have Made My Heart Happy ." The weather was definitely hot during our trip! Tomorrow it cools down to mid-40s. How  is the weather where you live? I can't wait to see what you all share this week. As always, thank you for being a part of the party. I truly appreciate you! If you missed the last party, just click here to revisit the post:  The Crazy Little Lovebirds Link Party 132. Congratulations to our featu...

How to Transform Glass Garlic Jars into Multi-Functional Pin Cushions with Storage

Transform your glass garlic jars into multi-functional pin cushions with storage by following this creative and practical DIY tutorial. You will learn how to repurpose these jars into stylish and useful organization tools for sewing or crafting supplies. Hello everyone! A while ago, I purchased some pin cushions from my local Dollar Tree and stored them away, completely forgetting about them. Today, while cleaning, I came across them and decided to use them with my glass garlic jars. I thought the glass garlic jars would be wonderful for creating multi-functional pin cushion storage jars. Materials Three pin cushions Glass jars (I'm reusing my garlic jars) Mod Podge Paintbrush Acrylic paint Sewing and craft accessories to add to each glass jar Adding Mod Podge and Paint to jars To give my jars a stained glass appearance, I combined my Mod Podge and paint. I used a paintbrush to add a thin layer of the mixture and then used a drying tool to dry the paint. I repeated this process for...

All content copyright 2010-2025

I kindly request that my photos and words not be taken or used without my permission. If you have any inquiries, please do not hesitate to contact me. Additionally, for more information regarding this blog, please refer to the disclosure policy tab located above. Thank you.