
Mini Halloween Chalkboards

 Hi everyone! I'm excited to bring you this fun craft. This craft is perfect for Halloween, and you could definitely get your children to help and create as well. We are taking three mini chalkboards and decorating each one using felt stickers, crafts gems, and more! I purchased a pack of these mini chalkboards at my local Target in the Dollar spot. 


Supplies

Assorted craft gems

Paint- Black, white, and orange

Glitter glue, or glitter

Felt Halloween stickers

Wood word tiles--I purchased a pack at Walmart

The ribbon is optional- I decided not to use it, but feel free to use it if you would like

Paintbrush

Hot glue


Start by taking your frames and painting them black. For this craft, you will paint all three of your mini chalkboards black. 


Working with the first design, use hot glue and add on your wood tile letters. 

Next, take one felt sticker and add it to your mini chalkboard. I decided to use a ghost felt sticker on my first design.


After, take your white paint and create a few stripes on your chalkboard. 


Your first design is complete. 


Take your second felt sticker and add it to your second painted mini chalkboard. 
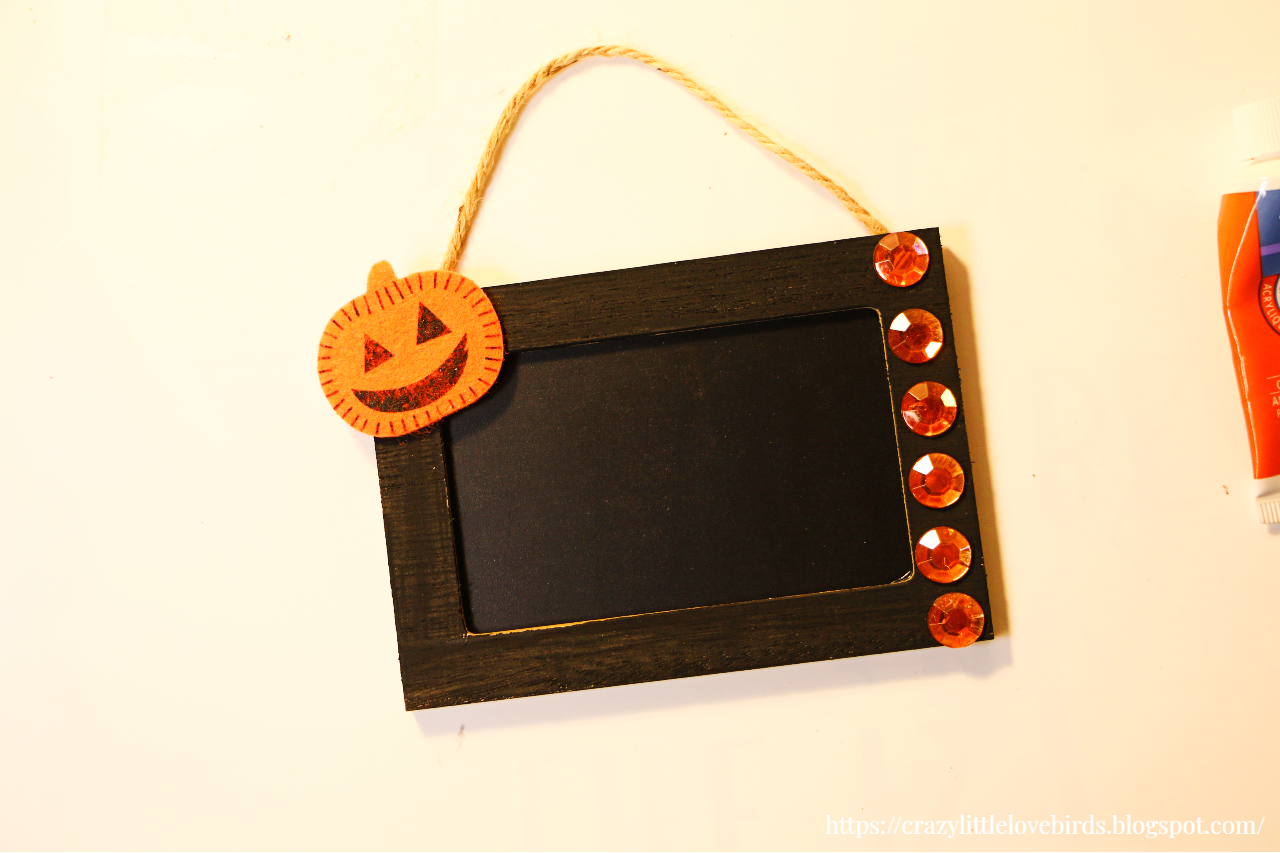


Take a few of your orange craft gems and add them to the front side of your chalkboard. I added my gems on one side of my mini-board.


Next, use your orange paint and begin to add a few dots using your paintbrush. 


Your second mini chalkboard is complete and ready to be displayed. 


For my final board, I decided to create a bat theme mini chalkboard. I added my bat felt sticker onto the top middle section of my board.


Next, I took my clear craft gems and added them to the bottom section of my board.


After, I used my glitter glue and added that to the painted areas of my board.


Your third mini chalkboard is complete. 

These mini chalkboards make cute reminder boards and are perfect for displaying during Halloween.

Thank you so much for stopping by and creating with me. See you soon!


Pin/Save/Share


Comments

  1. Really cute! Thanks so much for linking up at the Unlimited Link Party 81. Pinned.

    ReplyDelete
  2. Adorable! Will make a few for my little grandkids. Please share at Funtastic Friday Link Party--party opens at 9 pm on Thursdays and you can find it on our blog!

    ReplyDelete
    Replies
    1. Thank you! I think your grandchildren will love these. =) I'll be sure to stop by your link party. I appreciate you stopping by. I hope you have a wonderful week.

      Delete
  3. super cute idea. My kids would love to make these with me.

    ReplyDelete
  4. These are too cute! I found you over on Teresa's Keeping it Real's link party. If you get a chance, I'd love to have you come share on Crafty Creators Link Party which is open Thursdays at 6am CST thru Mondays at 11:59pm. You can also share on Happiness is Homemade (Sun-Thurs) & You're the Star Blog Hop (if you don't already share there). Have a great week!

    ReplyDelete
    Replies
    1. Thank you! I'll be sure to visit your Crafty Creators Link Party soon. I appreciate you stopping by. =)

      Delete
  5. These chalkboard signs are adorable! I'd love for you to join us over at the Creative Crafts Linky Party, Stephanie! https://creativelybeth.com/creative-crafts-linky-party/ Every Wednesday through Sunday :)

    ReplyDelete
    Replies
    1. Beth, thank you so much! I'll be sure to stop by and join the link party. :)

      Delete
  6. These are the cutest chalk boards, perfect for small spaces. Thank you for stopping by to Link Up at Oh My Heartsie Girls Wonderful Wednesday. Please stop by and share again this week.

    ReplyDelete
    Replies
    1. Thank you so much! I'll be sure to stop by again.

      Delete
  7. Nice post thank you Renee

    ReplyDelete
  8. Visiting again to say thanks so much for linking up at the #UnlimitedLinkParty 127. Pinned.

    ReplyDelete
  9. Visiting again to say Thanks so much for linking up at the #UnlimitedLinkParty 134. Pinned again. Be sure to bring all your Halloween posts over to my themed party for Halloween, opens on Thursday the 19th :)

    ReplyDelete
    Replies
    1. Dee, thank you. 😊 I'll be sure to come by with my Halloween crafts. Thank you for letting me know.

      Delete
  10. Visiting again to say thanks so much for linking up at #AThemedLinkup 168 for All Things Halloween. Pinned again.

    ReplyDelete
  11. How adorable is this, thank you for sharing.

    ReplyDelete

Post a Comment

Welcome! I love hearing your thoughts and seeing what you’ve been up to. Please leave a comment or ask a question below—I do my best to respond to everyone! To keep the blog comments safe and inspiring, spam will be removed. Thank you for being a part of this blogging space!

Popular posts from this blog

The Crazy Little Lovebirds Link Party 149

Welcome to The Crazy Little Love Birds Link Party #149! I’m so happy you’re here! This is a warm and friendly gathering where you can share your amazing ideas—whether it's tasty recipes, fun family activities, creative crafts, home projects, or any other joyful inspirations. If you love finding new DIY ideas and learning from other bloggers, you’re in the perfect spot! Happy Friday, blogging friends! I hope you are doing well. As always, thank you for joining the party. Last week, we had some wonderful shares: Congratulations to our featured bloggers Big Joys in Small Spaces – Musings and Glimpses:  A cozy look at how porch blooms and indoor plants bring simple joy to small corners of the home. Our Generation Boy Doctor – Craft Attic Resources:  A quick look at a cute doctor outfit for an OG boy doll, with easy notes on the yarn and small tweaks along the way. Small Worlds, Big Wonders – InkTorrents:  A quiet, creative post in which Soma shares her handmade books, waterco...

Little Clay Bowls.

Little clay bowls  I created these simple textured clay bowls, and I'd love it if you created some too! Take some clay and mold them into a round bowl shape. I used air-dry clay for this project.  Allow it to dry completely overnight. Then take some paint and mix a few colors together and paint each bowl. I'm using these cute handmade clay bowls to store some of my jewelry in them.   Enjoy~ **Hello to all my readers, and welcome new readers. It's such a pleasure to have you come along on my journey. I appreciate YOU!** 

Dollar Tree Peel‑and‑Stick Wallpaper Box Makeover

I transformed a simple, everyday box into a beautiful and functional storage piece for my belongings. This makeover is both easy and budget-friendly, using affordable supplies from Dollar Tree along with some creative touches to enhance the box's appearance. With a few simple steps, you can create an attractive decorative storage box that can be styled in any room of your home. Whether you're looking to organize small items on your desk or add a pop of color to your living space, this project is versatile and practical. If you have a box that you're considering throwing away, think again! This DIY project not only gives new life to unused items but also allows you to showcase your creative side. Join me as I guide you through transforming an ordinary box into a charming accent piece you'll love to display. Quick video tutorial Materials Peel‑and‑stick wallpaper (Dollar Tree) Gold acrylic paint Decorative edge scissors Adhesive gems Paintbrush Optional: greenery or small...

The Crazy Little Lovebirds Link Party 150

  Welcome to The Crazy Little Love Birds Link Party #150! I’m so happy you’re here! This is a warm and friendly gathering where you can share your amazing ideas—whether it's tasty recipes, fun family activities, creative crafts, home projects, or any other joyful inspirations. If you love finding new DIY ideas and learning from other bloggers, you’re in the perfect spot! Hi, blogging friends, happy Friday! I hope your week went well. Thank you all for sharing at last week's party. I always enjoy your posts! As we head into the weekend, I hope you all have beautiful days ahead. I'm hopeful we'll get some rain in our area. If you missed last week's party, you can revisit it here-- The Crazy Little Lovebirds Link Party 149 I'm excited to share the featured posts with everyone... Congratulations to our featured bloggers Making Sundried Tomatoes From Your Garden – 3 Winks Design Be sure to check out this super handy guide to turning your garden tomatoes into real sun...

The Crazy Little Lovebirds Link Party 147

   Welcome to The Crazy Little Love Birds Link Party #147! I’m so happy you’re here! This is a warm and friendly gathering where you can share your amazing ideas—whether it's tasty recipes, fun family activities, creative crafts, home projects, or any other joyful inspirations. If you love finding new DIY ideas and learning from other bloggers, you’re in the perfect spot! We just picked up our youngest daughter from summer camp yesterday. She had so much fun and met new people. The drive to her camp was beautiful. When we dropped her off last week, I took this picture of a cow as it passed by.  At that moment, I was reminded of all the beauty that surrounds us. Here in Colorado, like many other places, we are battling wildfires. My thoughts and prayers are with everyone affected, including families, wildlife, firefighters, and others who have been working so hard to deal with these fires. It's been dry and windy, and we could honestly use some moisture. Wishing you all a ...

All content copyright 2010-2026

I kindly request that my photos and words not be taken or used without my permission. If you have any inquiries, please do not hesitate to contact me. Additionally, for more information regarding this blog, please refer to the disclosure policy tab located above. Thank you.