
Mini Halloween Chalkboards

 Hi everyone! I'm excited to bring you this fun craft. This craft is perfect for Halloween, and you could definitely get your children to help and create as well. We are taking three mini chalkboards and decorating each one using felt stickers, crafts gems, and more! I purchased a pack of these mini chalkboards at my local Target in the Dollar spot. 


Supplies

Assorted craft gems

Paint- Black, white, and orange

Glitter glue, or glitter

Felt Halloween stickers

Wood word tiles--I purchased a pack at Walmart

The ribbon is optional- I decided not to use it, but feel free to use it if you would like

Paintbrush

Hot glue


Start by taking your frames and painting them black. For this craft, you will paint all three of your mini chalkboards black. 


Working with the first design, use hot glue and add on your wood tile letters. 

Next, take one felt sticker and add it to your mini chalkboard. I decided to use a ghost felt sticker on my first design.


After, take your white paint and create a few stripes on your chalkboard. 


Your first design is complete. 


Take your second felt sticker and add it to your second painted mini chalkboard. 
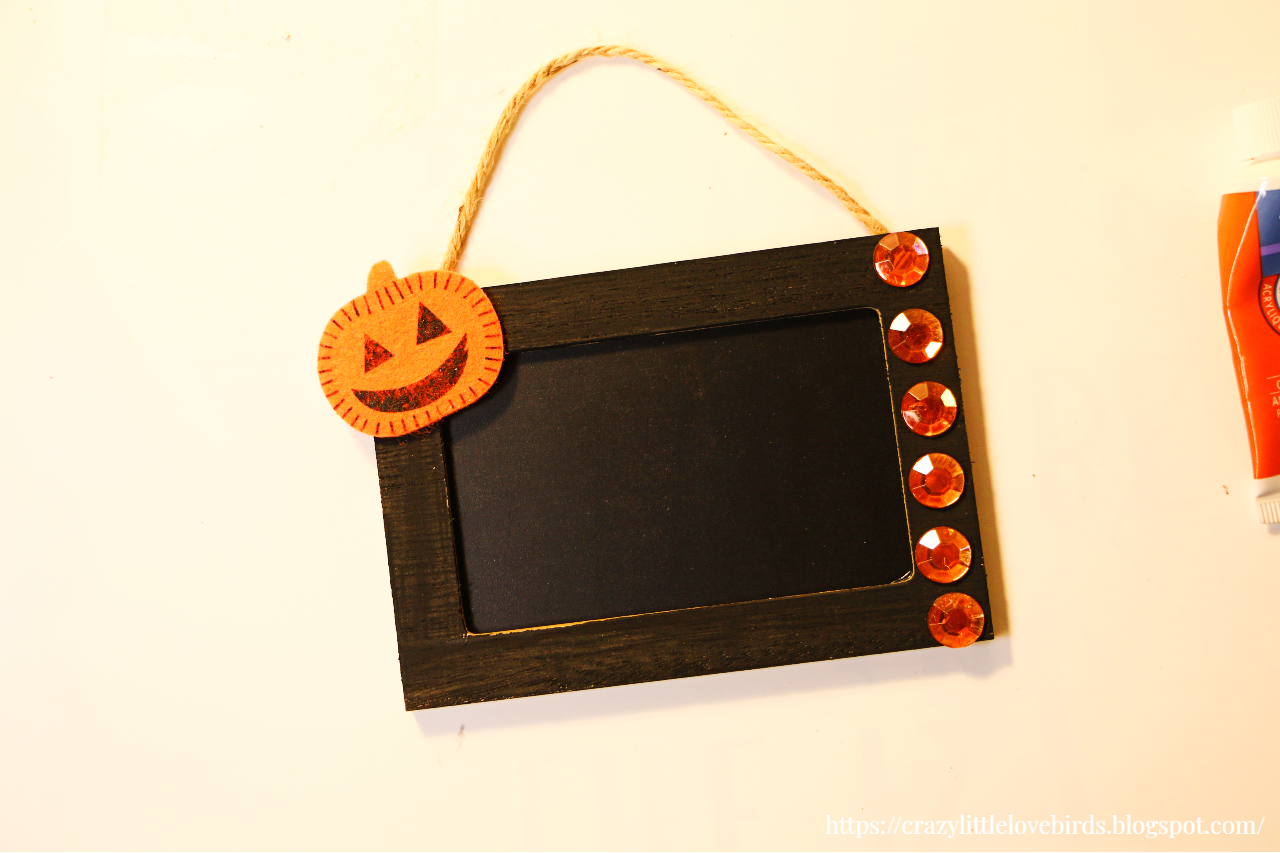


Take a few of your orange craft gems and add them to the front side of your chalkboard. I added my gems on one side of my mini-board.


Next, use your orange paint and begin to add a few dots using your paintbrush. 


Your second mini chalkboard is complete and ready to be displayed. 


For my final board, I decided to create a bat theme mini chalkboard. I added my bat felt sticker onto the top middle section of my board.


Next, I took my clear craft gems and added them to the bottom section of my board.


After, I used my glitter glue and added that to the painted areas of my board.


Your third mini chalkboard is complete. 

These mini chalkboards make cute reminder boards and are perfect for displaying during Halloween.

Thank you so much for stopping by and creating with me. See you soon!


Pin/Save/Share


Comments

  1. Really cute! Thanks so much for linking up at the Unlimited Link Party 81. Pinned.

    ReplyDelete
  2. Adorable! Will make a few for my little grandkids. Please share at Funtastic Friday Link Party--party opens at 9 pm on Thursdays and you can find it on our blog!

    ReplyDelete
    Replies
    1. Thank you! I think your grandchildren will love these. =) I'll be sure to stop by your link party. I appreciate you stopping by. I hope you have a wonderful week.

      Delete
  3. super cute idea. My kids would love to make these with me.

    ReplyDelete
  4. These are too cute! I found you over on Teresa's Keeping it Real's link party. If you get a chance, I'd love to have you come share on Crafty Creators Link Party which is open Thursdays at 6am CST thru Mondays at 11:59pm. You can also share on Happiness is Homemade (Sun-Thurs) & You're the Star Blog Hop (if you don't already share there). Have a great week!

    ReplyDelete
    Replies
    1. Thank you! I'll be sure to visit your Crafty Creators Link Party soon. I appreciate you stopping by. =)

      Delete
  5. These chalkboard signs are adorable! I'd love for you to join us over at the Creative Crafts Linky Party, Stephanie! https://creativelybeth.com/creative-crafts-linky-party/ Every Wednesday through Sunday :)

    ReplyDelete
    Replies
    1. Beth, thank you so much! I'll be sure to stop by and join the link party. :)

      Delete
  6. These are the cutest chalk boards, perfect for small spaces. Thank you for stopping by to Link Up at Oh My Heartsie Girls Wonderful Wednesday. Please stop by and share again this week.

    ReplyDelete
    Replies
    1. Thank you so much! I'll be sure to stop by again.

      Delete
  7. Nice post thank you Renee

    ReplyDelete
  8. Visiting again to say thanks so much for linking up at the #UnlimitedLinkParty 127. Pinned.

    ReplyDelete
  9. Visiting again to say Thanks so much for linking up at the #UnlimitedLinkParty 134. Pinned again. Be sure to bring all your Halloween posts over to my themed party for Halloween, opens on Thursday the 19th :)

    ReplyDelete
    Replies
    1. Dee, thank you. 😊 I'll be sure to come by with my Halloween crafts. Thank you for letting me know.

      Delete
  10. Visiting again to say thanks so much for linking up at #AThemedLinkup 168 for All Things Halloween. Pinned again.

    ReplyDelete
  11. How adorable is this, thank you for sharing.

    ReplyDelete

Post a Comment

Welcome! I love hearing your thoughts and seeing what you’ve been up to. Please leave a comment or ask a question below—I do my best to respond to everyone! To keep the blog comments safe and inspiring, spam will be removed. Thank you for being a part of this blogging space!

Popular posts from this blog

The Crazy Little Lovebirds Link Party 158

  Welcome to The Crazy Little Love Birds Link Party #158! I'm so happy you're here! This gathering is all about sharing what brings us joy.  Bring your delicious recipes, fun family moments, cozy crafts, and home projects—basically, everything wonderful you've been working on. Congratulations to our featured bloggers Mod Crochet Loopy Hair Ties Pattern — Val & Holland Val & Holland made the cutest loopy hair ties, and they’re just such a fun, quick little crochet project.  An Unexpected Adventure — Jennifer Jennifer shared how a long‑dreamed‑of getaway with her husband turned into a true adventure — steep trails, gorgeous waterfalls, a few shaky moments, and plenty of faith guiding her through. Creamy Paprika Salad Dressing — Scratch-Made Food Melynda has a creamy paprika dressing that’s simple, flavorful, and perfect for everyday meals. One of those easy homemade staples you’ll want to keep around. Jahresprojekt 2026 – August — Mami Made It Mami Made It shared he...

The Crazy Little Lovebirds Link Party 161

     Welcome to The Crazy Little Love Birds Link Party #161! I'm so happy you're here! This gathering is all about sharing what brings us joy.  Bring your delicious recipes, fun family moments, cozy crafts, and home projects—basically, everything wonderful you've been working on. Happy Friday, blogging friends! We are just a few days away from our much-needed vacation. We’ll be exploring and doing what we love: attending a concert. We leave early next week. Just a heads-up: the next party, scheduled to open on Friday the 16th, won’t have featured posts since I will be out of town. However, I will have it set up as a scheduled post, so it will still go live. I will be returning on the 19th.  Please feel free to share your posts at the party! The party on the 23rd will include featured posts. Thank you all for sharing at the party; I truly appreciate all of you. Congratulations to our featured bloggers To visit the blogs of the featured bloggers, simply click on ...

Crafting Personalized Thanksgiving Place Cards with Air Dry Clay and Pie Stamps

Hey there! I am thrilled to introduce you to an exciting Thanksgiving craft that will add a wonderful touch to your holiday table. This project involves using air-dry clay and pie stamps to create personalized and unique place cards. Do not worry, I will provide you with a step-by-step guide throughout the entire process. Additionally, we will use paint, twine, and a brown paper bag to give our place cards a festive feel.  Materials needed Pie stamps which can be obtained from Joann's Acrylic paint  Air-dry clay A hole puncher Paintbrush Wooden beads Twine A brown paper bag (or any other material you prefer to use as a template), one pencil, and scissors. Working with air clay Begin by flattening the air-dry clay, using either your hands or a roller. Once the clay has been flattened, use the pie stamps to press your desired design into the clay. Following the stamping process, remove any excess clay around the outer edge of the stamp and use the stamp press to release your cla...

Decoupage Bookmarks using Metal Tags

Create beautiful decoupage bookmarks using metal tags from Dollar Tree. This easy DIY project is perfect for all skill levels and adds a personal touch to your reading materials. Hello everyone! Today, I have an easy and quick craft idea to share with you that book lovers will surely appreciate. My daughters love reading books on their Kindles, but we still take regular trips to the library to check out physical copies of books they are interested in.  However, I wanted to try something new this time, so I went to the Dollar Tree store and found a pack of metal tags. Yes, you read that right - these bookmarks are made of metal, but don't worry, we can add some decorative details to make them more attractive.  Materials Metal tags (I purchased them at Dollar Tree) Acrylic paint Mod Podge Decorative napkins Paintbrush Twine Beads Inspirational stickers Scissors Applying paint to metal tags Begin by applying two coats of acrylic paint to both sides of each metal tag. Use a heatin...

DIY Holiday Glass Candle Display- An Upcycled Craft

Learn how to create a beautiful holiday glass candle display using upcycled materials with this DIY craft project. Perfect for adding a festive touch to your home decor. Find step-by-step instructions and inspiration for this creative and sustainable holiday project. Recently, I have been feeling very festive and have been enjoying decorating, baking, and much more. I noticed that I had a few glass jars and old candle jars around my home, and I wanted to create something simple. I thought a candle display would be great and easy to create. If you have any pasta jars, old candle jars, or any glass jars, this craft is perfect for you! For this project, you will need the following materials: Frosted Glass Spray (I used Rust-Oleum) Gold wire Stretch cord (optional) Holiday greenery, berries, and any holiday decoration can be added Flameless tealights Mini ornaments (I used one for this project) You can find flameless tealights at your local Big Lots store. A pack of 10 with extra batteries...

All content copyright 2010-2026

I kindly request that my photos and words not be taken or used without my permission. If you have any inquiries, please do not hesitate to contact me. Additionally, for more information regarding this blog, please refer to the disclosure policy tab located above. Thank you.