

We have just a few more days, and we can finally welcome Autumn. I'm super excited about this. Today I created this simple Autumn wagon. All of my materials for this craft came from my local dollar store. Are you ready to create your very own Autumn wagon?
I'm sure the answer was yes! It is simple, and you'll just love the way it all turns out when you are all done.


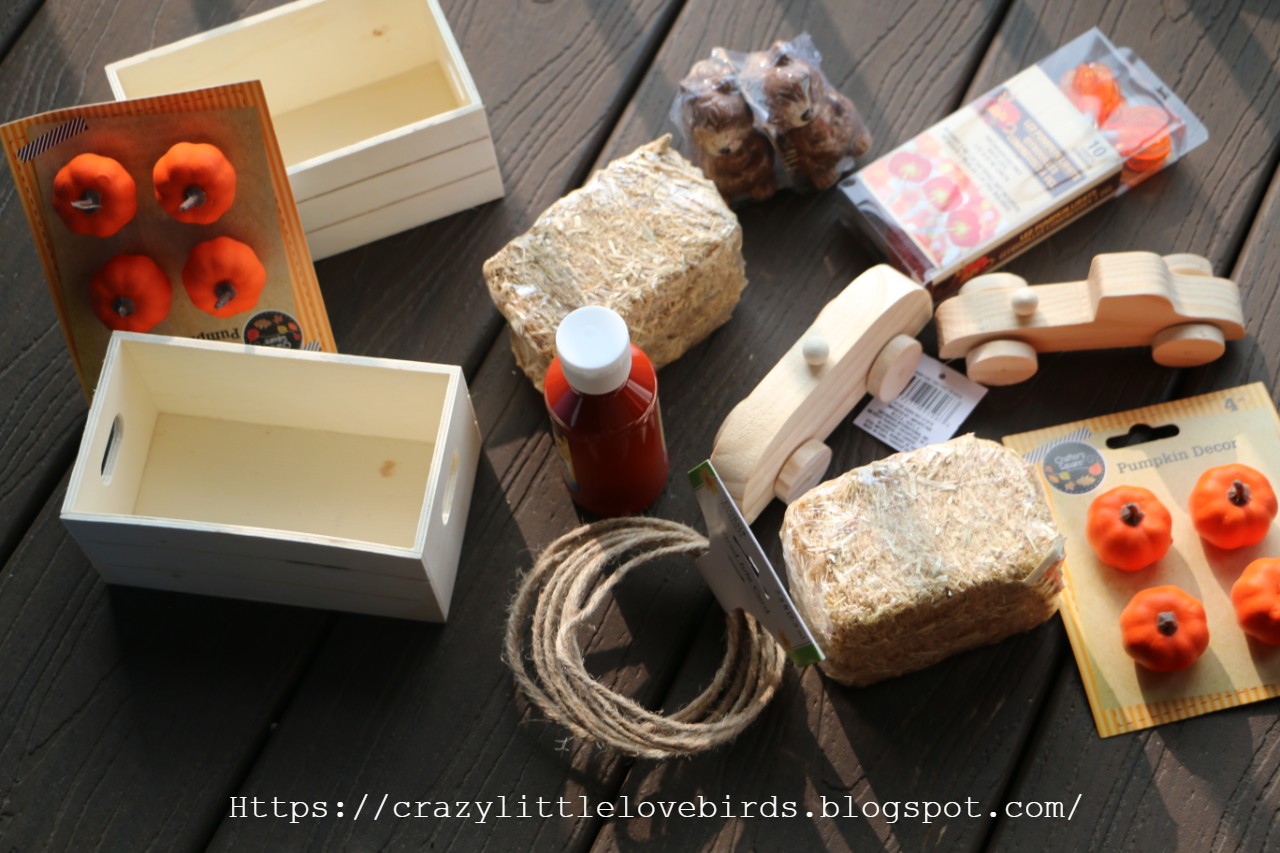
Materials Needed
(If you are only making one wagon, just buy one of each listed below)
1 Small straw bale
2 sets of pumpkin decorations
2 wooden baskets
1 wired twine
Paint brushes/water/ glass jar
2 Wooden cars (you'll just want these for the wheels)
Paint
(I used red, orange, bronze, and black)
Gold glitter glue
Hot glue gun
Optional
****
1 set of squirrels or any other animals you are able to find.
(The squirrels that I have are actually salt, and pepper shakers)
2 sets of lights
(I was able to find some cute pumpkin lights)
If you are only making one wagon, you will spend around $8. With my materials, I created two wagons.


Creating your wagon
Start off with making sure the area where you are painting is prepped. I used a few plastic bags and paper towels. This craft is also kid friendly! I had my girls help me with painting.
Keep in mind that you can leave your pumpkins as is.
I chose to paint them another orange color. I felt like the first color was a little too bright. I used a softer orange color and a bronze color for the stem.
While your pumpkins sit and dry, you can start painting your wooden boxes. I used a red color for my wagons.
During this time, remove the wheels from your wooden cars. I just twisted the wheels off. If you notice that they are not coming off so easily, you can break them off of the wooden dowels.
Once you have removed the wheels make sure to paint them. I used black paint for the wheels.
Allow everything to completely dry.
You can now cut your wired twine. I used my wire snips for this.
Using hot glue, glue your wire twine to the inside of your wooden box. You'll want to make sure that you create a loop.
Next, glue your wheels to your basket. After adding your wheels, take your straw bale, and place it inside your wagon. Take each pumpkin, and glue it on top of your straw bale. Once you have done this, take some of your glitter glue, and gently apply some to the tops of your pumpkins. This just gives it a little shine and sparkle.
The last thing to do is to add your animal.
I added my squirrels, and I also added some leaves, lights, and flowers.

You're all done!
Find a spot to display your wagon, and enjoy!
I hope that you have enjoyed this post!
Have you created any new crafts lately?
If so, what did you create? I'd love to hear all about it in the comments below.
As always please feel free, and share.
Pin/Save/Share for later

You should totally sell these if you aren't already! Love the wagon!
ReplyDeleteAw, thank you so much! That is very kind of you to say. :)
DeleteWhat a great little project for the fall! I'm going to pass this on to my wife who teaches little ones as I think they might enjoy doing this.
ReplyDeleteI'm sure they will enjoy it! :)
DeleteThis is such a cute craft project for autumn. I’d love to make something like this but I’m not very crafty.
ReplyDeleteThank you. :)
DeleteThat looks super cute when it's finished! I love that this is such a child friendly activity. You could even take them with you to the dollar store, allowing them to pick the details out themselves - For example, they can decide which animal should be sitting in their wagon when it's finished.
ReplyDeleteBritt, thank you! And yes it definitely is child friendly! I love taking my girls with me to the craft store. They are my little helpers, and they usually pick out items for the craft we are doing. :)
Deletethat is so so so cute! I love this themed craft, it is just too pretty! I am so overjoyed with it, perfect for older kids
ReplyDeleteLyosha, aw thank you! Your comment was just so lovely. Thanks for stopping by.
DeleteLooks so pretty, and so very doable too! I'm so not into crafts, yet this looks too cute to not try.
ReplyDeleteSmita, thank you!
DeleteThank you! I hope that you have a lovely week as well. :)
ReplyDeleteYou're making me want to start crafting again! Seriously, this looks so adorable and easy to do. My problem is that I would want to make one with every type of animal sitting in the wagon, so I would end up with a bunch of these, and my husband asking where we're supposed to put them all. Have you ever considered selling your wonderful creations on Etsy or somewhere similar? I feel like you could do really well. I'm sure there are many people who want things like this, but don't want to do it themselves, despite how easy it really is, and would gladly buy them instead.
ReplyDeleteErica, aw you're so kind. I actually had started a small business on Etsy, and recently stopped. I didn't enjoy it so much. I think the reason was because I wasn't making things I really enjoyed. But I could see selling my crafts, I enjoy creating these sorts of things. Thank you for your kind words. I appreciate it so much! I think you may have inspired me to try again!
DeleteThis is a great idea and something really fun to make with kids. I bet my mother would enjoy doing a project like this with her schoolchildren. She is always looking for new craft projects, thanks for the inspiration.
ReplyDeleteKat, thank you! I hope your mom enjoys this fun craft. Happy first day of Autumn!
DeleteThis is super cute! I used to love doing these kind of crafts and create stories in my head to go along with what I was making. This really brings in the autumn feelings!
ReplyDeleteNkem, thank you! I really enjoy creating things. Happy first day of Autumn!
DeleteLove this! This is so cute. You do lovely work.
ReplyDeleteThank you for linking up with Sweet Tea & Friends this month.
Paula, thank you so much. 😊 I'm so happy to have linked up at Sweet Tea & friends.
DeleteThank you for stopping by.
Oh, another light up, love it!! Thanks so much for linking up at the #UnlimitedLinkParty 125. Pinned.
ReplyDeleteDee, thank you! Yes, another light up. These pumpkin lights are available almost every year at my local Dollar Tree. :)
DeleteNow this looks store bought, I did not anticipate all of the pieces that went into it, thank you for sharing Stephanie. So cute! The squirrel would be our pup's nemesis, ha!
ReplyDeleteCara, aw thank you! I love what you said about your pup! Ha, we are always chasing the squirrels away from my garden. They keep me on my toes. ;)
DeleteI'm featuring you this week when the next To Grandma's house we go link party starts - thanks for sharing with us!
ReplyDeleteTarahlynn, thank you very much. Happy you enjoyed my Autumn wagon.
DeleteLove the creativity! A great craft to celebrate my favorite season.
ReplyDeleteAmalia
xo
Amalia, thank you very much. :)
DeleteSuper, super cute.
ReplyDeleteStole your idea and made into a Christmas wagon and will be making one for each of the holidays, birthday, as well as a baby shower wagon only using a larger wagon for baby shower for guests to bring a child's book to put inside the wagon.
Many Thanks for the Great Inspiration.
Colleen, that is wonderful to hear! I love that you are going to make one for each holiday, birthday, and baby shower. That's a wonderful idea, and I love it! I'm happy to have helped. :)
DeleteTake care~
Stephanie, this post is one of my features for this week's SSPS, thank you so much for sharing with us!
ReplyDeleteMelynda, I'm so glad you enjoyed my wagon. 😊
DeleteSo cute, featuring you at Wednesdays in the Studio!
ReplyDeleteThank you! 😊
DeleteThis is so adorable, Stephanie! What a fun idea. :) Thanks for sharing this post with all of us at the Will Blog for Comments #69 linkup. Hope to see you next week at #70, too, with more posts (old or new)!
ReplyDeleteI'm featuring you next week when the To Grandma's house we go party starts again, thanks for sharing!
ReplyDeleteThank you! 😊
DeleteStephanie, these little wagons are just THE CUTEST!!! I can't wait to make one for my fall miniatures. I have a bunch of doll house things and I think a little tableau over on the buffet would be really fun. We will be having a new window (or three) installed in the living room plus doing flooring (small flood) this fall, so that could throw a kink unless I do everything now (including my October Christmas post, lol!).
ReplyDeleteAnyway, very happy to feature your little fall wagons and your little squirrel (love squirrels!) for this week's Share Your Style #509 for you. <3
Have a wonderful weekend,
Hugs,
Barb :)
Barb, you made me smile. I'm so glad you enjoyed this craft. I'd love to see how yours turns out and what you end up putting in it. I know it will be super adorable. It sounds like your house will be brand new by the time you are finished with these projects! How nice. We need new windows; I bet it would help with this heat, too.
DeleteThank you so much for the feature. I always appreciate you visiting. Have a lovely weekend. 😊🤗
Love, love, love the little lights. Beautifully done, Stephanie. It's darling. Thank you for sharing this with us at the Will Blog for Comments #90 linkup. We hope to see you sharing more at #91 when it opens next Monday. Wishing you a fabulous week.
ReplyDeleteJennifer, aw thank you. I'm glad you enjoyed it. 😊🤗
Delete