
Learn how to create a beautiful fall sign with faux leaves and a thankful design in this easy DIY tutorial. Get creative with this fun craft project for the autumn season.
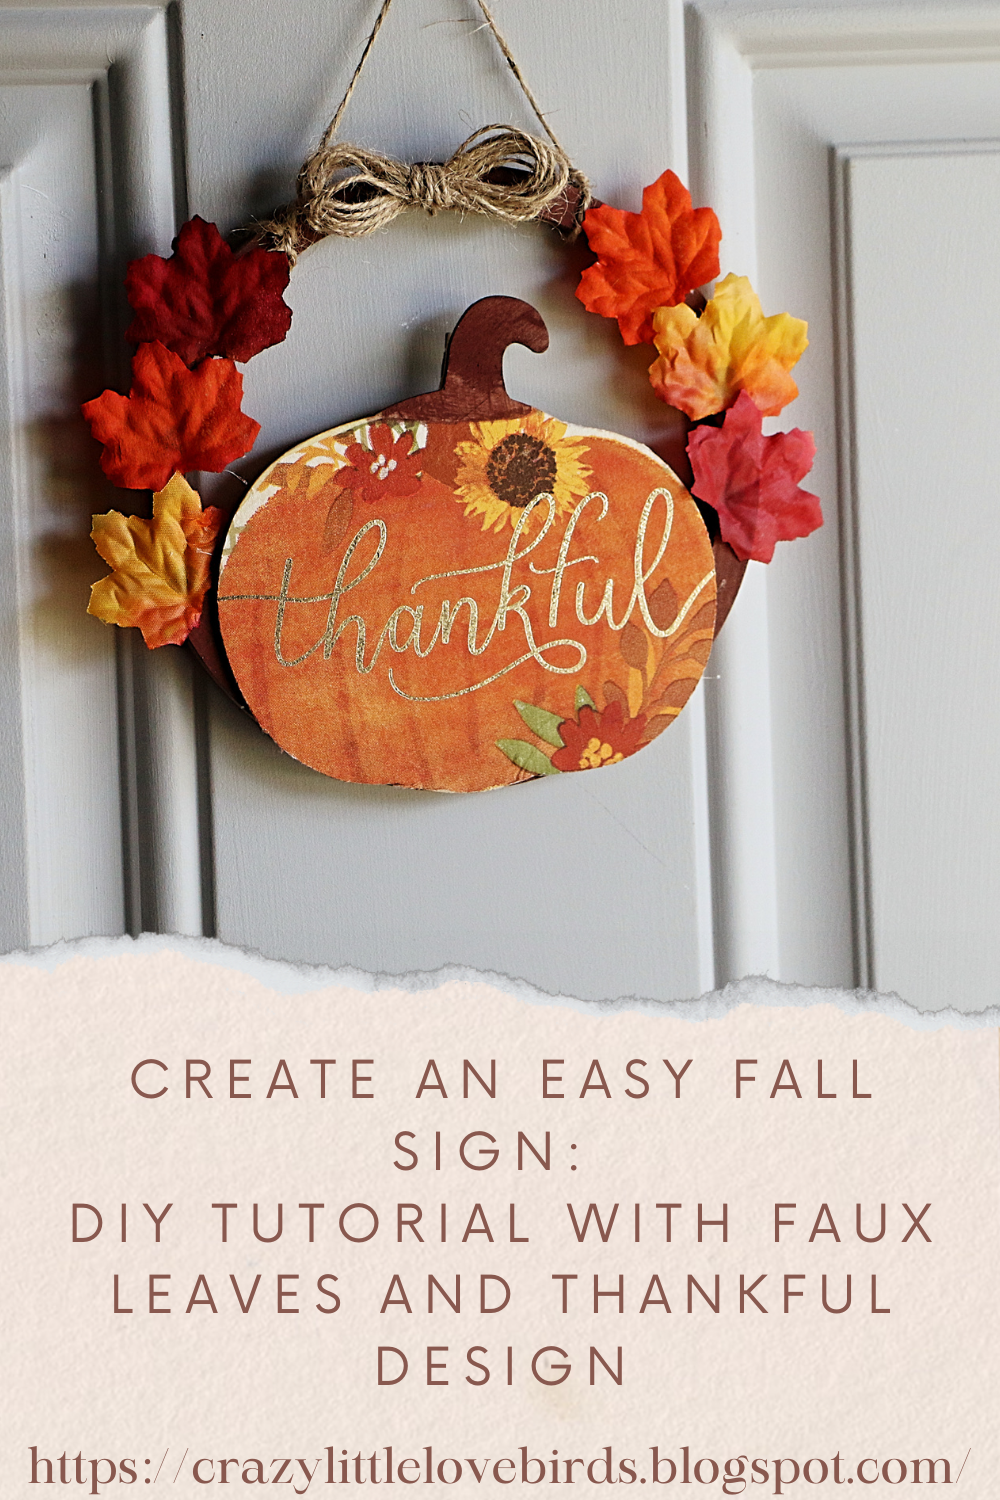
I am thrilled to share with you an easy craft that involves making a wonderful fall sign using faux fall leaves and a beautiful thankful design. I used a decorative napkin that I had purchased earlier from Hobby Lobby for the thankful design.
The faux leaves used in this craft are from a wonderful fall party confetti pack that I also bought from Hobby Lobby. This pack consists of 300 assorted fall leaves, which means I will be using more of these wonderful leaves in other crafts too. If you are interested, I would love to take you through the process I used to create my wonderful fall sign.

Materials
Assorted faux fall leaves
One floral craft ring (The size I am using is 6inches)
One decorative napkin
Paintbrush
One wooden pumpkin
Acrylic paint
Twine
Wooden Pumpkin
Mod Podge
Mini iron

Adding the napkin to the wooden pumpkin
To make your own fall sign, follow these simple steps. First, remove the second layer from the napkin and cut out the desired portion for your design. Then, apply a thin layer of Mod Podge to the wooden pumpkin using a paintbrush. Place the decorative napkin over the Mod Podge and use a craft iron covered with parchment paper to gently press over the napkin. Use a sanding block to remove any excess paper.


Applying paint and faux leaves to floral craft ring
Next, customize the color of the floral craft ring by applying acrylic paint. Use hot glue to attach the wooden pumpkin to the bottom of the ring. Then, add faux leaves to the craft ring, placing three leaves on each side.


Adding twine and bow
If you'd like to add a bow, create one using twine, and secure it by making a loop. This will serve as a hanger for your sign.


So pretty :) I think I'd add some twinkle lights, of course there might not be anywhere to hide the batteries. Thanks so much for linking up at the #UnlimitedLinkParty 132. Pinned.
ReplyDeleteThank you, Dee. Twinkle lights would look pretty displayed on this sign. I love that idea. :) I think I would tape the battery pack behind the sign.
DeleteGreat idea!
DeleteThis is darling! It turned out beautifully. Visiting from Crazy Little Lovebirds Link Party.
ReplyDeleteJennifer, thank you!
DeleteThat is really pretty and just perfect for fall!
ReplyDeleteJoanne, thank you. :)
DeleteSuper cute!
ReplyDeleteThank you so much!!
DeleteSteph, this is so cute! Love it.
ReplyDeleteThanks so much for sharing this with Sweet Tea & Friends this month my friend.
I love how you've created this sign, every element is just lovely.
ReplyDeleteJulie, thank you so much. Happy to hear you enjoyed this craft. 😊
DeleteYour sign turned out really cute
ReplyDeleteThank you for sharing this at the Sunday sunshine blog hop
Laurie
Thank you so much! :)
DeleteThat's super cute! I love the sign. Thank you for visiting Tell It To Me Tuesday. I hope to see you again this week!
ReplyDeleteThank you for sharing your DIY Fall Wreath at the Senior Salon Pit Stop! I'm excited to be featuring you at Monday’s party. Congrats! Pinned
ReplyDeleteHugs,
Maria @ kraftyplanner.com
Maria, thank you so much. I'm excited to be featured at your party. 😊
DeleteHi - Yes please!! Visiting from the Funtastic Friday blog party. This sign is really cute - and so easy!
ReplyDeleteThank you so much! I appreciate you visiting and I'm happy to hear you enjoyed this easy DIY.
DeleteBeautiful and what a lovely way to welcome Fall. Featuring when my link party opens!
ReplyDeleteCarol, thank you. I'm glad you enjoyed my fall sign. ☺️
DeleteAwww, this is beautiful, it's amazing how creative you are. Every piece you create is always looking so cute and everything that comes from your hands is unique. Thank you for sharing!
ReplyDeleteMariama, thank you. You are always so kind, and I appreciate that. I'm glad to see you enjoyed this fall craft. Again, thank you. ♡
Deletewhat a great project - thanks for sharing with Create-it Link Party.
ReplyDeleteStephanie,
ReplyDeleteLove your pumpkin. Congratulations, you are being feature on TFT today. https://www.eclecticredbarn.com/2024/09/fall-ideas-on-tft.html
I hope you stop by.
Hugs,
Bev
Bev, thank you. ♡
DeleteThis looks great, very creative. Love autumn.
ReplyDeleteThank you, Claire. ♡
Delete