Hey there! I am thrilled to introduce you to an exciting Thanksgiving craft that will add a wonderful touch to your holiday table. This project involves using air-dry clay and pie stamps to create personalized and unique place cards. Do not worry, I will provide you with a step-by-step guide throughout the entire process. Additionally, we will use paint, twine, and a brown paper bag to give our place cards a festive feel.
Materials needed
Pie stamps which can be obtained from Joann's
Acrylic paint
Air-dry clay
A hole puncher
Wooden beads
Twine
A brown paper bag (or any other material you prefer to use as a template), one pencil, and scissors.
Working with air clay
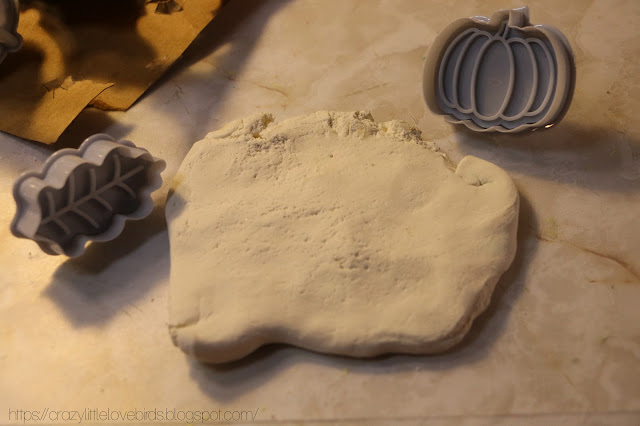
Begin by flattening the air-dry clay, using either your hands or a roller. Once the clay has been flattened, use the pie stamps to press your desired design into the clay. Following the stamping process, remove any excess clay around the outer edge of the stamp and use the stamp press to release your clay design.
It's worth noting that for optimal results, it's best to wait until your clay has fully dried before applying paint. It's recommended to let the clay dry for at least 24 hours. If you plan to add twine to your clay creation, you can make the process easier by creating a hole in the clay before it dries. This can be done by using a small paintbrush to gently push into the clay and create the hole.
Adding Acrylic paint
To create your clay design, first apply acrylic paint to each stamp using a paintbrush. After painting, set the design aside.
Creating and tracing a design
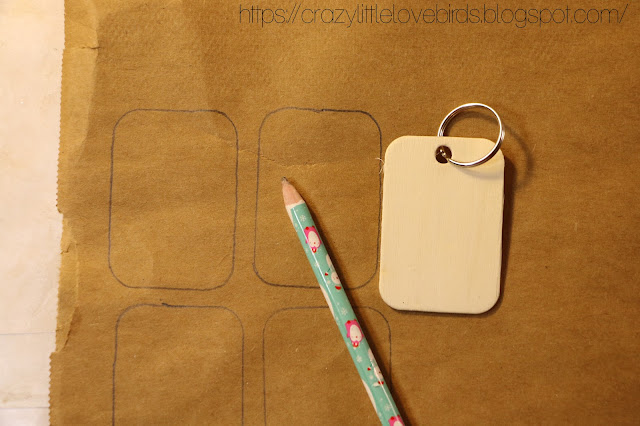
Next, take a paper bag and either trace a template or design your own shape. For example, consider tracing a wooden keychain onto a paper bag. After tracing or cutting out the tag, use letter stamps to imprint names or initials onto the paper.
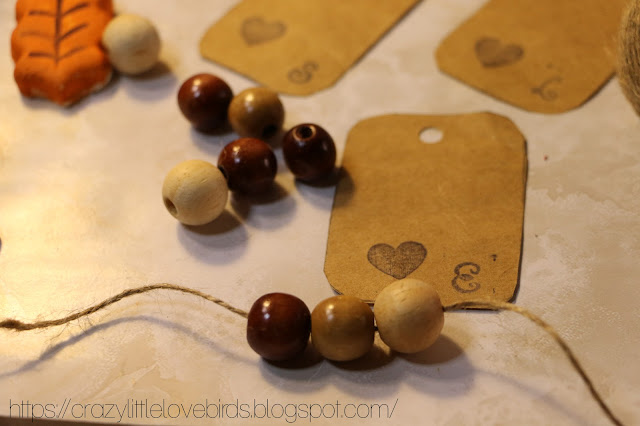
Using a hole puncher, make holes on each side of the paper tags.
Designing and adding beads to paper tags
String a few wooden beads onto the twine, then pull the twine through the paper tag and tie it off. Be sure to leave enough twine to pull it through the clay design. Once the twine is pulled through the clay, tie it off. You should now have the clay, paper tag, and wooden beads at the top of the paper bag.
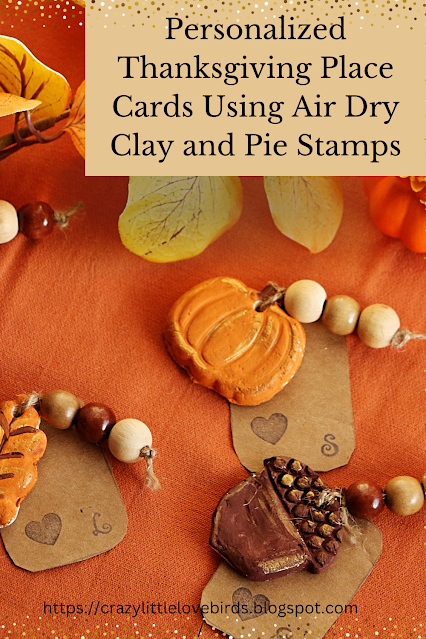
Your custom Thanksgiving place cards are complete! I love that I personalized each one using clay, letter stamps, and pie stamps, and reused a paper bag.
Thank you for joining me today. I hope you had fun making your personalized place cards, and I'm sure your guests will love them!
You may also enjoy this craft
Create an Easy Fall Sign: DIY Tutorial with Faux Leaves and Thankful Design


.jpg)


How pretty and made of clay, I like them!! Thanks so much for linking up at the #UnlimitedLinkParty 133. Pinned.
ReplyDeleteThank you. 😊
DeleteI love these so much! What a darling idea. Pinning, for sure. :) Visiting from Crazy Little Lovebirds linkup #9. (I'd love you to share this at Will Blog for Comments, too! https://lifetalesbooks.blogspot.com/p/calling-fellow-bloggers.html)
ReplyDeleteJennifer, thank you so much!
DeleteThese are so cute! Thank you for sharing this tutorial!
ReplyDeleteThank you so much! :)
DeleteThese are so cute, what a lovely idea to make your table really special.
ReplyDeleteJulie, thank you. 😊
DeleteVisiting again to say thanks so much for linking up at #IMadeItMondayLinkParty 28. Pinned again.
ReplyDeleteDee, thank you! :)
DeleteIncredibly tedious beautiful work.
ReplyDeleteJoy, thank you. This craft was fun to create. It's actually pretty simple to create.
DeleteI have always wanted to try air clay. This seems simple enough.
ReplyDeleteGive it a try! 😊
DeleteThese are adorable!! How festive for a Thanksgiving table! Thanks so much for sharing at Home Imagined this week!
ReplyDeleteThank you. 😊
DeleteThese are so cute and festive!
ReplyDeleteAmy, thank you so much. 😊
DeleteThese are so pretty! So special for each guest. I'm happy to tell you I'll be featuring this post at Thursday Favorite Things today, starting at 10:00 a.m. CST. :)
ReplyDeletePam, thank you. 😊 I appreciate it very much.
DeleteSo very cute and creative. Perfect for place cards. I am happy to feature your personalized Thanksgiving place cards at Love Your Creativity.
ReplyDeleteLinda, thank you so much. 😊 I'm excited to be featured at your party.
DeleteCONGRATS Stephanie! Your post is FEATURED at #IMadeItMondayLinkParty 29. And, I just noticed your logo of the little ♥ birds kissing under the umbrella, how cute!!
ReplyDeleteDee, thank you. I'm happy to be featured at your party. Aw, and that is cute that you noticed the two birds. I just changed it over the weekend. Thank you. 🥰
DeleteLooks cute and I saw that you changed the other blog too :)
DeleteDee, thank you. 😊
DeleteThese are lovely!
ReplyDeleteThank you, Joanne. 😊
DeleteThese are adorable! I would love these for our Thanksgiving table! Pinning and thanks for sharing at The Home Imagined link party. XO-MaryJo
ReplyDeleteMaryJo, thank you. 😊 I'm happy to hear you enjoyed them.
DeleteVisiting again to say thanks so much for linking up at the #UnlimitedLinkParty 135. Tried to pin again but it won't let me.
ReplyDeleteDee, thank you. I'll need to see why it doesn't let you.
DeleteThis is such a cute idea! I love the pumpkin especially. Thanks for linking up with Tell It To Me Tuesday, I hope to see you again this week!
ReplyDeleteLyndsey, thank you. I appreciate it. 😊
DeleteThose are so stinkin' cute! Love them. Thank you for linking up on Farmhouse Friday 323. I'll be featuring this post tomorrow. Hope you link up again soon. pinned
ReplyDeleteCindy, thank you so much. I am happy to hear that you enjoyed them. I'm excited to be featured at your party. :)
DeleteWhat a fun (and memorable) way to welcome guests to your Thanksgiving table! I love these!
ReplyDeleteThanks for sharing at Funtastic Friday . I adore these and they can be adapted for parties and different holidays. I'm thinking for my daughters baby shower.
ReplyDeleteYou're very welcome. Oh yes, they sure can be adapted for parties and different holidays. I love that idea. And that sounds wonderful to use for a baby shower. Thank you for visiting.
DeleteThey are so pretty! My grandchildren will enjoy making them.
ReplyDeletePat, aw this would be great to work on with your grandchildren. 🥰 Thank you so much for visiting.
DeleteThese are darling Steph. Thanks so much for sharing this tutorial with Sweet Tea & Friends this month.
ReplyDeletePaula, thank you so much. 😊
DeleteThis is soooo cute! Like everything you make, these little cards are adorable!
ReplyDeleteMariama, thank you so much. I appreciate your kind words.
DeleteThese look great and will make people feel very special. Thanks for sharing step-by-step tutorial.
ReplyDeleteThank you. You are too kind. I'm glad you enjoyed this DIY project.
DeleteThese are fabulous and I'm featuring when my party opens.
ReplyDeleteThank you!
DeleteThanks for sharing with us, I'm featuring you this week when the next To Grandma's house we go link party starts!
ReplyDeleteThank you very much!
DeleteLove this Thanksgiving craft! It's easy enough I can do it with even my youngest grandkids! from Saturday Sparks #29, 30 and 33
ReplyDeleteLinda, thank you! I am happy you enjoyed this craft. :)
DeleteI really love these, Steph! So pretty. I need to do these this year. Visiting from the Wednesdays in the Studio link party.
ReplyDeleteJennifer, thank you! I was surprised at how well they turned out. It was such a fun little craft. :)
Delete