
Transform a Plastic Organizer into a Chic Artificial Succulent Hanging Garden

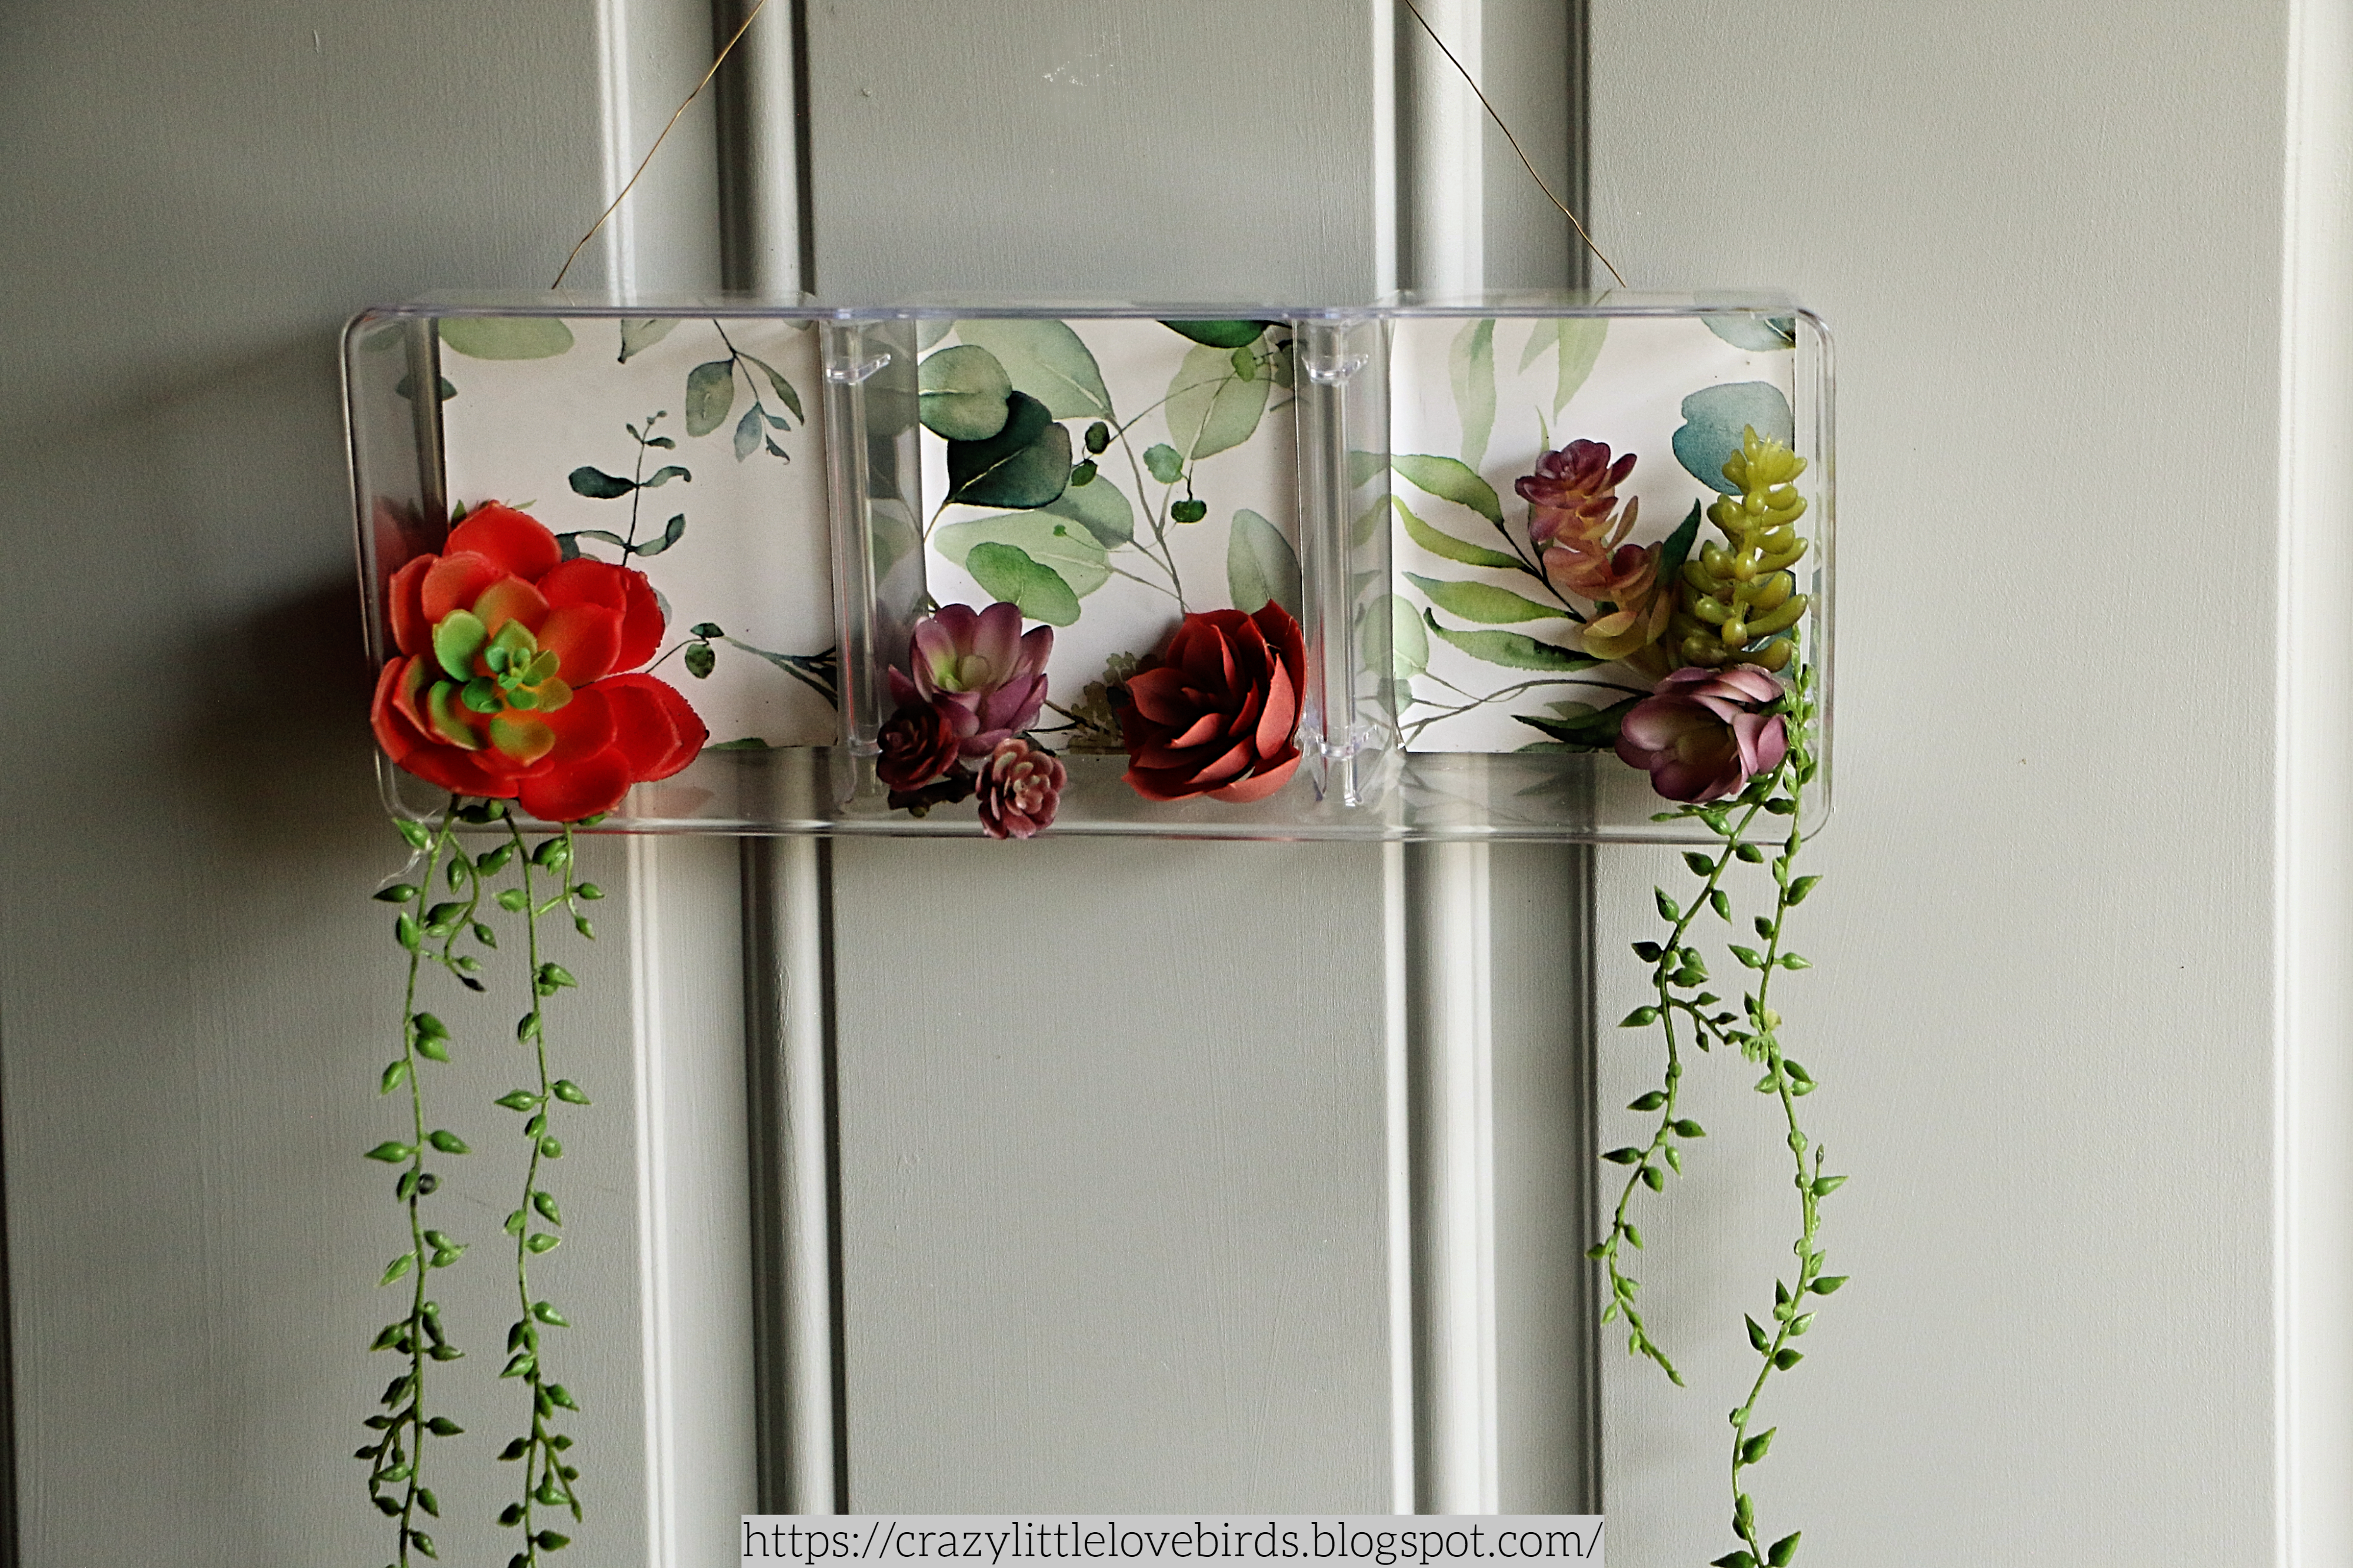
Hello everyone, I hope you're doing well. Today, I want to share a simple decor idea using a Dollar Tree plastic organizer. The organizer I'm using has three compartments. 

We will be creating a hanging garden display with faux succulents. If you know me, then you know how much I love succulents. 

Honestly, I could decorate every space in my home with them. The best part is that with artificial succulents, I won't have to worry about killing them. I'll provide you with all the details on creating your own hanging garden display, and I'll include a full materials list below. Let's get started!

Faux succulent hanging garden

Materials to create Faux succulent hanging garden

Materials

  • One plastic organizer (I'm using the one with three compartments)
  • Dollar Tree wallpaper sheet
  • Wire
  • Artificial succulents
  • Hot glue
  • Pencil or pen for tracing
  • floral cutters
  • scissors
Plastic organizer, wallpaper sheet and a pen

Tracing onto the wallpaper

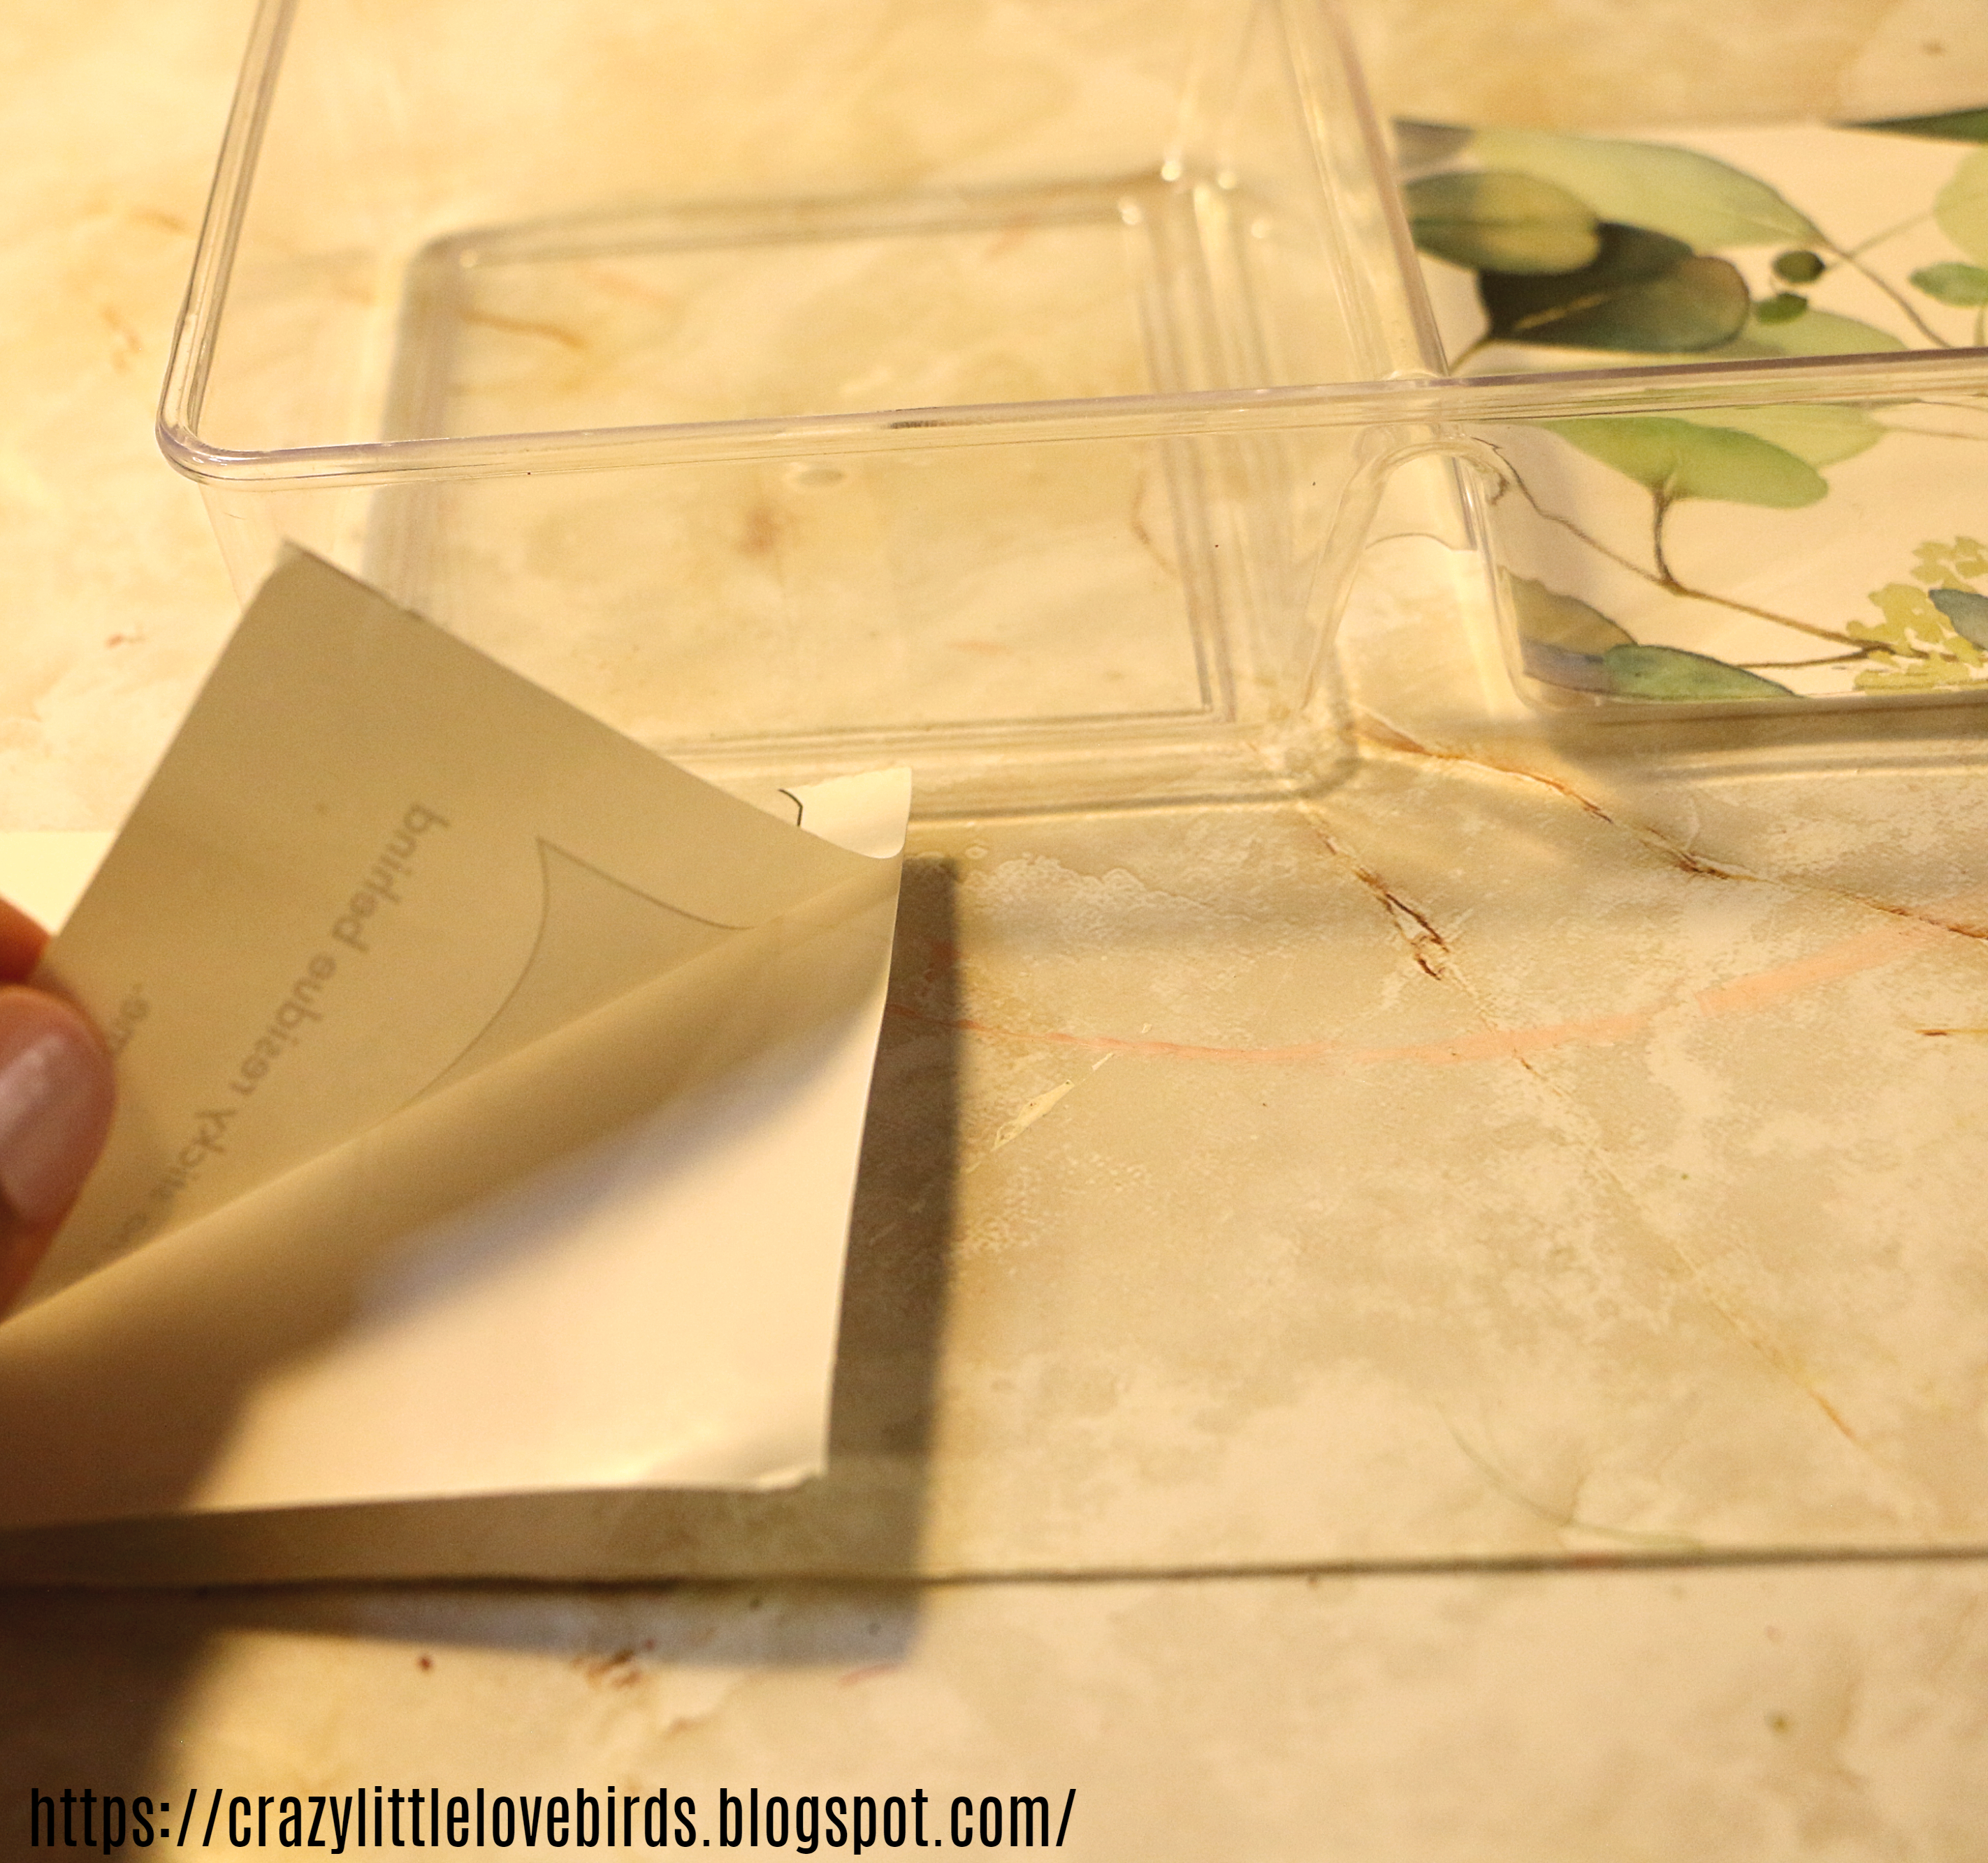
Begin by placing your plastic organizer on top of the wallpaper sheet. Use a pencil to trace around the organizer, but don't worry if you don't trace every section. Remember, to make extra cuts when adding the wallpaper to each compartment.

Cut-out wallpaper square

Cut-out wallpaper square

Wallpaper squares placed in organizer

Cutting and attaching wallpaper sections

Use scissors to cut out each traced section on the wallpaper sheet. Take each cut-out section and place it into the compartments. You may find that the sections are not perfect, but that's okay. Make any necessary cuts to ensure that they fit.

To add the wallpaper sections to the organizer, remove the backing from each one, exposing the sticky backing. Place each section into its compartment and press down gently.

Artificial succulents and floral cutters

Adding succulents and wire

Now it's time to add the succulents to each compartment. Before adding them, use floral cutters to make any necessary cuts. Use hot glue to attach each succulent flower. If you prefer, insert a section of foam block in each compartment and add your succulent into the foam block.

Use your floral cutters to cut a section of wire. Attach the wire to the back of the organizer using a few extra wallpaper sections, clear tape, or hot glue.

Succulents placed in plastic organizer

Adding the gold wire

gold wire with cut-out wallpaper sheet over it

Succulents displayed

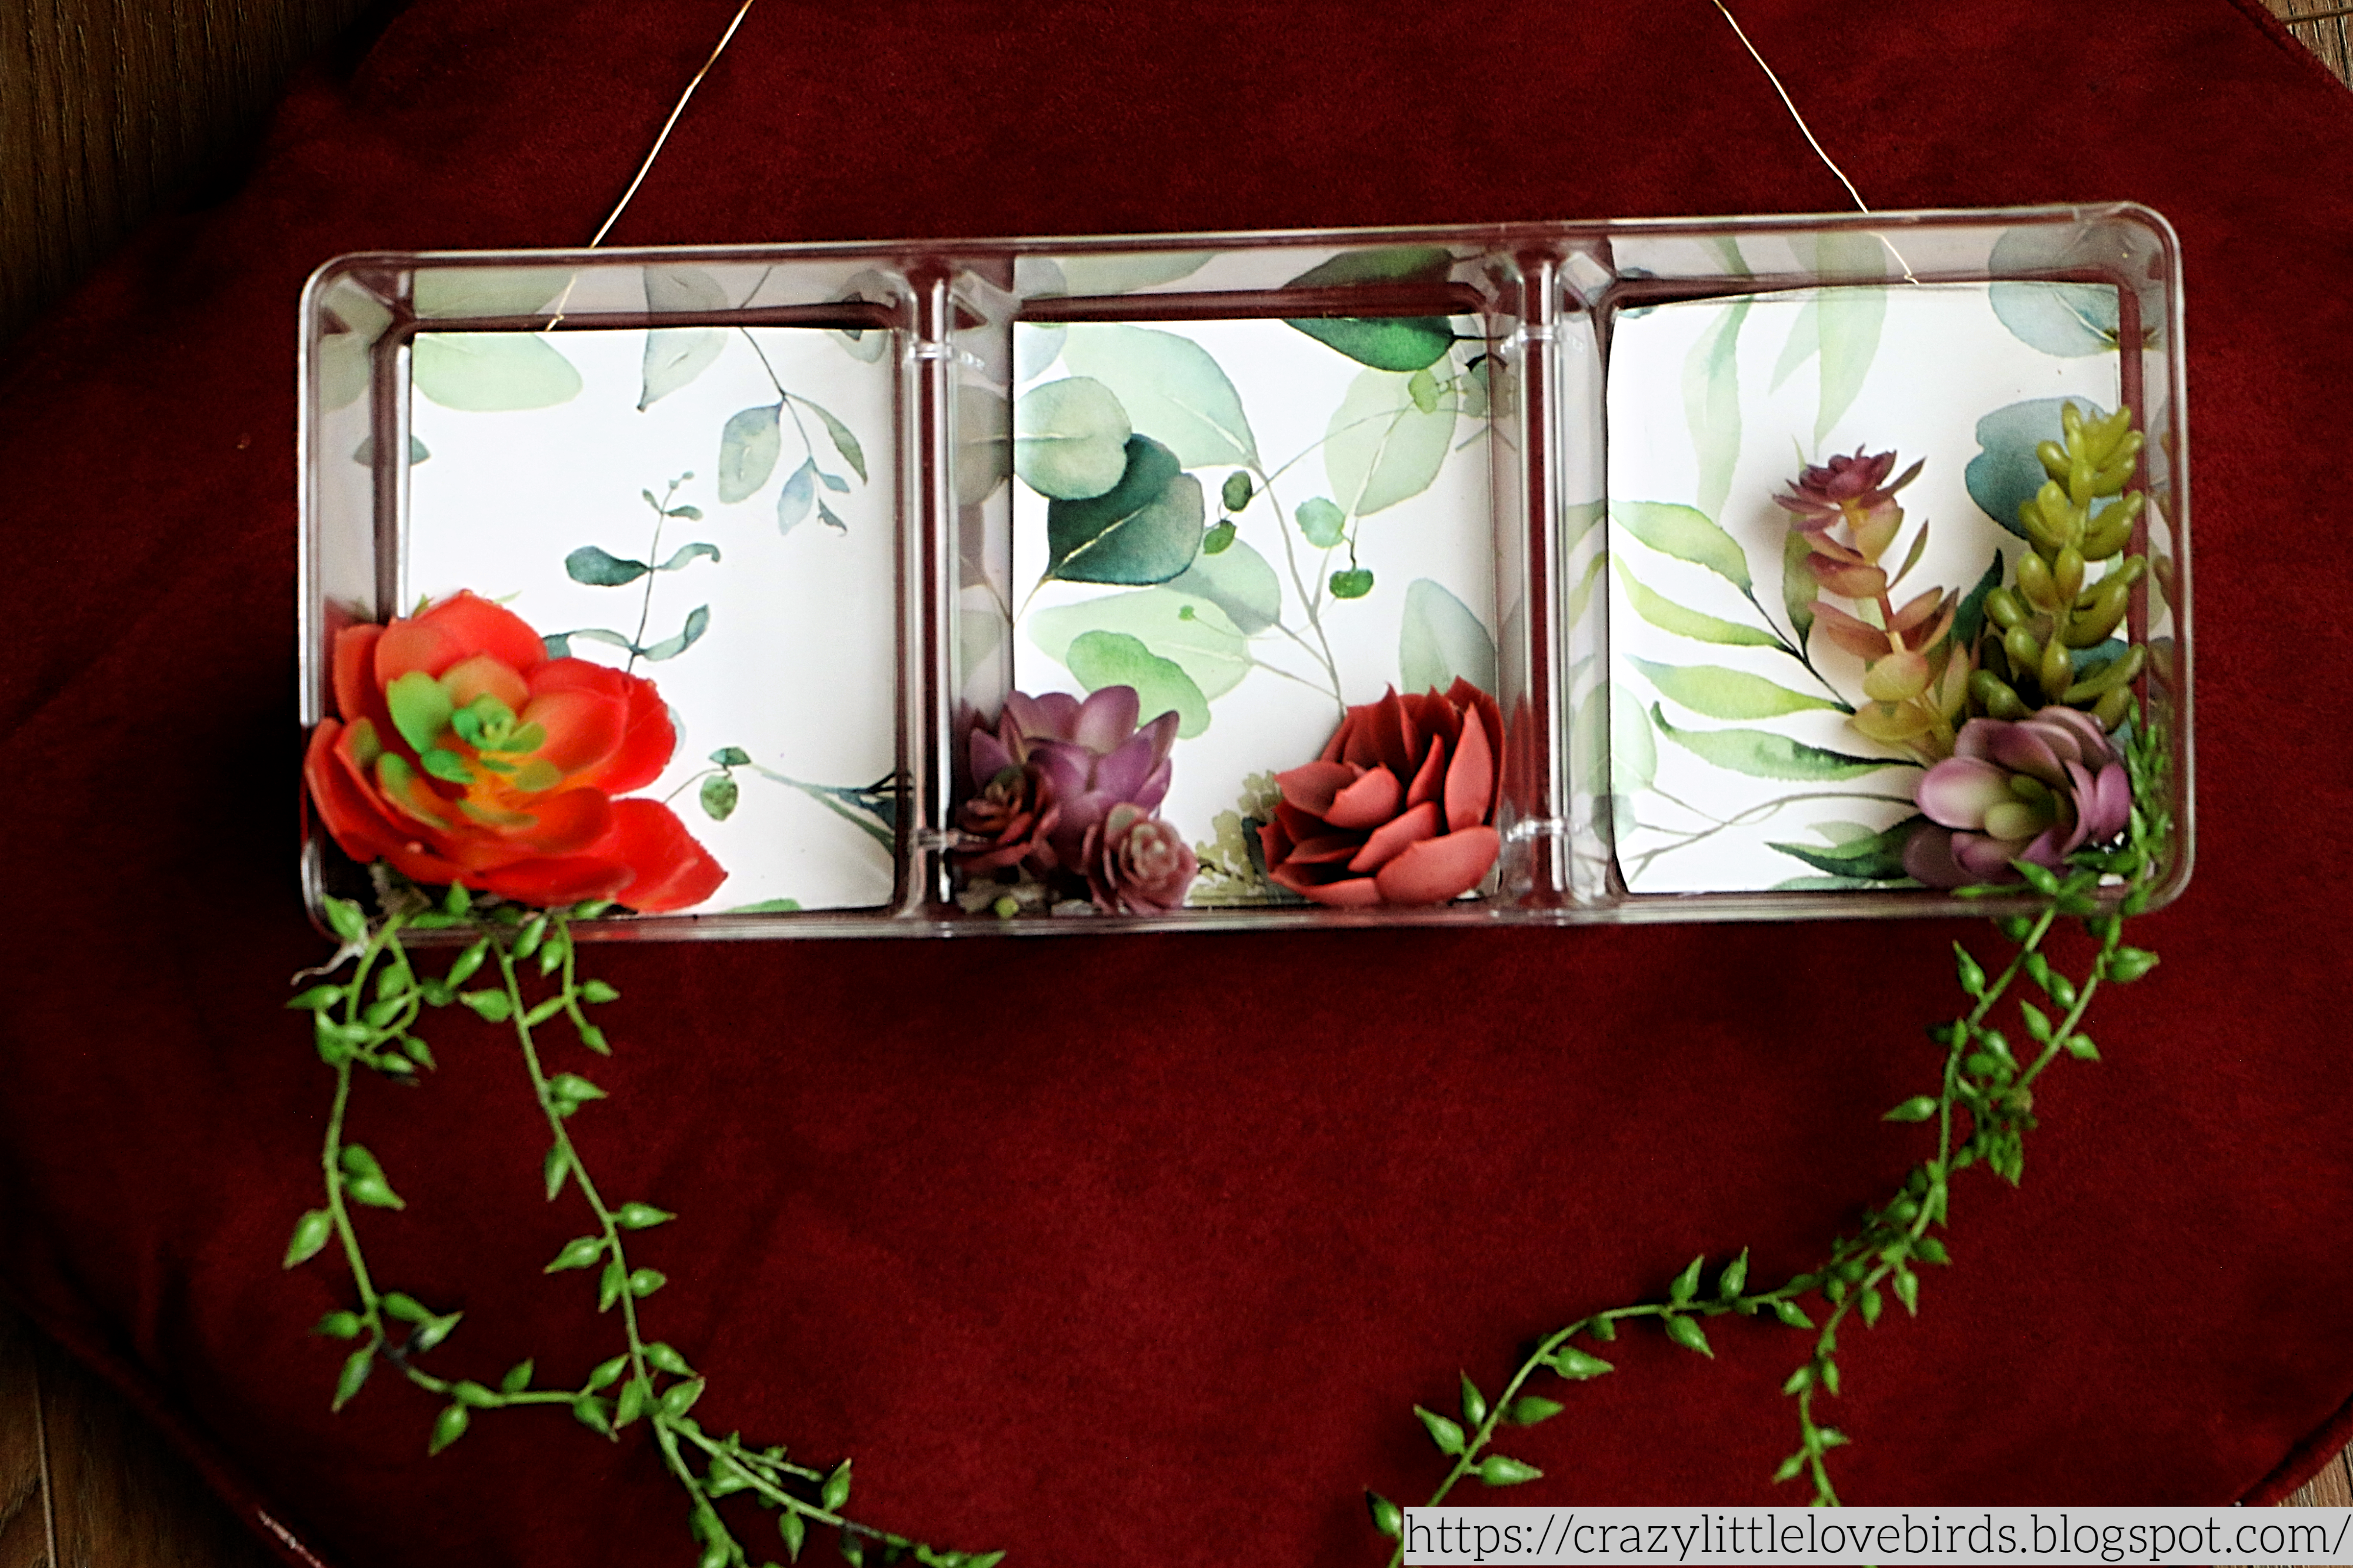
Your succulent hanging garden display is complete! It's a great way to repurpose an everyday item and create a beautiful display of succulents.

Let me know if you try this project. I love hearing from all of you. Take care, and thank you for visiting!

You might also enjoy

Pin Share Save

Pinterest pin succulent hanging garden


Comments

  1. wow! I want to have that for my living room!! Really cool :-)

    ReplyDelete
    Replies
    1. Angie, thank you! 😊 It's super easy to make and makes a great addition to any space. Thank you for visiting.

      Delete
  2. This is SO clever! What a fun display. Pinning to share and save! Thank you for sharing this post at the Will Blog for Comments #35 linkup. We hope to see you next time, too, for #36. Have a great week.

    ReplyDelete
  3. That is such a great idea! It pops so well against that dark red background too.

    ReplyDelete
  4. Lovely! I wondered why the "wallpaper" looked so familiar; I had seen it at my local Dollar Tree. Will have to look for your organizer--I just bought some clearance succulents at Hobby Lobby!!!

    ReplyDelete
    Replies
    1. Kathy, I hope you make one! This was such a fun project. :)

      Delete
  5. such a unique transformation - thanks for sharing with Create-it Link Party

    ReplyDelete
  6. I would use the floral foam block so I could change the succulents out for florals for the seasons or holidays. Will make one for myself to put in my new apartment. Thanks for your post.Sharon A

    ReplyDelete
    Replies
    1. Thank you for visiting. Yes, floral foam would definitely come in handy if you want to change the floral arrangements to match the season. 😊

      Delete
  7. So simple yet so effective. The succulents look like really good ones too. Thank you for sharing your idea.

    ReplyDelete
    Replies
    1. Thank you! I was impressed with the faux succulent quality as well. Thanks so much for visiting. 🌱

      Delete
  8. Wow, thanks for the inspiration as I have a few of these trays from Dollar Tree already. #Alittlebitofeverything

    ReplyDelete
  9. How pretty, featuring you at Wednesdays in the Studio!

    ReplyDelete
  10. Would it surprise you to know I have both the tray and the wallpaper in my stash?! Love this and featuring it when my party opens!

    ReplyDelete
    Replies
    1. Carol, that's wonderful! Honestly, I figured you would have those items. Seems like we both have that same love for DT, haha. 💖 Thank you so much for visiting and for the feature. I appreciate it so much. 😊

      Delete

Post a Comment

Welcome! I love hearing your thoughts and seeing what you’ve been up to. Please leave a comment or ask a question below—I do my best to respond to everyone! To keep the blog comments safe and inspiring, spam will be removed. Thank you for being a part of this blogging space!

Popular posts from this blog

The Crazy Little Lovebirds Link Party 136

Welcome to The Crazy Little Love Birds Link Party #136! I’m so happy you’re here! This is a warm and friendly gathering where you can share your amazing ideas—whether it's tasty recipes, fun family activities, creative crafts, home projects, or any other joyful inspirations. If you love finding new DIY ideas and learning from other bloggers, you’re in the perfect spot! Thank you so much for joining this week’s link party. I truly enjoy seeing all the creativity, recipes, projects, and inspiration you share. Your ideas brighten this space and make it such a lovely place to gather. If you missed the last party and would like to revisit some of the posts, you can do so by clicking here: The Crazy Little Lovebirds link party 135 Congratulations to our featured bloggers Salt Prairie – My Favorite Tips for Making House Cleaning More Enjoyable I really enjoyed this post because the tips are so simple and doable. If you’ve been wanting to make cleaning feel a little lighter and less over...

The Crazy Little Lovebirds Link Party 99

Welcome to The Crazy Little Love Birds Link Party #99! This party offers a platform for sharing inspiring content, including recipes, family-friendly blog posts, crafts, home décor, and other uplifting ideas. This week Thank you all for your kind and thoughtful comments on my daughter's behalf. She's doing well and healing wonderfully after having her wisdom teeth removed. We experienced a few rainy days, and I managed to do some weeding in my gardens. How was your week? I wanted to share this picture of one of the squirrels that visits our porch. These snapshots show the squirrel taking a break in the morning, lying on the railing. I guess the squirrel was thinking about where to hide those peanuts next.   Congratulations to our featured bloggers Jennifer at Tea With Jennifer shared a post reflecting on friendship and reminding us of the greatest friendship we can ever have. Visit her blog as she explores friendships, especially one that will never fail you.   Two Chicks and ...

The Crazy Little Lovebirds Link Party 135

Welcome to The Crazy Little Love Birds Link Party #135! I’m so happy you’re here! This is a warm and friendly gathering where you can share your amazing ideas—whether it's tasty recipes, fun family activities, creative crafts, home projects, or any other joyful inspirations. If you love finding new DIY ideas and learning from other bloggers, you’re in the perfect spot! Hello everyone, I hope you all had a wonderful week. We celebrated our oldest daughter's 15th birthday. I let her know that you all shared those sweet birthday wishes with her, and she thanks you and truly appreciates it. I baked her a cookie cake, and we enjoyed dinner at Applebee's. My mom sent us a gift card, so we didn't have to decide what to have for dinner that day. She really made things easy! As always,  thank you to everyone who joins in each week . I appreciate each of you. You truly make this party wonderful. I've enjoyed visiting each of your blogs and seeing what's new in the bloggin...

DIY Holiday Decor: How to Make a Wintery Faux Foliage Bowl

Create a stunning DIY holiday decor with this step-by-step guide on making a wintery foliage bowl. Learn how to craft a beautiful centerpiece that brings the essence of winter into your home. Hi there, I hope everything is going well for you. Today, I want to share with you a simple upcycling holiday craft idea. The three main materials you will need for this craft are a bowl, a cork, and some wintery foliage. I used a cork lid from a salt bottle that I had kept, and a pink bowl I had bought a few months ago for just 50 cents. You can easily put this project together in less than 15 minutes, and it looks absolutely beautiful once it's displayed. So, if you're ready, let's start creating! Here's what you'll need One bowl (any size works, I am using a smaller bowl for my design) Wintery faux foliage Cork (I am reusing a cork from a salt bottle) Hot glue Floral cutters (to cut foliage to size) Pinecones (optional) Attaching the cork to the bowl To begin, turn your bowl...

Budget-Friendly Spring Frame Decor with Faux Flowers

There’s something truly wonderful about transforming the simplest craft supplies into a soft, delicate piece of décor. Recently, I was looking at a plain white picture frame from Dollar Tree—nothing fancy, just simple and clean. It reminded me of my love for quick projects that utilize materials we already have on hand.    I had a few leftover faux flowers from a previous craft , and instead of putting them away again, I thought, “Why not add a touch of spring magic to this frame? ”    It’s one of those easy, no-stress projects that is calming to create and instantly brightens up any space. With just a few snips and some hot glue, that plain frame transforms into something soft, pretty, and perfectly suited for the season. Quick video tutorial  Materials You'll Need A simple white picture frame is a great choice for this project, especially if you love a clean, minimalist vibe! It really gives a fresh, stylish look that can brighten any space.   Gather an...

All content copyright 2010-2025

I kindly request that my photos and words not be taken or used without my permission. If you have any inquiries, please do not hesitate to contact me. Additionally, for more information regarding this blog, please refer to the disclosure policy tab located above. Thank you.