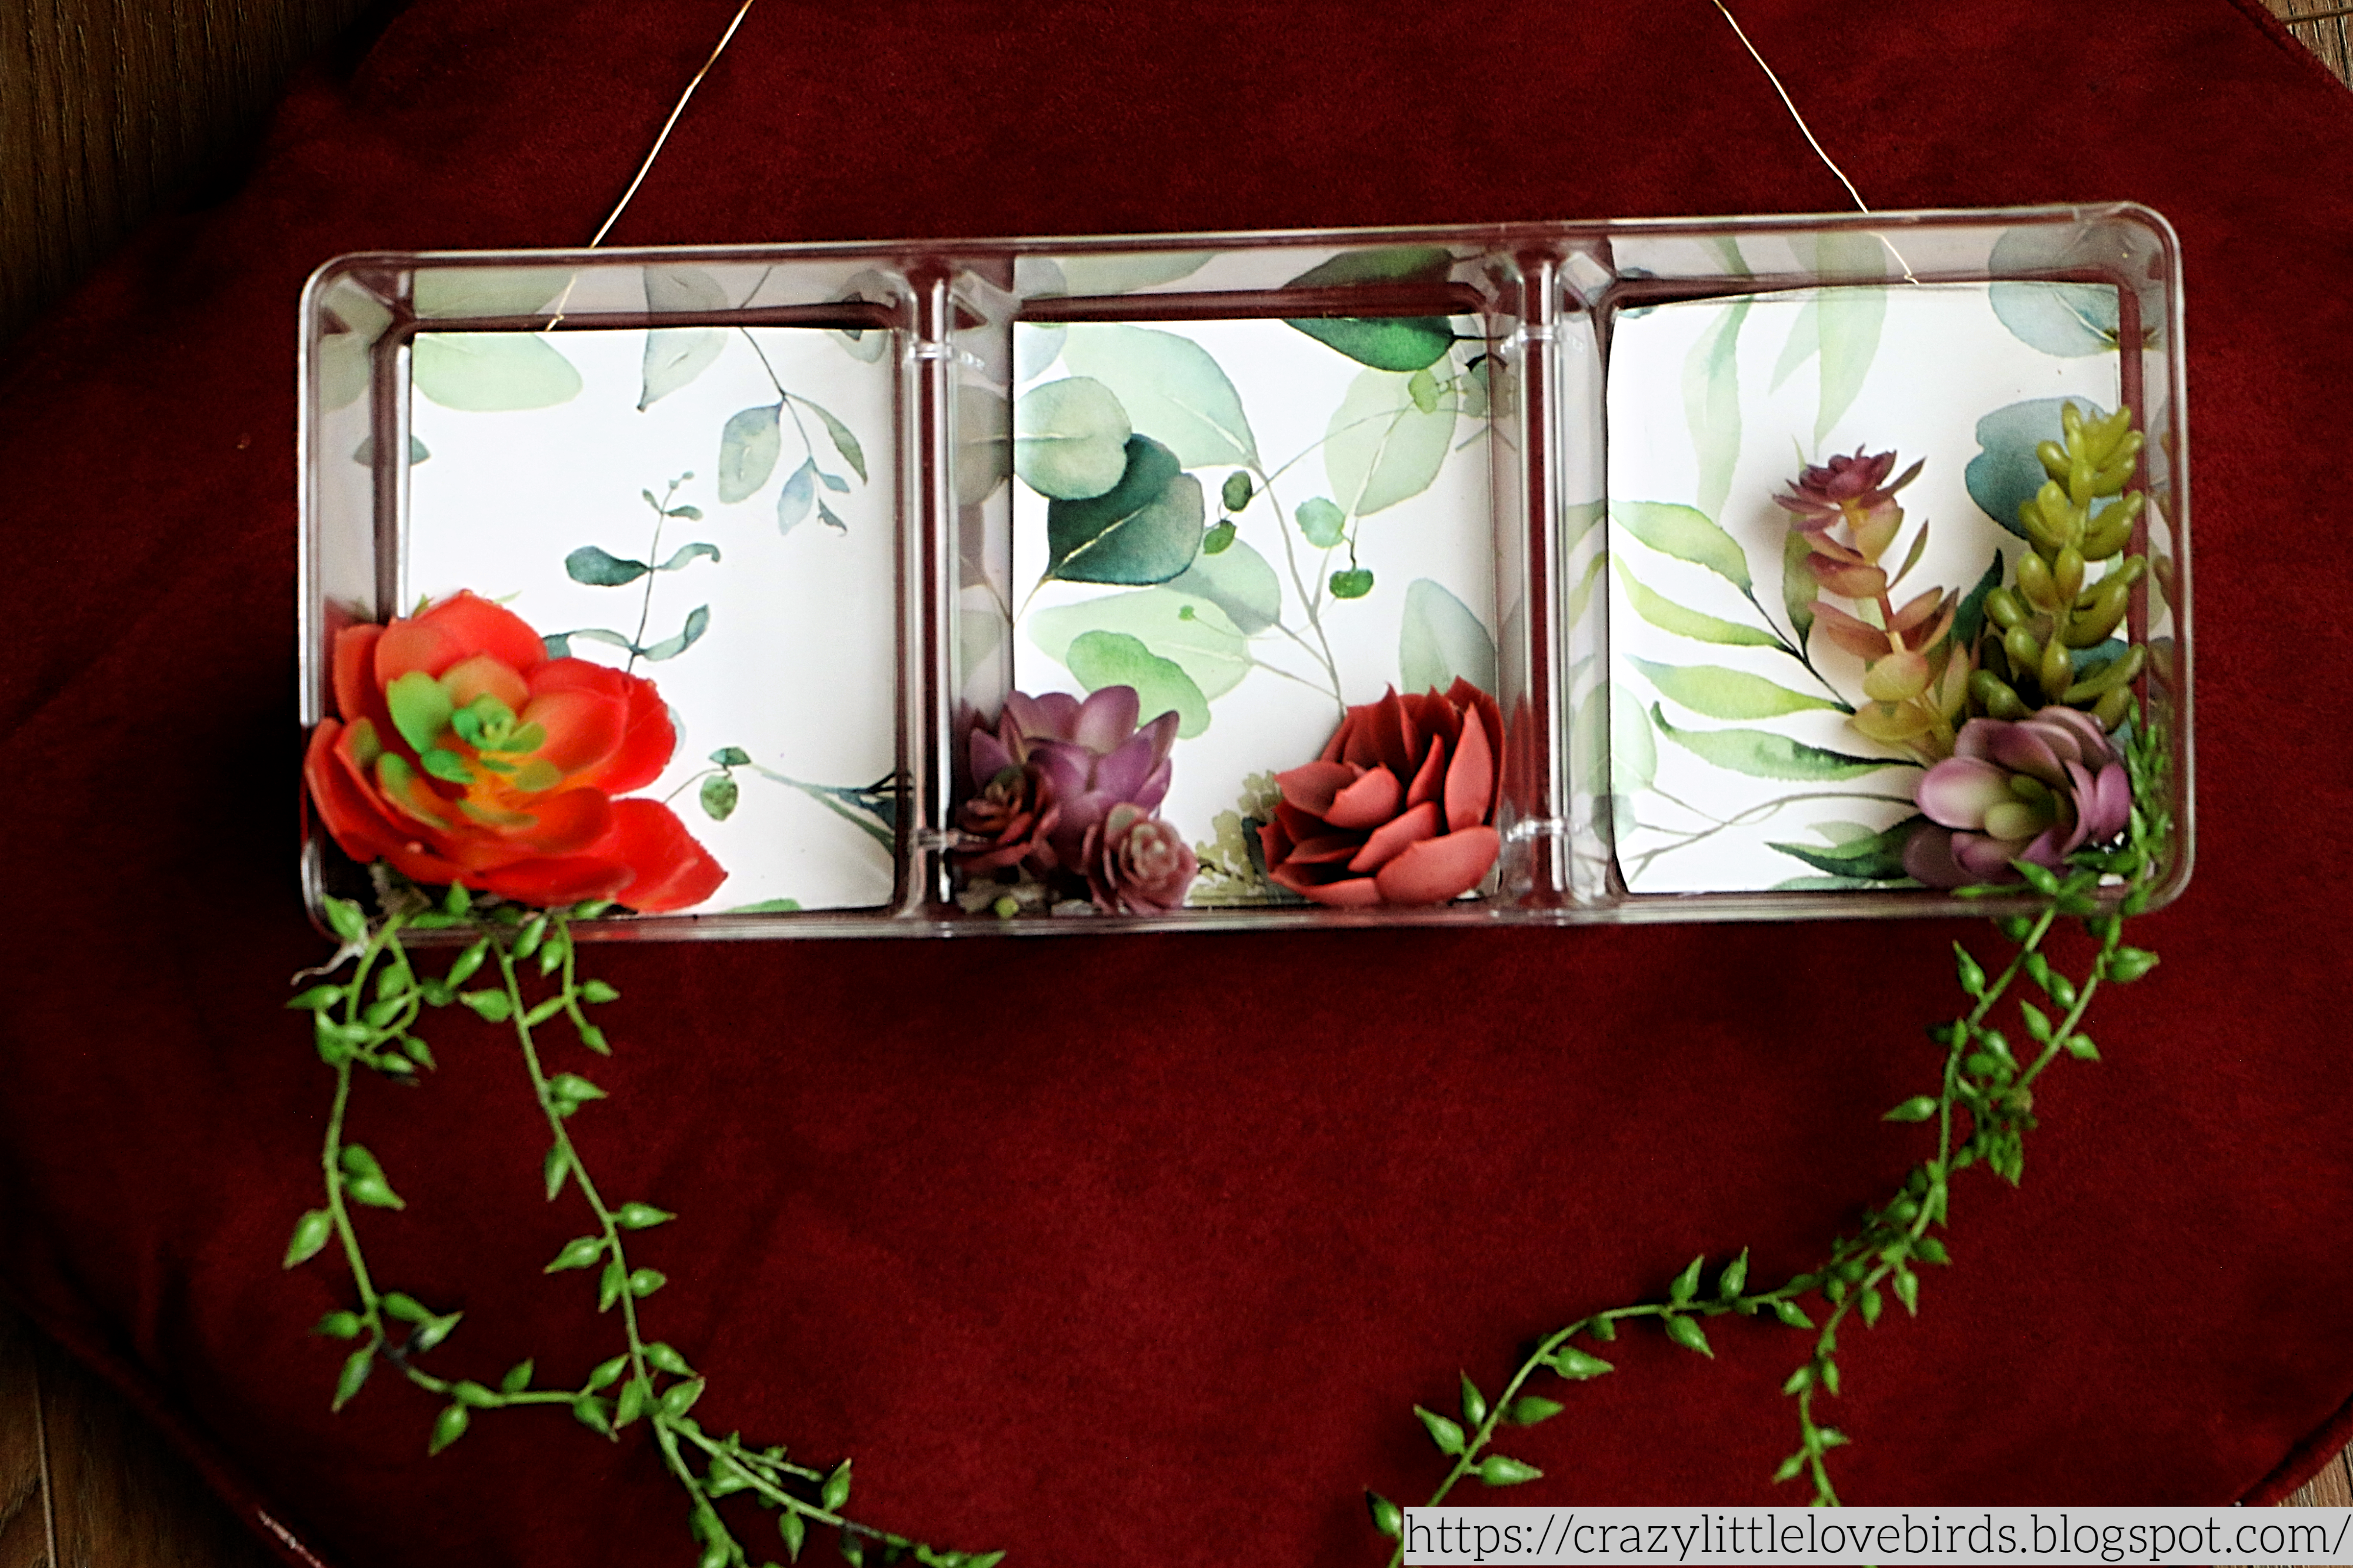
Transform a Plastic Organizer into a Chic Artificial Succulent Hanging Garden

Hello everyone, I hope you're doing well. Today, I want to share a simple decor idea using a Dollar Tree plastic organizer. The organizer I'm using has three compartments. 

We will be creating a hanging garden display with faux succulents. If you know me, then you know how much I love succulents. 

Honestly, I could decorate every space in my home with them. The best part is that with artificial succulents, I won't have to worry about killing them. I'll provide you with all the details on creating your own hanging garden display, and I'll include a full materials list below. Let's get started!
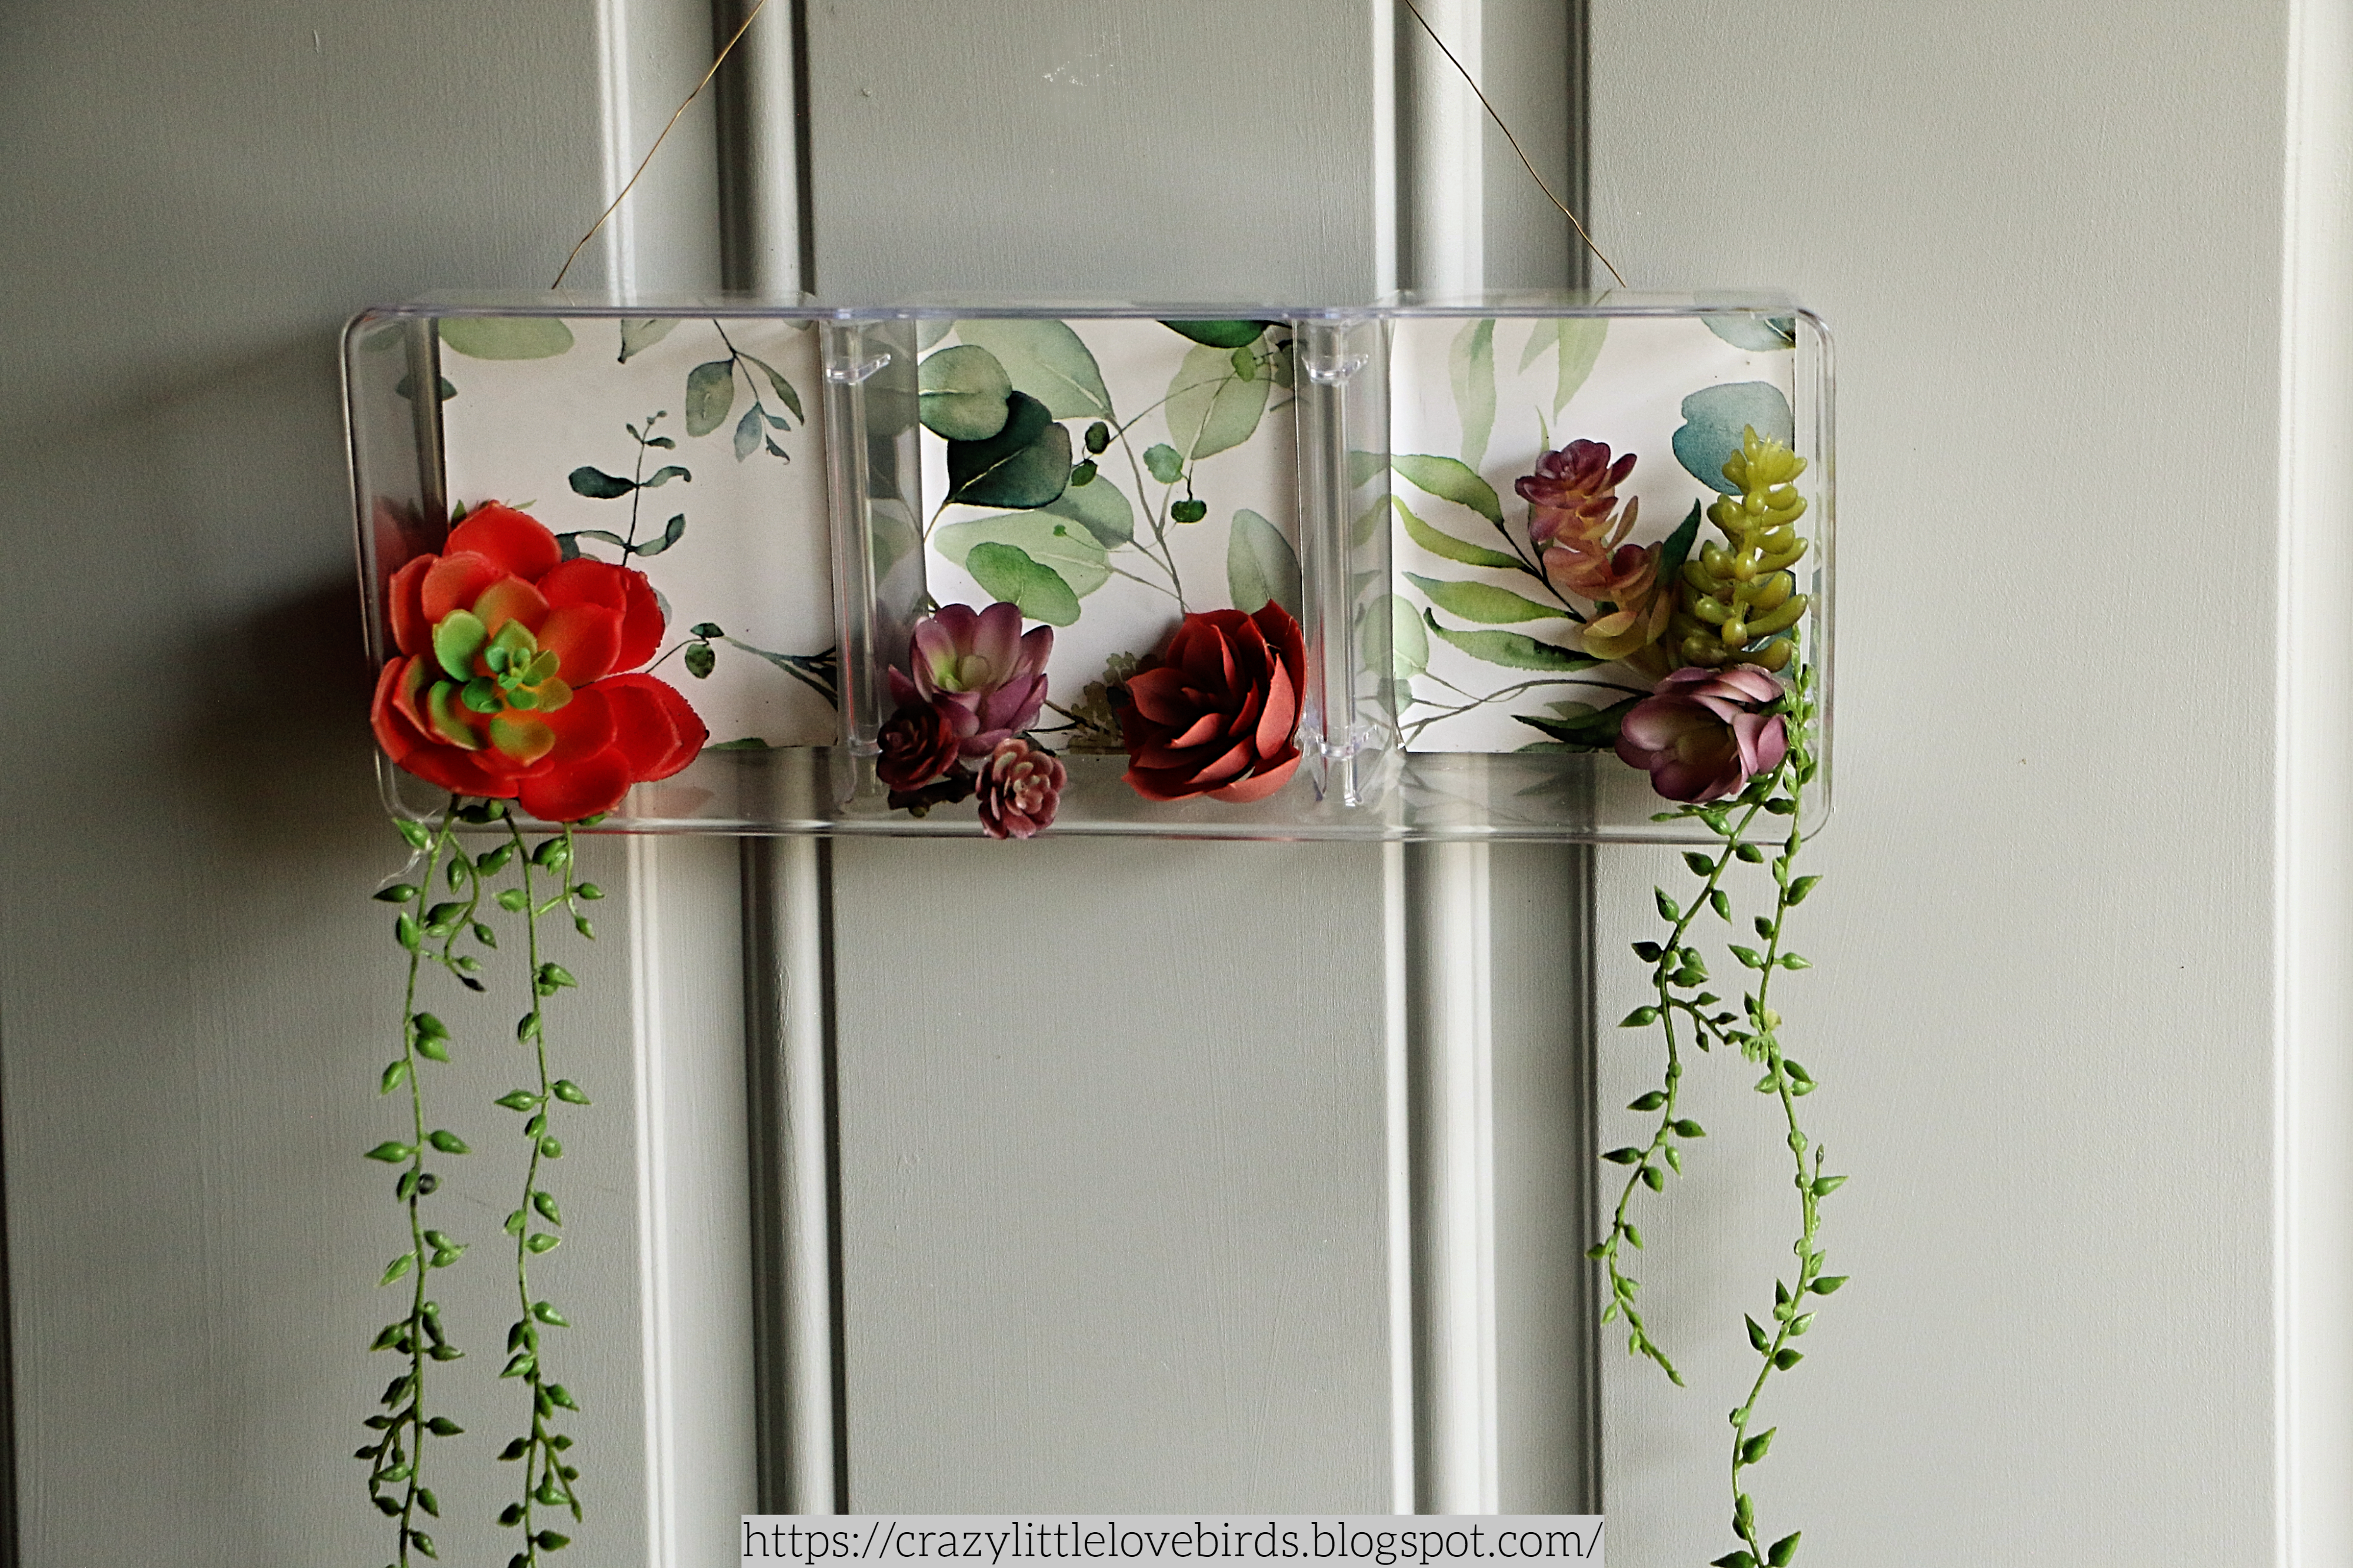
Faux succulent hanging garden

Materials to create Faux succulent hanging garden

Materials

  • One plastic organizer (I'm using the one with three compartments)
  • Dollar Tree wallpaper sheet
  • Wire
  • Artificial succulents
  • Hot glue
  • Pencil or pen for tracing
  • floral cutters
  • scissors
Plastic organizer, wallpaper sheet and a pen

Tracing onto the wallpaper

Begin by placing your plastic organizer on top of the wallpaper sheet. Use a pencil to trace around the organizer, but don't worry if you don't trace every section. Remember, to make extra cuts when adding the wallpaper to each compartment.

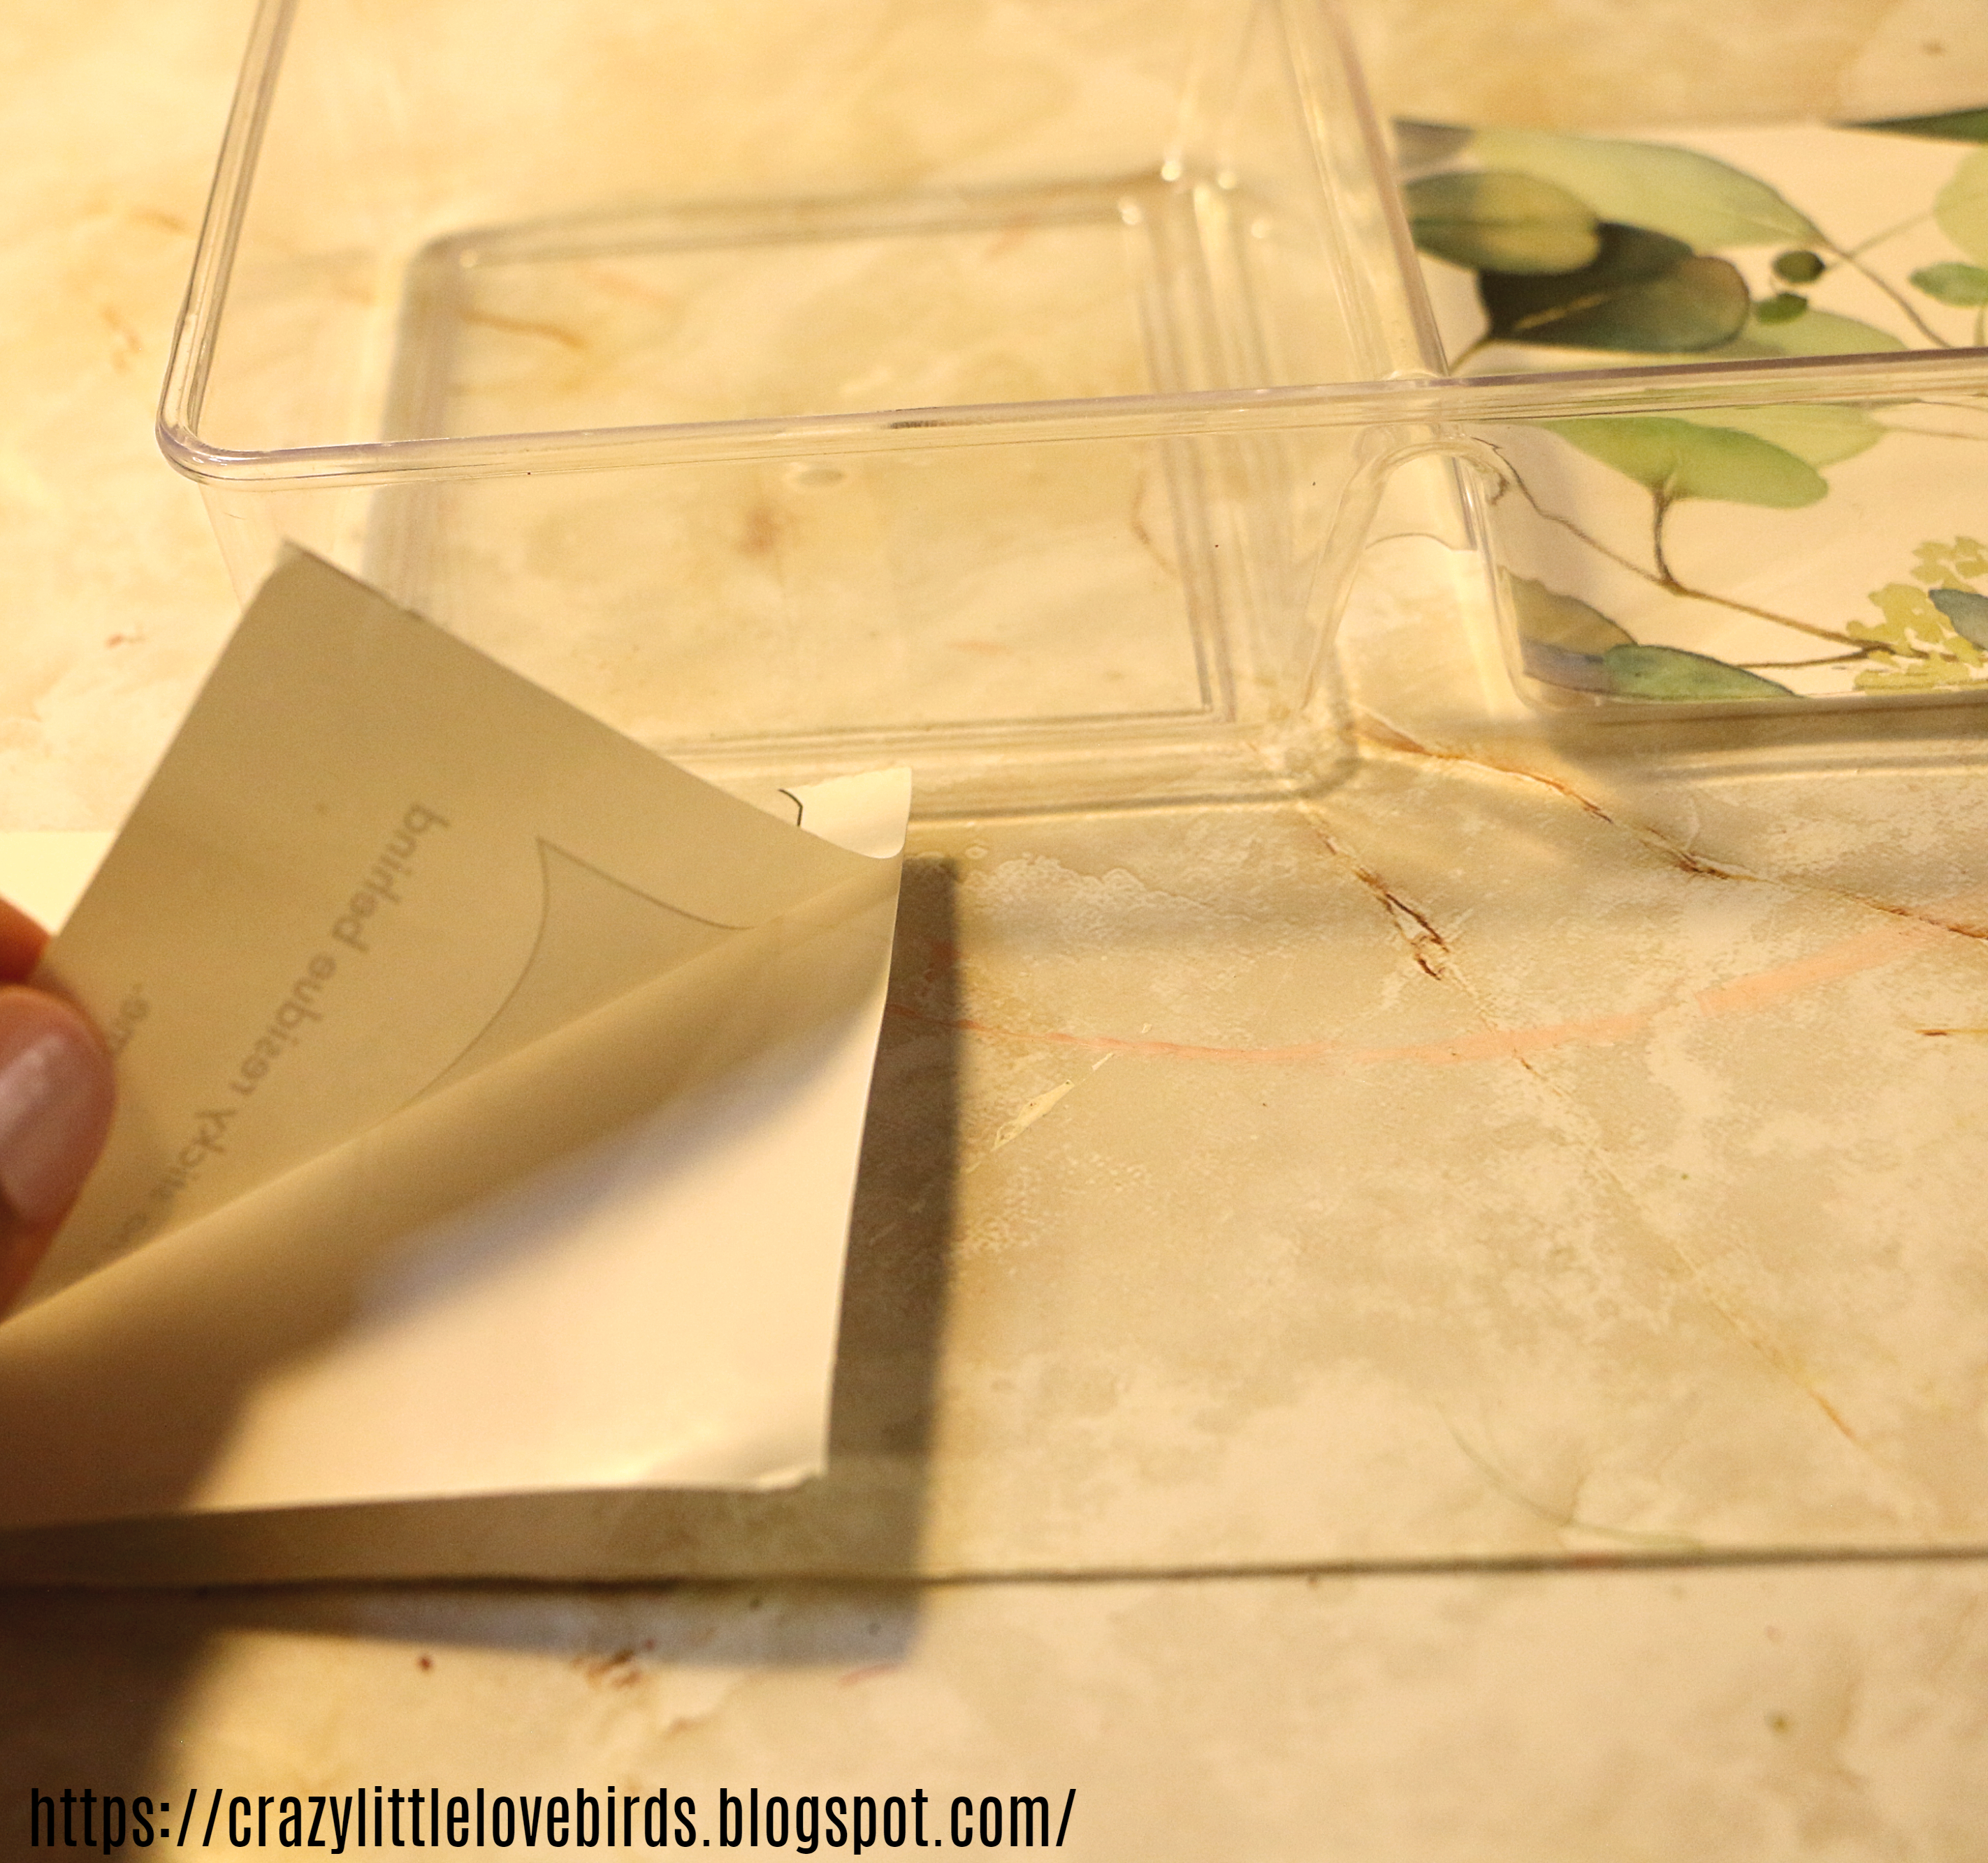
Cut-out wallpaper square

Cut-out wallpaper square

Wallpaper squares placed in organizer

Cutting and attaching wallpaper sections

Use scissors to cut out each traced section on the wallpaper sheet. Take each cut-out section and place it into the compartments. You may find that the sections are not perfect, but that's okay. Make any necessary cuts to ensure that they fit.

To add the wallpaper sections to the organizer, remove the backing from each one, exposing the sticky backing. Place each section into its compartment and press down gently.

Artificial succulents and floral cutters

Adding succulents and wire

Now it's time to add the succulents to each compartment. Before adding them, use floral cutters to make any necessary cuts. Use hot glue to attach each succulent flower. If you prefer, insert a section of foam block in each compartment and add your succulent into the foam block.

Use your floral cutters to cut a section of wire. Attach the wire to the back of the organizer using a few extra wallpaper sections, clear tape, or hot glue.

Succulents placed in plastic organizer

Adding the gold wire

gold wire with cut-out wallpaper sheet over it

Succulents displayed

Your succulent hanging garden display is complete! It's a great way to repurpose an everyday item and create a beautiful display of succulents.

Let me know if you try this project. I love hearing from all of you. Take care, and thank you for visiting!

You might also enjoy

Pin Share Save

Pinterest pin succulent hanging garden


Comments

  1. wow! I want to have that for my living room!! Really cool :-)

    ReplyDelete
    Replies
    1. Angie, thank you! 😊 It's super easy to make and makes a great addition to any space. Thank you for visiting.

      Delete
  2. This is SO clever! What a fun display. Pinning to share and save! Thank you for sharing this post at the Will Blog for Comments #35 linkup. We hope to see you next time, too, for #36. Have a great week.

    ReplyDelete
  3. That is such a great idea! It pops so well against that dark red background too.

    ReplyDelete
  4. Lovely! I wondered why the "wallpaper" looked so familiar; I had seen it at my local Dollar Tree. Will have to look for your organizer--I just bought some clearance succulents at Hobby Lobby!!!

    ReplyDelete
    Replies
    1. Kathy, I hope you make one! This was such a fun project. :)

      Delete
  5. such a unique transformation - thanks for sharing with Create-it Link Party

    ReplyDelete
  6. I would use the floral foam block so I could change the succulents out for florals for the seasons or holidays. Will make one for myself to put in my new apartment. Thanks for your post.Sharon A

    ReplyDelete
    Replies
    1. Thank you for visiting. Yes, floral foam would definitely come in handy if you want to change the floral arrangements to match the season. 😊

      Delete
  7. So simple yet so effective. The succulents look like really good ones too. Thank you for sharing your idea.

    ReplyDelete
    Replies
    1. Thank you! I was impressed with the faux succulent quality as well. Thanks so much for visiting. 🌱

      Delete
  8. Wow, thanks for the inspiration as I have a few of these trays from Dollar Tree already. #Alittlebitofeverything

    ReplyDelete
  9. How pretty, featuring you at Wednesdays in the Studio!

    ReplyDelete
  10. Would it surprise you to know I have both the tray and the wallpaper in my stash?! Love this and featuring it when my party opens!

    ReplyDelete
    Replies
    1. Carol, that's wonderful! Honestly, I figured you would have those items. Seems like we both have that same love for DT, haha. 💖 Thank you so much for visiting and for the feature. I appreciate it so much. 😊

      Delete

Post a Comment

Welcome! I love hearing your thoughts and seeing what you’ve been up to. Please leave a comment or ask a question below—I do my best to respond to everyone! To keep the blog comments safe and inspiring, spam will be removed. Thank you for being a part of this blogging space!

Popular posts from this blog

The Crazy Little Lovebirds Link Party 153

  Welcome to The Crazy Little Love Birds Link Party #153! I’m so happy you’re here! This is a warm and friendly gathering where you can share your amazing ideas—whether it's tasty recipes, fun family activities, creative crafts, home projects, or any other joyful inspirations. If you love finding new DIY ideas and learning from other bloggers, you’re in the perfect spot! Happy Friday! How was your week? I hope you all had a nice week. I've decided to completely dig up my flowerbeds and start each of them over next growing season. The heat did a number on my flowers this growing season. Our grass also did not do well this year. So now we are left with so many decisions about what to do next.  I'm excited to share the wonderful featured posts with everyone. As always, thank you to each of you who participates in the party each week. Congratulations  to our featured bloggers Agua Fresca Punch – Seasonal & Holiday Recipe Exchange A refreshing watermelon agua fresca that...

The Crazy Little Lovebirds Link Party 152

  Welcome to The Crazy Little Love Birds Link Party #152! I’m so happy you’re here! This is a warm and friendly gathering where you can share your amazing ideas—whether it's tasty recipes, fun family activities, creative crafts, home projects, or any other joyful inspirations. If you love finding new DIY ideas and learning from other bloggers, you’re in the perfect spot! Happy Friday! I hope that you all have a wonderful weekend. Congratulations  to our featured bloggers Rabbit in Carrot – Craft Attic Resources A sweet little felt rabbit tucked inside a carrot. Quick, cute, and perfect for spring or Easter crafting. Honey & Wheat Germ Bread – Scratch Made Food A wholesome whole‑grain loaf with honey and wheat germ. Easy, hearty, and great for everyday baking. Marbled Paper with Shaving Cream – Artful Analog A fun, colorful marbling project using shaving cream. Fast, kid‑friendly, and perfect for handmade papers. Splish Splash Summer Spotlight – Our Grand Lives A r...

Crafting Personalized Thanksgiving Place Cards with Air Dry Clay and Pie Stamps

Hey there! I am thrilled to introduce you to an exciting Thanksgiving craft that will add a wonderful touch to your holiday table. This project involves using air-dry clay and pie stamps to create personalized and unique place cards. Do not worry, I will provide you with a step-by-step guide throughout the entire process. Additionally, we will use paint, twine, and a brown paper bag to give our place cards a festive feel.  Materials needed Pie stamps which can be obtained from Joann's Acrylic paint  Air-dry clay A hole puncher Paintbrush Wooden beads Twine A brown paper bag (or any other material you prefer to use as a template), one pencil, and scissors. Working with air clay Begin by flattening the air-dry clay, using either your hands or a roller. Once the clay has been flattened, use the pie stamps to press your desired design into the clay. Following the stamping process, remove any excess clay around the outer edge of the stamp and use the stamp press to release your cla...

The Crazy Little Lovebirds Link Party 137

Welcome to The Crazy Little Love Birds Link Party #137! I’m so happy you’re here! This is a warm and friendly gathering where you can share your amazing ideas—whether it's tasty recipes, fun family activities, creative crafts, home projects, or any other joyful inspirations. If you love finding new DIY ideas and learning from other bloggers, you’re in the perfect spot! Congratulations to our featured bloggers  An Artful Mom — Fountain‑Pen Friendly Composition Notebook Pam shares a simple little joy — a basic composition notebook that turns out to be surprisingly lovely for fountain‑pen journaling. She gives it a quick, pretty makeover and tests different inks so you know exactly what to expect. It’s such a calm, encouraging read for anyone who loves paper, pens, and those quiet, creative moments. Lisa Howeler — Saturday Afternoon Chat Lisa invites us into one of her cozy weekend chats, where spring is trying its best to arrive, and their poor cat is still recovering from a skunk in...

Creating faux stained glass using plastic plates

Learn how to create stunning faux stained glass using plastic plates with this easy and eco-friendly DIY project. Discover creative ways to reuse plastic plates and bring a beautiful stained glass effect to your home decor. Hi everyone! I'm excited to share a quick craft with all of you. I am reusing a plastic plate, giving it a stained glass look. I will run you through two options. I'm joining the Sustainable challenge with a group of other bloggers, sharing eco-friendly and sustainable craft ideas. This is my first time participating. I am thrilled to share this upcycled craft with you all. The theme this month is sunshine. I chose to go with this project since I had extra clear plastic plates stored away since my oldest turned 12 this past April. I purchased a pack around her birthday and stored away the plastic plates that weren't used.  Creating faux stained glass using plastic plates Materials One plastic plate One sheet of paper for creating a template Pencil Stenci...

All content copyright 2010-2026

I kindly request that my photos and words not be taken or used without my permission. If you have any inquiries, please do not hesitate to contact me. Additionally, for more information regarding this blog, please refer to the disclosure policy tab located above. Thank you.