
DIY Upcycled Sesame Oil Glass Bottle Design

Hello everyone! I hope all is well with you. After finishing my sesame oil, I decided to reuse the glass jar it came in as it had nice details on it. This craft only cost me around $2 for a floral sticker pack. I already had all the other materials on hand.

Painted glass sesame oil bottle with craft gems

Faux foliage, paint, and glass bottle

Materials needed

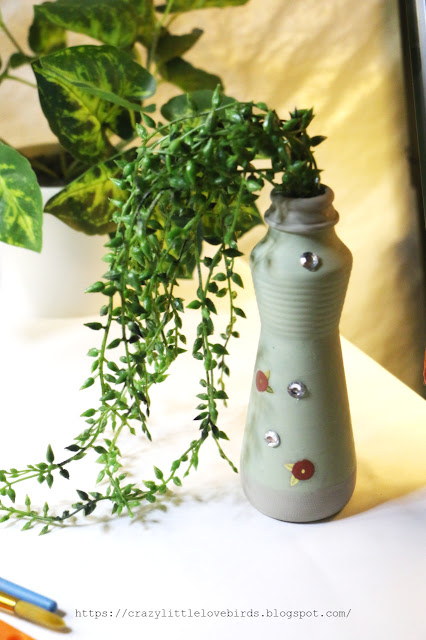
  • Chalk Paint I'm using the colors celery and mineral
  • Craft gems
  • Paintbrush
  • One faux vine
  • Hot glue
  • A few floral stickers
Applying paint to the glass jar
Painted glass bottle

To begin, get an empty jar and wash it. I recommend using a dishwasher, especially if there's any scent left inside. Wait for it to dry before painting it. Use a paintbrush to apply a few coats of your main color; in this case, it's celery. Remember to apply around three coats to make it look nice and even.

Painted glass bottle

Paintbrush and painted glass bottle

Paintbrush and painted glass bottle

Once you have added a few coats of paint, allow it to completely dry.  Once dry, take your second paint, and add it around the bottom, and top sections of your bottle.
Adding craft gems to the glass bottle
Hot glue, and glass bottle with gems on table

Craft gems on painted glass bottle

Next, add a little hot glue on the back of your gems, and add them to your glass bottle.
Adding floral stickers
Floral stickers

After you have applied your gems, take your floral stickers and add them to your glass bottle. 
Completed painted glass bottle design with gems


Now that you have gathered all the necessary materials, it's time to add to your vine. If you want your vine to hang over your glass bottle, then there's no need to make any cuts to the stem. You can leave it as it is.

That's it! Your bottle is now complete and ready for display. I personally added my bottle to a floating shelf and I just love the way it looks. This craft is simple to create, and I hope you enjoy it.

Remember to check out my other DIY projects under the craft tab on my blog. Thank you so much for stopping by!

Pin/Share/Save


Comments

  1. Looks great! Love that color green. Thanks so much for linking up at A Themed Linkup 106 for Crafting with Bottles and Jars. Pinned.

    ReplyDelete
  2. CONGRATS Stephanie! Your post is FEATURED at A Themed Linkup 107 for Photos and Videos from the previous linkup for Crafting with Bottles and Jars.

    ReplyDelete
  3. It is lovely to find a new use for a prettily shaped bottle, this turned out beautifully.

    ReplyDelete
    Replies
    1. Thank you! Yes, I was happy to find a great way to reuse this glass jar.

      Delete

Post a Comment

Thank you for taking the time to leave a comment. Your feedback is greatly appreciated. I strive to respond to every comment and welcome any questions you may have. ***However, spam or comments that do not offer valuable feedback will be deleted.***

Popular posts from this blog

How to Transform Glass Garlic Jars into Multi-Functional Pin Cushions with Storage

Transform your glass garlic jars into multi-functional pin cushions with storage by following this creative and practical DIY tutorial. You will learn how to repurpose these jars into stylish and useful organization tools for sewing or crafting supplies. Hello everyone! A while ago, I purchased some pin cushions from my local Dollar Tree and stored them away, completely forgetting about them. Today, while cleaning, I came across them and decided to use them with my glass garlic jars. I thought the glass garlic jars would be wonderful for creating multi-functional pin cushion storage jars. Materials Three pin cushions Glass jars (I'm reusing my garlic jars) Mod Podge Paintbrush Acrylic paint Sewing and craft accessories to add to each glass jar Adding Mod Podge and Paint to jars To give my jars a stained glass appearance, I combined my Mod Podge and paint. I used a paintbrush to add a thin layer of the mixture and then used a drying tool to dry the paint. I repeated this process for...

DIY Holiday Decor: How to Make a Wintery Faux Foliage Bowl

Create a stunning DIY holiday decor with this step-by-step guide on making a wintery foliage bowl. Learn how to craft a beautiful centerpiece that brings the essence of winter into your home. Hi there, I hope everything is going well for you. Today, I want to share with you a simple upcycling holiday craft idea. The three main materials you will need for this craft are a bowl, a cork, and some wintery foliage. I used a cork lid from a salt bottle that I had kept, and a pink bowl I had bought a few months ago for just 50 cents. You can easily put this project together in less than 15 minutes, and it looks absolutely beautiful once it's displayed. So, if you're ready, let's start creating! Here's what you'll need One bowl (any size works, I am using a smaller bowl for my design) Wintery faux foliage Cork (I am reusing a cork from a salt bottle) Hot glue Floral cutters (to cut foliage to size) Pinecones (optional) Attaching the cork to the bowl To begin, turn your bowl...

Delicious Fall Recipe: Roasting Pumpkin Seeds

🎃 Delicious Fall Recipe: Roasting Pumpkin Seeds If you're anything like me, your favorite season is Autumn, and I get excited when making fall snacks and new recipes. My family loves it when I roast pumpkin seeds for a quick and easy snack. Roasting pumpkin seeds is one of those simple pleasures that turns seasonal scraps into a crunchy, crave-worthy snack. Here's my step-by-step method—with measurements—to help you make the perfect batch. Step 1: Scoop Out the Seeds Begin by carefully using a sharp kitchen knife to slice off the top portion of your pumpkin, making your cut around the stem to create a wide enough opening for easy access to the interior.  Once the top is removed, reach inside the pumpkin to extract the seeds. You can do this with your bare hands, but I prefer wearing a latex glove to keep things clean and comfortable—though this step is entirely optional.  Alternatively, you can use tools like an ice cream scooper, a sturdy fork, or a specialized pumpkin seed...

All content copyright 2010-2025

I kindly request that my photos and words not be taken or used without my permission. If you have any inquiries, please do not hesitate to contact me. Additionally, for more information regarding this blog, please refer to the disclosure policy tab located above. Thank you.