
Learn how to create stunning faux stained glass using plastic plates with this easy and eco-friendly DIY project. Discover creative ways to reuse plastic plates and bring a beautiful stained glass effect to your home decor.
Hi everyone! I'm excited to share a quick craft with all of you. I am reusing a plastic plate, giving it a stained glass look. I will run you through two options.
I'm joining the Sustainable challenge with a group of other bloggers, sharing eco-friendly and sustainable craft ideas. This is my first time participating. I am thrilled to share this upcycled craft with you all. The theme this month is sunshine.
I chose to go with this project since I had extra clear plastic plates stored away since my oldest turned 12 this past April. I purchased a pack around her birthday and stored away the plastic plates that weren't used.

Creating faux stained glass using plastic plates
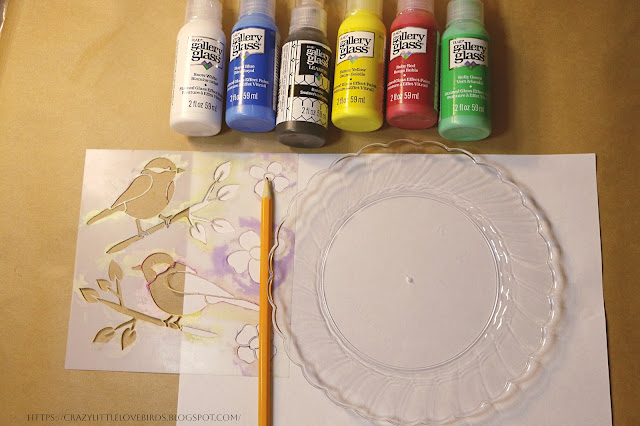
Materials
One plastic plate
One sheet of paper for creating a template
Pencil
Stencil template, or a picture of the design you would like to use
Acrylic paint or gallery glass
I will show you two ways to create this stained glass look using gallery glass paint, and the second option is using a permanent marker and acrylic paint. Using the gallery glass paint will give it more of the stained glass look, but the marker option with acrylic paint is a great option if you don't have the glass paint and still would like to create one.
This collage shows the marker and acrylic paint option
.png)
Creating your stained glass design

Begin by taking your stencil template or picture and tracing it onto a sheet of paper. This helps when applying your gallery glass paint.
If you want to use a permanent marker option, take your stencil, add it to the center of your plate, and trace it out using a thinner marker.

Next, take your plastic plate and place it over your traced design. The gallery glass bottles have a pointy tip, which makes tracing lines easy.
Begin to trace out your design using the color of your choice. I traced my bird and branch using black.
With the permanent marker option, you will take a thicker marker and trace over your design. The reason to use a thinner marker when starting will depend on the stencil used. The thicker marker would make it a little difficult to trace the design if it is smaller.


Take your gallery glass paint colors and begin to fill in the areas of your design. I decided to paint my bird using a sunny yellow color.
If you are using acrylic paint, be sure to thin your paint out by using some water. This will create a thinner layer when applied.


Continue to create your design.


This took me a few days since it is recommended to allow the gallery glass paint to dry for at least 24 hours.

I finished my design by adding blue and white to the center of my design.
Once my white paint dried, it appeared to be clear and more of a glazed look.

The last step is to add some twine or string to your plate. Since my plate was not thick, I used a hole puncher. You could also use mounting tape squares or clear tape to attach your string.
I punched out a hole on top, took twine, and pulled it through. After, I tied it off in a knot and that was it.

.png)
I found that using the gallery glass paint really helped with bringing out the stained glass look. The marker and acrylic paint are a great option for those who may already have those materials on hand. It keeps things a little more simple.
Both are great options! All that is left is to hang your beautiful design and let the sunshine bring out the many colors.
Thank you for stopping by and creating this craft with me!
Pin Share Save


Terri-Our Good Life
Gail-Purple Hues and Me
Allyson-Southern Sunflowers
Christine- Christine's Crafts
Niki-Life As A Leo Wife
This is such a lovely idea, both ways look great. I love the transparency of the glass paints but the vibrancy of the acrylic paint is great, especially with the colours you chose.
ReplyDeleteI would have been so nervous to punch a hole after painting in case I cracked the plate and messed up all my hard work, you are very brave!
Julie, thank you. Yes, I love how they both turned out as well. I was a bit nervous when punching out the hole. I practiced on an extra plate right before. I really enjoyed this project and participating in this challenge.
DeleteHow pretty!!
ReplyDeleteDee, thank you so much! 😊
DeleteThat is beautiful!
ReplyDeleteJoanne, thank you so much.
DeleteHey, I'm back again to say thanks so much for linking up at #IMadeItMondayLinkParty 18. Pinned.
ReplyDelete🥰 Thanks Dee!
DeleteI agree with everything Julie said, both ways look awesome! And I love the look of each one! You certainly provided us with options on which one we prefer most! Both would be perfect for decorating near a window or outdoors! And I love that!
ReplyDeleteGail, thank you. Yes, I wanted to make sure I provided both options. Happy to hear you enjoyed it. Thank you so much for stopping by.
DeleteBoth faux stained glass versions turn out looking great! I was recently looking for the black faux lead paint and couldn't find it. I'm happy to see how well it works on your projects.
ReplyDeleteAllyson, thank you. Yes, I went to Michaels to look for the paint. They had a great selection. You can purchase in a set or individual bottles.
DeleteI love this idea Stephanie, especially since you were able to use a plastic plate for it. I can't decide which paint I like better, I think they both look awesome!
ReplyDeleteCara, thank you. Yes I like how they both turned out.
DeleteI enjoyed reading about these stained glass plates. I was inspired to see how I could use them for Christmas. I think a simple nativity scene would be adorable here.
ReplyDeleteThat would be so pretty to create one around Christmas time. I love that idea. I'm so happy to hear it helped inspired you. ✨️
DeleteCONGRATS Stephanie! This post and your 'quick artwork with rub on transfer' are both FEATURED at #IMadeItMondayLinkParty 19.
ReplyDeleteDee, thank you so much. I'll be sure to Stop by. 😊
DeleteWhat a beautiful idea! I think my favorite is the acrylic paint. Thank you for linking up with Tell It To Me Tuesday, I hope to see you again this week!
ReplyDeleteLyndsey, thank you. Yes, I love how it turned out as well.
DeleteWow! Steph, I love both ways. Great job, well done.
ReplyDeleteThanks so much for sharing this with Sweet Tea & Friends this month.
Paula, thank you. You're always so kind.
DeleteThis is so awesome, so cute and creative. I am happy to feature your Faux Stained Glass at Love Your Creativity.
ReplyDeleteLinda, thank you! Happy to hear that you enjoyed it. 😊
DeleteIt's so pretty! I like the blue one, it does really look like stained glass work!
ReplyDeleteAw, thank you! I was really surprised at how well it turned out. This was a fun project for sure. Thanks so much for stopping by.
DeleteThis is so pretty! I'm definitely going to try this with my kids. We made a similar one before using dollar store picture frames. We used black glue tinted with black paint on the glass, and then when it dried we used acrylic paint to color them in. It was fun and easy, but this looks like something we would have a blast with.
ReplyDeleteHi Megan, that sounds like so much fun. I've seen the glue technique and thought it looked fun. Yes, give this a try and see how you like it. I appreciate you visiting. Thank you. 🙂
DeleteWhat a great idea! The glass paint really makes it look like stained glass!
ReplyDeleteThank you! I'm glad you enjoyed this idea; yes, it's a great way to create your own stained-glass look. Thank you for visiting! 😊
DeleteI think I said "Wow!" six times while reading this post and looking at your pictures. This is AMAZING, Stephanie! Pinning to save and share. :) Visiting from the Wednesdays in the Studio linkup.
ReplyDeleteJennifer, you are always so supportive and kind, and I honestly appreciate that. Thank you so much! 😊 I'm so happy you enjoyed it.
DeleteThis is impressive! Featuring you at Wednesdays in the Studio!
ReplyDeleteThank you 😊
Delete