
Crazy Little Love Birds Link Party #17

   Welcome to The Crazy Little Love Birds Link Party #17! At The Crazy Little Love Birds party, we share recipes, family-friendly posts, crafts, home decor, and anything that inspires you! 

Hello everyone! I am thrilled that you have decided to join us here. I want to say thank you to each of you who have taken the time to visit my link party. Your presence means a lot to me. I hope you all have a wonderful weekend.

At the previous party many of you inspired me to bake, so this weekend that's what I'll be doing. It's forecasted to snow, so I'll be indoors baking and creating! We'll also be taking out some board games and listening to some Christmas music. 

What are your plans for this weekend? I would love to hear about them, so feel free to share them with me in the comments section. I read through all your comments, and I appreciate them all. Now, let's move on to the fabulous features of party #16.

But first...

Thank you to everyone who joined this link party. I appreciate all of you. This party is possible because of you! I can't wait to see what you all have to share today. Before we share, let's take a look at the wonderful features from last week's party.

Congratulations to our featured bloggers 

Party#16 Featured posts


Two Chicks and a Mom are sharing an adorable Felt Santa Filled with Goodies. It's so cute!

Jennifer from Easy Pantry Recipes is sharing her recipe for Peachy Oat Bread (Jar Mix). The recipe sounds delicious and the presentation in the jar is adorable.

Treat N' Trick is sharing a wonderful recipe for Light Fruit Cake.


Be sure if you are pinning any of the posts mentioned above that you pin from the original post from the blogger's blog! 

All featured posts will be pinned on Crazylittlelovebirds Featured Pinterest Board

If you would like you can use the featured party button! Just right-click and save the image.


Now on to party #17

Don't forget to have a great time and make connections with your fellow bloggers.

Joining the Crazylittlelovebirds link party grants me permission to showcase your links and images on my social media accounts, complete with a mention of your blog name and a link back to your site.


You are invited to the Inlinkz link party!

Click here to enter

Comments

  1. No plans for us this weekend. My husband came down with covid Monday night, and I tested positive yesterday. :(

    ReplyDelete
    Replies
    1. Lisa, I'm sorry to hear that. I hope you and your husband get all the rest you need this weekend. Praying for the two of you. Get well soon.
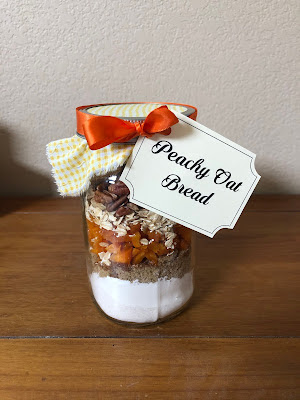
      Delete
  2. Thanks so much for featuring my Peachy Oat Bread Jar Mix! It really is a tasty one (and such a pretty gift presentation, too), and I hope your readers enjoy it. :) I am sharing links 4, 5, and 6 this time. Thank you for hosting this fabulous party. Have a great weekend and I'll see you next week! I'll be getting ready for Christmas this weekend.

    ReplyDelete
    Replies
    1. Jennifer, yes we loved your peachy oat bread recipe post. I'll be by to check out all of your posts. Thank you for joining us here. 😊

      Delete
  3. Thanks for sharing our Felt Santa pattern! My original Santa is 30 years old and sitting on a kitchen shelf this December :) As for this weekend, I will be baking, too. It's that time of the year. Have a fun weekend, Stephanie!

    ReplyDelete
    Replies
    1. We just loved your Felt Santa pattern. It's adorable. Aw, that is wonderful about your original Santa. I'm sure he's a cutie. Have a wonderful weekend baking.

      Delete
  4. Happy Friday. Thanks for hosting. I'm links 11-13.

    ReplyDelete
    Replies
    1. You're very welcome. Happy Friday! --And thank you for joining us. :)

      Delete
  5. Thanks you for hosting Stephanie, I know how much work goes into the linky party every week! Have a lovely weekend
    Creatively, Beth

    ReplyDelete
    Replies
    1. Beth, aw thank you so much. I hope that you have a wonderful weekend as well. Thank you for joining us here.

      Delete
  6. Thanks Stephanie for hosting and all you do.
    I visited you via Crazylittlelovebirds Link Party #17
    I linked up this week with = 18+19
    I hope you will join us M-S SeniorSalonPitStop. You will find it under BLOGGING.

    ReplyDelete
    Replies
    1. You're very welcome. Happy to have you join us again.

      Delete
  7. Thank you so much Stephanie for featuring my Christmas Countdown Printable at this week's party. I’m grateful, thrilled, and honored. Wishing you a beautiful weekend and a happy holiday season!
    Maria @ Krafty Planner

    ReplyDelete
  8. We're in a severe heat wave here on the east coast of Australia at the moment, so this weekend it will be staying inside in the cool 😊
    Blessings, Jennifer

    ReplyDelete
    Replies
    1. Jennifer, stay cool. Hoping that the heat wave does not last very long.

      Delete
  9. Oh, I don't like snow but board games and Christmas music sounds fun! Thanks so much for linking up at the #UnlimitedLinkParty 141. Pinned.

    ReplyDelete
    Replies
    1. Dee, same. I'm not a big fan when it comes to snow. It's pretty to watch it fall. Thank you for visiting and sharing. I appreciate it.

      Delete
  10. Thanks, as always, for hosting this fun link up, Stephanie! Sounds like you have a fun weekend planned! Happy baking!

    ReplyDelete
    Replies
    1. Laura, thank you! I love it when you join us here.

      Delete
  11. Always a pleasure to stop by and visit. thanks again for hosting this party each week. wishing you a very happy week ahead. My entries are #36 - 38.
    Lynne

    ReplyDelete
    Replies
    1. Lynne, I'm so happy you joined us at the party. I'll be by to check out your wonderful posts.

      Delete
  12. Stephanie, thanks for hosting. As for our weekend, we had a single young man over last night and we watching the 1959 movie Ben Hur. He had never seen it. It's one of my husband's and my all-time favorite movies. It is one of the most powerful stories about Christ and the difference He can make in a life. If you've never seen it, watch it with your family. You'll be surprised at how the story still resonates today.

    ReplyDelete
    Replies
    1. Donna. You're very welcome. That was nice of you to have him over for the night. I haven't seen the 1959 Ben Hur, but my husband was telling me about it. He has seen it. It sounds like a very powerful movie. It's always so nice having you join us here. ☺️

      Delete
  13. I'm loosing it Steph, I thought I linked up earlier, I came over to visit and didn't see my link and thought how could I have missed this. So here I am linking up at #42&43.
    Thanks bunches for hosting this amazing group each week. I so appreciate you.

    ReplyDelete
    Replies
    1. Paula, no worries! I forget at times which link parties I have entered in. Happy to have you join us. :)

      Delete
  14. Thanks for hosting and I am at #44. Hope that you have a wonderful week.

    ReplyDelete
    Replies
    1. Happy to have you join us! I'll be by to check out your post. :) Have a wonderful week.

      Delete
  15. Thanks bunches Steph, for sharing Crazy Little Love Birds #17 with Sweet Tea & Friends this month sweet friend.

    ReplyDelete

Post a Comment

Welcome! I love hearing your thoughts and seeing what you’ve been up to. Please leave a comment or ask a question below—I do my best to respond to everyone! To keep the blog comments safe and inspiring, spam will be removed. Thank you for being a part of this blogging space!

Popular posts from this blog

Easy DIY Springtime Wooden Beehive Decoration

Hey! Let's create a cute and simple Springtime beehive wooden plaque decoration using just a few materials. Easy DIY Springtime Wooden Beehive Decoration Materials One wooden beehive decoration Wooden oval piece Scrap wood or a wooden rectangular section Mod podge-optional Acrylic paint Faux Floral Hot glue Paintbrush Wooden letters Adding paint to the wooden decoration Start by applying your paint to your wooden beehive decoration. I used yellow and black paint for this. After you allow your paint to dry, you can add a layer of Mod Podge over your beehive decoration. I decided to use my Mod Podge that has glitter in it. Adding paint to wooden letters Next, take your black paint and apply it to your wooden letters. I decided to paint the letters black, and I used a smaller paintbrush and added yellow dots to my wooden letters. Adding paint to the oval wood and rectangle wood section After, apply your black paint to your rectangular wood and oval wood sections. Attaching your wood s...

The Crazy Little Lovebirds Link Party 138

Welcome to The Crazy Little Love Birds Link Party #138! I’m so happy you’re here! This is a warm and friendly gathering where you can share your amazing ideas—whether it's tasty recipes, fun family activities, creative crafts, home projects, or any other joyful inspirations. If you love finding new DIY ideas and learning from other bloggers, you’re in the perfect spot! Happy May! Wow, this year is flying by so quickly. I hope you are all doing well. This week has been busy for us, but I'm looking forward to the weekend and catching up on your latest posts. As always, thank you for joining us here at the party! If you missed the last party and would like to revisit some of the posts, you can do so by clicking here:  The Crazy Little Lovebirds Link Party 137 Congratulations to our featured bloggers Easy Pantry Recipes — Pantry Pizza Soup A cozy, simple soup made from pantry staples, with all the comfort of pizza in a bowl. Easy, warm, and perfect for a no‑stress dinner. Musings ...

Eco-Friendly Craft: Create a beautiful Winter Tree Scenery using Cardboard

  Learn how to create a stunning winter tree scenery using eco-friendly materials like cardboard in this DIY craft tutorial. Embrace your creativity and make a beautiful and sustainable decoration for the winter season. I am excited to be participating in the Sustainable Challenge along with a group of fellow bloggers. We will be sharing eco-friendly and sustainable craft ideas. I cannot wait to share my upcycled craft with you all. The theme for this month is Christmas.  For my project, I chose to repurpose some old cardboard. I believe that using household items in crafting is a great choice. Today, I am excited to share with you a beautiful Winter Tree scenery that I created using cardboard and a few other materials. If you're ready, I would love for you to join me and recreate it. Video tutorial Materials needed for your cardboard craft project: Cardboard Acrylic paint Tissue paper Holiday stencils Paintbrush Scissors Mod Podge Faux snow Paper tree template  Any decor...

Stay-at-Home Summer Fun: Activities for a Memorable Season

Today, I'm excited to share some creative and enjoyable activities that you can try in the comfort of your own home. 1. Backyard Camping Adventure:    Set up a tent in your backyard or indoors if you don’t have outdoor space.    Gather cozy blankets, pillows, and sleeping bags.    Roast marshmallows over a portable fire pit or stovetop.    Share stories under the starry sky. 2. DIY Water Balloon event and water stations:    Fill up colorful water balloons and have an epic water balloon event with family or friends.  Set up “bases” and create teams for added excitement. For those who do not want to throw balloons at each other, they can toss the balloons onto the bases to create a splash!   And don't forget to set out a sprinkler or two for furry friends too! Creating water stations is fun and refreshing, utilizing splash pads and sprinklers to keep everyone cool during the summer.  Don’t forget to capture the laughter...

Fun and Easy Cardboard Place Cards for Your Thanksgiving Table

 Are you l ooking for a quick and easy Thanksgiving DIY project? Learning to create upcycled cardboard place cards for your Thanksgiving table using simple materials. Great for a festive touch! Hello everyone! I'm excited to share this easy upcycling project with you. We'll be making place cards by repurposing cardboard. I had some cardboard lying around and wanted to find a creative use.  Quick Video tutorial Materials: - Cardboard sections: 3x8 inches (cut into strips) - Faux flowers - Paint marker - Floral cutters - Hot glue - Scissors or paper cutter (Used for cutting the cardboard into strips) Start by cutting the cardboard into strips. I used sections that are 3x8 inches in size. Next, fold each cardboard strip in half and flatten them out by pressing the folded sections together. Then, use a paint marker to write the names and add any designs you want on the cards. After that, use floral cutters to cut faux flowers that you want to use on the place cards. Attach the flo...

All content copyright 2010-2025

I kindly request that my photos and words not be taken or used without my permission. If you have any inquiries, please do not hesitate to contact me. Additionally, for more information regarding this blog, please refer to the disclosure policy tab located above. Thank you.