DIY Dollar Tree Mirror Upgrade

Transform your plain Dollar Tree mirror into a stylish and unique home decor with this easy DIY mirror upgrade. You can discover budget-friendly ways to give your mirror a fresh look and add a touch of elegance to your space. This DIY project is quick and easy; you only need a few materials to give your mirror a new look. So, if you're ready, let's create your own mirror upgrade!

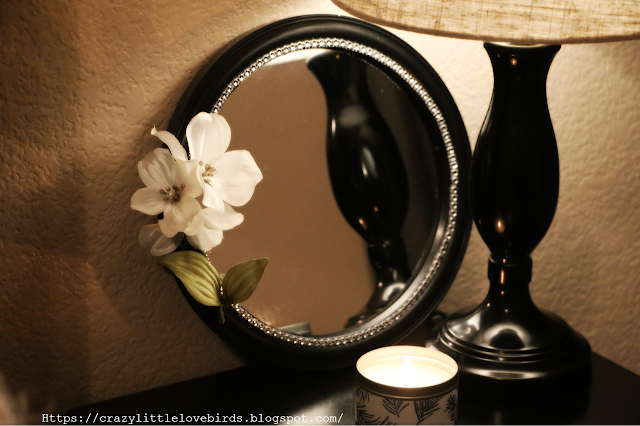
Round mirror with gems and faux white floral attached to the mirror


For this project, you will need

Hot glue, gems, mirror and faux floral

One pack of diamond gem wrap

One mirror

Floral

Hot glue

Wire cutters/ Scissors

You can purchase all of these materials from your local Dollar Tree, or any other discount store you might have in your area. I purchased the mirror and gem wrap from my local Dollar Tree.

 My floral was purchased at my local Michaels craft store.  My total for this project was around five dollars.

three gem strips near round black mirror

First, take your gem wrap, and cut around four long strips of your wrap. Once you have done this step, take your strips and remove the paper backing when applying them to your mirror. 

When removing the paper backing, you should still have a sticky surface.

Round black mirror with gems attached to it.

Take your gem wrap, and gently press it down on the outer surface around the mirror, just above the glass surface. You will repeat this step for each strip. 

faux floral near round mirror

Next, take your floral pieces and begin the cut the stems. You will want to leave some of the stem, as well as some of the leaves. 

white faux flowers attached to round black mirror

After cutting your floral, take your hot glue, and apply a small amount on the back of each of your floral pieces. 

Gently press each floral piece onto your mirror. Get creative, and place them where you would like. 

faux white flowers displayed on round black mirror

Black round mirror with faux white flowers and gems displayed near a lamp on a table

You're all done! Now all that is left is to find a spot to display your beautiful mirror upgrade. Wasn't that simple? And I just love the way it turned out. 

Let me know in the comment below if you decide to create your very own mirror design. 

You might also enjoy

DIY Dollar Tree Wood Crate Vase Holder


Pin/Save/Share
Pinterest pin showing round mirror with faux floral and gems


Comments

  1. Oh, so elegant looking. Thanks so much for linking up at #IMadeItMondayLinkParty 16. Pinned.

    ReplyDelete
    Replies
    1. Dee, thank you. Love that it is a Dollar Tree mirror. Very inexpensive, and a great way to decorate.

      Delete
  2. CONGRATS, Stephanie! Your post is FEATURED at #IMadeItMondayLinkParty 17.

    ReplyDelete
  3. This is gorgeous! Whether for a gothic Halloween, everyday decor or both! Featuring when my party opens.

    ReplyDelete
    Replies
    1. Carol, aw thank you! I appreciate the feature. :)

      Delete
  4. How pretty! Featuring you at Wednesdays in the Studio!

    ReplyDelete

Post a Comment

Welcome! I love hearing your thoughts and seeing what you’ve been up to. Please leave a comment or ask a question below—I do my best to respond to everyone! To keep the blog comments safe and inspiring, spam will be removed. Thank you for being a part of this blogging space!

Popular posts from this blog

Easy Floral Decoupage Idea for Faux Pumpkin Display

 Hi everyone! I'm excited to share a simple and easy floral pumpkin design you can create quickly. Today, we will make a faux floral pumpkin display using decoupage and a few additional designs. I'm reusing a foam pumpkin that I bought at Dollar Tree. If you’re ready, let’s begin creating an easy floral decoupage faux pumpkin display! Quick video tutorial **Materials needed:** - Acrylic paint - Paintbrush - Floral napkin - Faux pearls - Faux flowers - Craft knife - Scissors - Mod Podge Carefully remove the top of your pumpkin. I used my craft knife to go around the top section, creating a hole at the top. Using a paintbrush, apply acrylic paint to the pumpkin. I chose to paint mine black. Next, use scissors to cut out a few flowers from your napkin. Make sure to remove the second layer of the napkin before cutting out the designs.   Once you have your floral designs cut out, use a paintbrush to apply Mod Podge to the pumpkin. While the Mod Podge is wet, add the floral napkin c...

The Crazy Little Lovebirds Link Party 156

Welcome to The Crazy Little Love Birds Link Party #156! I'm so happy you're here! This gathering is all about sharing what brings us joy.  Bring your delicious recipes, fun family moments, cozy crafts, and home projects—basically, everything wonderful you've been working on. Happy Friday! How was your week? I hope you’re doing well.  This week, we finally went to court about the damage to our fence. Honestly, no one likes to go to court, and we would have preferred to resolve this issue privately with the individual involved. He didn't cooperate, which ultimately led us to take him to court. We hope to finally move on from this situation. I can't wait to share the lovely featured posts with you all.  **Update** Looks like blogger has fixed the comment section. Yay! Blogger is having some issues with commenting. It shows "publishing..." when the button is hit and stays there for some time. As always, thank you all for joining! ⭐Congratulations to our featur...

The Crazy Little Lovebirds Link Party 155

Welcome to The Crazy Little Love Birds Link Party #155! I'm so happy you're here! This gathering is all about sharing what brings us joy.  Bring your delicious recipes, fun family moments, cozy crafts, and home projects—basically, everything wonderful you've been working on. Hi, blogging friends. I hope you are all well. As always, thank you for joining me here at the party. I can't wait to see what you all share. Here's a sweet picture I took this week of one of the neighborhood squirrels that sits on the fence and watches while relaxing. I captured this photo one morning while bringing the trash bin in. Congratulations to our featured bloggers To visit the featured bloggers' posts, just click on their images, and you will be directed to each of their blogs. Rebuilding A Stone Front Stoop – Exquisitely Unremarkable Kim tackled her front stoop and oh my goodness… it turned out so pretty. She took a worn little entry and gave it a fresh, welcoming makeover. Suc...

DIY Floral Wooden Jack‑O’‑Lanterns (Easy Fall Decor)

I’ve been having so much fun creating fall projects this year. These floral wooden jack‑o’‑lanterns  started as simple wooden pumpkins, but with a few pretty transfers and some soft paint colors, they turned into the sweetest little fall accents. I love how the florals give them a cozy, cottage‑style feel while still keeping that classic jack‑o’‑lantern charm. They’re quick to make, easy to customize, and such a cute way to add a warm autumn touch to your home. Watch the video tutorial Materials Wooden pumpkin cutouts Floral transfers Acrylic paint (your chosen colors) Gold acrylic paint Green acrylic paint Mini dowels Hot glue gun + glue sticks Small wooden stands Brown acrylic paint Paintbrushes   Add the floral transfers I started by placing my floral transfers onto each wooden pumpkin, just arranging them until they felt right. Once they were where I wanted them, I used a little rubbing tool to press them down and transfer the design onto the wood. Take your time with this...

The Crazy Little Lovebirds Link Party 153

  Welcome to The Crazy Little Love Birds Link Party #153! I’m so happy you’re here! This is a warm and friendly gathering where you can share your amazing ideas—whether it's tasty recipes, fun family activities, creative crafts, home projects, or any other joyful inspirations. If you love finding new DIY ideas and learning from other bloggers, you’re in the perfect spot! Happy Friday! How was your week? I hope you all had a nice week. I've decided to completely dig up my flowerbeds and start each of them over next growing season. The heat did a number on my flowers this growing season. Our grass also did not do well this year. So now we are left with so many decisions about what to do next.  I'm excited to share the wonderful featured posts with everyone. As always, thank you to each of you who participates in the party each week. Congratulations  to our featured bloggers Agua Fresca Punch – Seasonal & Holiday Recipe Exchange A refreshing watermelon agua fresca that...

All content copyright 2010-2026

I kindly request that my photos and words not be taken or used without my permission. If you have any inquiries, please do not hesitate to contact me. Additionally, for more information regarding this blog, please refer to the disclosure policy tab located above. Thank you.