
DIY Dollar Tree Valentine's Clay Pot Floral Design


 Hi everyone! 

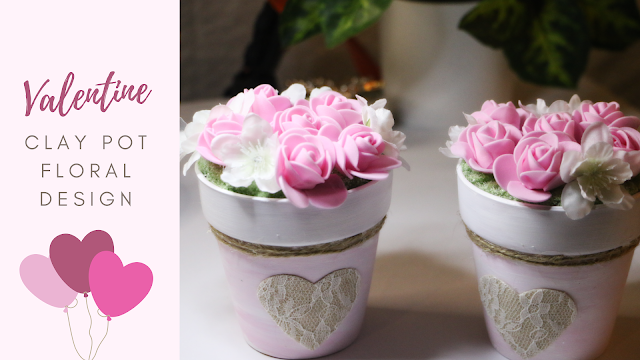
I took a quick trip to my local Dollar Tree, and I was so excited to find a few items to create this really cute craft. I created two Valentine clay pot floral pieces. This DIY project is super easy and does not take a lot of time.  And most of my materials were purchased at my local Dollar tree.  The rest of the materials I had on hand.  I purchased the pots, foam roses, and floral foam. This craft was around four dollars. 


Materials needed

- One pack of the clay pots

It comes with two

Paint

I used white, and pink

One pack of pink foam roses

White faux flower- Optional

Twine

Hot glue

Floral foam piece

A pack of lace hearts or something similar 


First, take your clay pots and apply a layer of white paint around, and on the top of your clay pots. 


Allow the first layer to dry, and after applying a mixture of the white and pink paint for your second layer. Set your pots aside, and allow them to completely dry.


Next, take your clay pots and twine. Using some hot glue, apply some glue around the top section under the lip of your pot. After, applying some glue, add your twine on top, and go around the top section. 

Repeat this step, and apply a second layer of twine to the top section of your pot. You will do this for both pots. 


 Next, take your lace hearts, and apply some hot glue onto the back side of the hearts.  Add it to the front side of your pots.


Now you are ready to work with the floral foam piece. I ended up cutting my floral foam in half and shaving parts of it down. I did this to create a better fit for when I placed it into the clay pots. You want your foam to sit at the top of your pot. 


You are now ready to add your cut foam pieces. Gently press it down. It should feel a little snug when you press it down, and you should still be able to see it. 


Take your foam roses, and add them using your hot glue. Apply a small amount of glue, and press them gently down onto your foam piece. 

Once you have down this if you have any white flowers you can add them in between your foam roses. 


You're all done! These pots look wonderful displayed on a tray, entry table, or even a coffee table. 

Let me know if you decide to create your very own. 

Thanks so much for stopping by.

You might also enjoy

Sweet little hearts garland.- A simple craft post.

DIY-Valentine frame art display and a bonus craft.

Be sure to visit my other craft blog over at https://stephcreatesthingsdiyhomeandcrafts.blogspot.com/


Pin/save/share


Comments

  1. Hi Stephanie, your little sweet clay pots turned out just adorable! Thank you for sharing with us at the TFT party. I’m featuring you this week! Congratulations!
    💕

    ReplyDelete
    Replies
    1. Theresa, thank you so much! I'll be sure to add a featured button. I hope you have a wonderful week.

      Delete
  2. Very pretty! Thanks so much for linking up at A Themed Linkup 95 for All Things Love and Valentine’s Day. Pinned.

    ReplyDelete
  3. CONGRATS Stephanie! Your post is FEATURED at A Themed Linkup 96 for Handcrafted Jewelry from the previous linkup for All Things Love and Valentine’s Day.

    ReplyDelete
  4. SO sweet! What lovely little gifts these will make :-)

    ReplyDelete
    Replies
    1. Thank you. 🙂 I really enjoyed creating this craft.

      Delete
  5. Stephanie,
    So cute, Congratulations, you are being featured on TFT. https://www.eclecticredbarn.com/2024/01/valentine-decor-on-tft.html
    Hugs,
    Bev

    ReplyDelete
  6. Such a cute DIY project - thanks for sharing at #WednesdayLinkUpParty

    ReplyDelete

Post a Comment

Welcome! I love hearing your thoughts and seeing what you’ve been up to. Please leave a comment or ask a question below—I do my best to respond to everyone! To keep the blog comments safe and inspiring, spam will be removed. Thank you for being a part of this blogging space!

Popular posts from this blog

Colorful Summer Flower: Recycled Paper Towel DIY

  Looking to bring a little sunshine into your space without visiting the craft store? This whimsical summer flower decoration makes great use of what you already have—think beads, pom poms, a humble paper towel tube, and a splash of acrylic paint. Bonus: it’s the perfect way to reuse an old frame and welcome summer in style! What You’ll Need: 1 paper towel tube (emptied, of course!) Acrylic paint (I chose a deeper pink) Craft pom poms (yellow makes a great center!) Assorted beads (medium for the stem, smaller for embellishing the petals) Foam letters (for your summer message) A reused frame (square or any shape of your choice) Scissors Hot glue gun Creating your summer flower decoration Cut the Tube and Shape the Petals :  Start by cutting the paper towel tube into four evenly-sized sections. Each section will serve as a petal. You should be left with four rings. Next, flatten each ring, then gently reshape it to form soft ovals. These will mimic delicate flower...

The Crazy Little Lovebirds Link Party 143

Welcome to The Crazy Little Love Birds Link Party #143! I’m so happy you’re here! This is a warm and friendly gathering where you can share your amazing ideas—whether it's tasty recipes, fun family activities, creative crafts, home projects, or any other joyful inspirations. If you love finding new DIY ideas and learning from other bloggers, you’re in the perfect spot! Happy Friday! I hope you all had a wonderful week. This week, the girls and I picked up our summer reading registration prizes at the library. Prizes included stickers, journals, and a book of your choice. Does your library have a summer reading program? We've been joining in on ours for a while now.  Today also kicks off the free outdoor concerts, which we may attend.   I hope you all have a wonderful weekend, and as always, thank you for joining the party each week. I love visiting each of your blogs and seeing what you've been up to. I'm excited to share this week's featured posts from party 142.  ...

Fun with popsicle sticks...and more!

Since my daughter and I didn't make it out to the library, we did our own craft, and story time. (Which in my opinion is the best) :) Today we made popsicle stick frames, with a message. It was so much fun. For this craft the materials you need are: -Popsicle sticks -Hot glue gun -Paint -Markers/crayons -Construction paper (and scissors) 1.Start off by making a frame out of your popsicle sticks. Glue the corners together. I went ahead and made a message on construction paper to glue on to the back of the frame. (You will have to cut it to fit the frame. 2.Once that is done, paint your frame. (Have fun with it!) My daughter had so much fun with all the different colors. :) 3.Now once that is finished make a T-shape out of two popsicle sticks. (This is for the stand for the back of the frame.) Glue both sticks together, and glue it to the back of the construction paper. You're all done! Now you have a cute popsicle stick frame, with a message! Enjoy~ ...

DIY Upcycled Peanut Jars

Transform your old peanut jars into stylish, functional containers with these creative and easy DIY upcycling ideas. Learn how to repurpose your peanut jars and give them a new life with practical and decorative uses.   Materials needed: Two  empty peanut containers Two sheets of crafting paper tape scissors Start  by removing the old label on your peanut containers  Next, you'll want to wrap your crafting paper around your container.  If you find that it does not completely cover the container, cut out a single strip to use later. I found it easier to wrap my containers with my craft paper and make the marks I needed before cutting them to size.  Tape your crafting paper into the container and then make necessary cuts to the paper using your scissors. Once this is done, take the last piece of crafting paper that you cut out earlier and place it over the spot that you were unable to cover. Take some clear tape and apply it to the contai...

The Crazy Little Lovebirds Link Party 142

Welcome to The Crazy Little Love Birds Link Party #142! I’m so happy you’re here! This is a warm and friendly gathering where you can share your amazing ideas—whether it's tasty recipes, fun family activities, creative crafts, home projects, or any other joyful inspirations. If you love finding new DIY ideas and learning from other bloggers, you’re in the perfect spot! Hi all! I hope you're all well. We've been very fortunate to have a few days of rain. I'm not sure if I'll plant vegetables this year. I may just have some potted herbs on the porch. Did you start your garden? If so, what did you plant? As always, thank you for joining the party. I hope you all have a beautiful weekend.  Congratulations to our featured bloggers! Croissant S’mores + Campfire Fun Such a cozy little moment — the mix of croissants, chocolate, and firelight felt so playful and sweet. There’s a simple joy in gathering close, making treats, and letting the evening slow down around you. A tru...

All content copyright 2010-2026

I kindly request that my photos and words not be taken or used without my permission. If you have any inquiries, please do not hesitate to contact me. Additionally, for more information regarding this blog, please refer to the disclosure policy tab located above. Thank you.