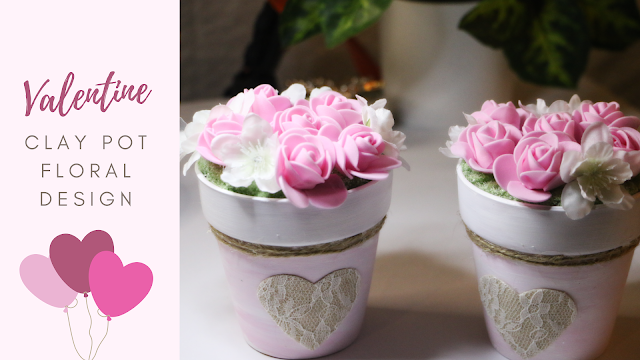
DIY Dollar Tree Valentine's Clay Pot Floral Design


 Hi everyone! 

I took a quick trip to my local Dollar Tree, and I was so excited to find a few items to create this really cute craft. I created two Valentine clay pot floral pieces. This DIY project is super easy and does not take a lot of time.  And most of my materials were purchased at my local Dollar tree.  The rest of the materials I had on hand.  I purchased the pots, foam roses, and floral foam. This craft was around four dollars. 


Materials needed

- One pack of the clay pots

It comes with two

Paint

I used white, and pink

One pack of pink foam roses

White faux flower- Optional

Twine

Hot glue

Floral foam piece

A pack of lace hearts or something similar 


First, take your clay pots and apply a layer of white paint around, and on the top of your clay pots. 


Allow the first layer to dry, and after applying a mixture of the white and pink paint for your second layer. Set your pots aside, and allow them to completely dry.


Next, take your clay pots and twine. Using some hot glue, apply some glue around the top section under the lip of your pot. After, applying some glue, add your twine on top, and go around the top section. 

Repeat this step, and apply a second layer of twine to the top section of your pot. You will do this for both pots. 


 Next, take your lace hearts, and apply some hot glue onto the back side of the hearts.  Add it to the front side of your pots.


Now you are ready to work with the floral foam piece. I ended up cutting my floral foam in half and shaving parts of it down. I did this to create a better fit for when I placed it into the clay pots. You want your foam to sit at the top of your pot. 


You are now ready to add your cut foam pieces. Gently press it down. It should feel a little snug when you press it down, and you should still be able to see it. 


Take your foam roses, and add them using your hot glue. Apply a small amount of glue, and press them gently down onto your foam piece. 

Once you have down this if you have any white flowers you can add them in between your foam roses. 


You're all done! These pots look wonderful displayed on a tray, entry table, or even a coffee table. 

Let me know if you decide to create your very own. 

Thanks so much for stopping by.

You might also enjoy

Sweet little hearts garland.- A simple craft post.

DIY-Valentine frame art display and a bonus craft.

Be sure to visit my other craft blog over at https://stephcreatesthingsdiyhomeandcrafts.blogspot.com/


Pin/save/share


Comments

  1. Hi Stephanie, your little sweet clay pots turned out just adorable! Thank you for sharing with us at the TFT party. I’m featuring you this week! Congratulations!
    💕

    ReplyDelete
    Replies
    1. Theresa, thank you so much! I'll be sure to add a featured button. I hope you have a wonderful week.

      Delete
  2. Very pretty! Thanks so much for linking up at A Themed Linkup 95 for All Things Love and Valentine’s Day. Pinned.

    ReplyDelete
  3. CONGRATS Stephanie! Your post is FEATURED at A Themed Linkup 96 for Handcrafted Jewelry from the previous linkup for All Things Love and Valentine’s Day.

    ReplyDelete
  4. SO sweet! What lovely little gifts these will make :-)

    ReplyDelete
    Replies
    1. Thank you. 🙂 I really enjoyed creating this craft.

      Delete
  5. Stephanie,
    So cute, Congratulations, you are being featured on TFT. https://www.eclecticredbarn.com/2024/01/valentine-decor-on-tft.html
    Hugs,
    Bev

    ReplyDelete
  6. Such a cute DIY project - thanks for sharing at #WednesdayLinkUpParty

    ReplyDelete

Post a Comment

Welcome! I love hearing your thoughts and seeing what you’ve been up to. Please leave a comment or ask a question below—I do my best to respond to everyone! To keep the blog comments safe and inspiring, spam will be removed. Thank you for being a part of this blogging space!

Popular posts from this blog

The Crazy Little Lovebirds Link Party 153

  Welcome to The Crazy Little Love Birds Link Party #153! I’m so happy you’re here! This is a warm and friendly gathering where you can share your amazing ideas—whether it's tasty recipes, fun family activities, creative crafts, home projects, or any other joyful inspirations. If you love finding new DIY ideas and learning from other bloggers, you’re in the perfect spot! Happy Friday! How was your week? I hope you all had a nice week. I've decided to completely dig up my flowerbeds and start each of them over next growing season. The heat did a number on my flowers this growing season. Our grass also did not do well this year. So now we are left with so many decisions about what to do next.  I'm excited to share the wonderful featured posts with everyone. As always, thank you to each of you who participates in the party each week. Congratulations  to our featured bloggers Agua Fresca Punch – Seasonal & Holiday Recipe Exchange A refreshing watermelon agua fresca that...

Crafting Personalized Thanksgiving Place Cards with Air Dry Clay and Pie Stamps

Hey there! I am thrilled to introduce you to an exciting Thanksgiving craft that will add a wonderful touch to your holiday table. This project involves using air-dry clay and pie stamps to create personalized and unique place cards. Do not worry, I will provide you with a step-by-step guide throughout the entire process. Additionally, we will use paint, twine, and a brown paper bag to give our place cards a festive feel.  Materials needed Pie stamps which can be obtained from Joann's Acrylic paint  Air-dry clay A hole puncher Paintbrush Wooden beads Twine A brown paper bag (or any other material you prefer to use as a template), one pencil, and scissors. Working with air clay Begin by flattening the air-dry clay, using either your hands or a roller. Once the clay has been flattened, use the pie stamps to press your desired design into the clay. Following the stamping process, remove any excess clay around the outer edge of the stamp and use the stamp press to release your cla...

Creating faux stained glass using plastic plates

Learn how to create stunning faux stained glass using plastic plates with this easy and eco-friendly DIY project. Discover creative ways to reuse plastic plates and bring a beautiful stained glass effect to your home decor. Hi everyone! I'm excited to share a quick craft with all of you. I am reusing a plastic plate, giving it a stained glass look. I will run you through two options. I'm joining the Sustainable challenge with a group of other bloggers, sharing eco-friendly and sustainable craft ideas. This is my first time participating. I am thrilled to share this upcycled craft with you all. The theme this month is sunshine. I chose to go with this project since I had extra clear plastic plates stored away since my oldest turned 12 this past April. I purchased a pack around her birthday and stored away the plastic plates that weren't used.  Creating faux stained glass using plastic plates Materials One plastic plate One sheet of paper for creating a template Pencil Stenci...

The Crazy Little Lovebirds Link Party 152

  Welcome to The Crazy Little Love Birds Link Party #152! I’m so happy you’re here! This is a warm and friendly gathering where you can share your amazing ideas—whether it's tasty recipes, fun family activities, creative crafts, home projects, or any other joyful inspirations. If you love finding new DIY ideas and learning from other bloggers, you’re in the perfect spot! Happy Friday! I hope that you all have a wonderful weekend. Congratulations  to our featured bloggers Rabbit in Carrot – Craft Attic Resources A sweet little felt rabbit tucked inside a carrot. Quick, cute, and perfect for spring or Easter crafting. Honey & Wheat Germ Bread – Scratch Made Food A wholesome whole‑grain loaf with honey and wheat germ. Easy, hearty, and great for everyday baking. Marbled Paper with Shaving Cream – Artful Analog A fun, colorful marbling project using shaving cream. Fast, kid‑friendly, and perfect for handmade papers. Splish Splash Summer Spotlight – Our Grand Lives A r...

The Crazy Little Lovebirds Link Party 151

  Welcome to The Crazy Little Love Birds Link Party #151! I’m so happy you’re here! This is a warm and friendly gathering where you can share your amazing ideas—whether it's tasty recipes, fun family activities, creative crafts, home projects, or any other joyful inspirations. If you love finding new DIY ideas and learning from other bloggers, you’re in the perfect spot! Happy Friday, blogging friends! I'm happy to share that we did get some rainy days. They helped cool things down, even if it was just a few degrees cooler; I'll take it! How was your week? I hope you all had a nice one. As always, thank you for joining the party this week. I'm happy to share the fabulous features from the last party. Congratulations to our featured bloggers Mod Peacock Hair Clip – Crochet Pattern This vibrant and playful peacock hair clip is a delightful project. Val & Holland offer a free crochet pattern that is quick to make, colorful, and ideal for using up scrap yarn. If you enj...

All content copyright 2010-2026

I kindly request that my photos and words not be taken or used without my permission. If you have any inquiries, please do not hesitate to contact me. Additionally, for more information regarding this blog, please refer to the disclosure policy tab located above. Thank you.