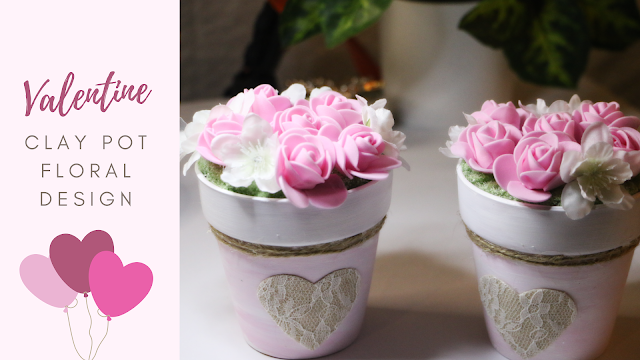
DIY Dollar Tree Valentine's Clay Pot Floral Design


 Hi everyone! 

I took a quick trip to my local Dollar Tree, and I was so excited to find a few items to create this really cute craft. I created two Valentine clay pot floral pieces. This DIY project is super easy and does not take a lot of time.  And most of my materials were purchased at my local Dollar tree.  The rest of the materials I had on hand.  I purchased the pots, foam roses, and floral foam. This craft was around four dollars. 


Materials needed

- One pack of the clay pots

It comes with two

Paint

I used white, and pink

One pack of pink foam roses

White faux flower- Optional

Twine

Hot glue

Floral foam piece

A pack of lace hearts or something similar 


First, take your clay pots and apply a layer of white paint around, and on the top of your clay pots. 


Allow the first layer to dry, and after applying a mixture of the white and pink paint for your second layer. Set your pots aside, and allow them to completely dry.


Next, take your clay pots and twine. Using some hot glue, apply some glue around the top section under the lip of your pot. After, applying some glue, add your twine on top, and go around the top section. 

Repeat this step, and apply a second layer of twine to the top section of your pot. You will do this for both pots. 


 Next, take your lace hearts, and apply some hot glue onto the back side of the hearts.  Add it to the front side of your pots.


Now you are ready to work with the floral foam piece. I ended up cutting my floral foam in half and shaving parts of it down. I did this to create a better fit for when I placed it into the clay pots. You want your foam to sit at the top of your pot. 


You are now ready to add your cut foam pieces. Gently press it down. It should feel a little snug when you press it down, and you should still be able to see it. 


Take your foam roses, and add them using your hot glue. Apply a small amount of glue, and press them gently down onto your foam piece. 

Once you have down this if you have any white flowers you can add them in between your foam roses. 


You're all done! These pots look wonderful displayed on a tray, entry table, or even a coffee table. 

Let me know if you decide to create your very own. 

Thanks so much for stopping by.

You might also enjoy

Sweet little hearts garland.- A simple craft post.

DIY-Valentine frame art display and a bonus craft.

Be sure to visit my other craft blog over at https://stephcreatesthingsdiyhomeandcrafts.blogspot.com/


Pin/save/share


Comments

  1. Hi Stephanie, your little sweet clay pots turned out just adorable! Thank you for sharing with us at the TFT party. I’m featuring you this week! Congratulations!
    💕

    ReplyDelete
    Replies
    1. Theresa, thank you so much! I'll be sure to add a featured button. I hope you have a wonderful week.

      Delete
  2. Very pretty! Thanks so much for linking up at A Themed Linkup 95 for All Things Love and Valentine’s Day. Pinned.

    ReplyDelete
  3. CONGRATS Stephanie! Your post is FEATURED at A Themed Linkup 96 for Handcrafted Jewelry from the previous linkup for All Things Love and Valentine’s Day.

    ReplyDelete
  4. SO sweet! What lovely little gifts these will make :-)

    ReplyDelete
    Replies
    1. Thank you. 🙂 I really enjoyed creating this craft.

      Delete
  5. Stephanie,
    So cute, Congratulations, you are being featured on TFT. https://www.eclecticredbarn.com/2024/01/valentine-decor-on-tft.html
    Hugs,
    Bev

    ReplyDelete
  6. Such a cute DIY project - thanks for sharing at #WednesdayLinkUpParty

    ReplyDelete

Post a Comment

Welcome! I love hearing your thoughts and seeing what you’ve been up to. Please leave a comment or ask a question below—I do my best to respond to everyone! To keep the blog comments safe and inspiring, spam will be removed. Thank you for being a part of this blogging space!

Popular posts from this blog

The Crazy Little Lovebirds Link Party 157

  Welcome to The Crazy Little Love Birds Link Party #157! I'm so happy you're here! This gathering is all about sharing what brings us joy.  Bring your delicious recipes, fun family moments, cozy crafts, and home projects—basically, everything wonderful you've been working on. Hello everyone! If you're new here, welcome! We’re thrilled that you decided to join us at the party. Last week, Blogger had some issues with the comment section. I experienced this on my own blog and on others while trying to leave comments. Thankfully, it seems everything is fixed now. How was your week? I hope you all had a wonderful time. I can’t wait to share the featured posts with you! Congratulations to our featured bloggers Mille Fiori Favoriti – A Bear‑Filled Summer:  Pat had the cutest (and wildest!) visitors this summer. Her bear stories and photos are such a treat, and I love getting a little glimpse into her beautiful mountain life. InkTorrents – Ruins, Tales, and Quiet Moments:  ...

Easy Floral Decoupage Idea for Faux Pumpkin Display

 Hi everyone! I'm excited to share a simple and easy floral pumpkin design you can create quickly. Today, we will make a faux floral pumpkin display using decoupage and a few additional designs. I'm reusing a foam pumpkin that I bought at Dollar Tree. If you’re ready, let’s begin creating an easy floral decoupage faux pumpkin display! Quick video tutorial **Materials needed:** - Acrylic paint - Paintbrush - Floral napkin - Faux pearls - Faux flowers - Craft knife - Scissors - Mod Podge Carefully remove the top of your pumpkin. I used my craft knife to go around the top section, creating a hole at the top. Using a paintbrush, apply acrylic paint to the pumpkin. I chose to paint mine black. Next, use scissors to cut out a few flowers from your napkin. Make sure to remove the second layer of the napkin before cutting out the designs.   Once you have your floral designs cut out, use a paintbrush to apply Mod Podge to the pumpkin. While the Mod Podge is wet, add the floral napkin c...

DIY Floral Wooden Jack‑O’‑Lanterns (Easy Fall Decor)

I’ve been having so much fun creating fall projects this year. These floral wooden jack‑o’‑lanterns  started as simple wooden pumpkins, but with a few pretty transfers and some soft paint colors, they turned into the sweetest little fall accents. I love how the florals give them a cozy, cottage‑style feel while still keeping that classic jack‑o’‑lantern charm. They’re quick to make, easy to customize, and such a cute way to add a warm autumn touch to your home. Watch the video tutorial Materials Wooden pumpkin cutouts Floral transfers Acrylic paint (your chosen colors) Gold acrylic paint Green acrylic paint Mini dowels Hot glue gun + glue sticks Small wooden stands Brown acrylic paint Paintbrushes   Add the floral transfers I started by placing my floral transfers onto each wooden pumpkin, just arranging them until they felt right. Once they were where I wanted them, I used a little rubbing tool to press them down and transfer the design onto the wood. Take your time with this...

The Crazy Little Lovebirds Link Party 156

Welcome to The Crazy Little Love Birds Link Party #156! I'm so happy you're here! This gathering is all about sharing what brings us joy.  Bring your delicious recipes, fun family moments, cozy crafts, and home projects—basically, everything wonderful you've been working on. Happy Friday! How was your week? I hope you’re doing well.  This week, we finally went to court about the damage to our fence. Honestly, no one likes to go to court, and we would have preferred to resolve this issue privately with the individual involved. He didn't cooperate, which ultimately led us to take him to court. We hope to finally move on from this situation. I can't wait to share the lovely featured posts with you all.  **Update** Looks like Blogger has fixed the comment section. Yay! Blogger is having some issues with commenting. It shows "publishing..." when the button is clicked and stays there for some time. As always, thank you all for joining! ⭐Congratulations to our fe...

The Crazy Little Lovebirds Link Party 126

Welcome to The Crazy Little Love Birds Link Party #126! This party offers a platform for sharing inspiring content, including recipes, family-friendly blog posts, crafts, home décor, and other uplifting  ideas. Hello, dear blogging friends! This week has been quite busy, and we're all ready to relax this weekend. We’ve learned a lesson we've encountered before: no matter how kind or justified you believe you are, there will always be people who remind you it doesn’t matter.  I'm sharing this as we continue to deal with the aftermath of someone colliding with our fence.   I hope for better days ahead.  Now, let’s move on to the party! We have some wonderful posts to share. A big thank you to each and every one of you who joins us for this party each week; please know that you are appreciated! 🌟🌟🌟Congratulations to our featured bloggers 🌟🌟🌟 Amy's Creative Pursuits shared her experience at the World Snow Sculpture Festival in Stillwater, Minnesota. Visit her blog...

All content copyright 2010-2026

I kindly request that my photos and words not be taken or used without my permission. If you have any inquiries, please do not hesitate to contact me. Additionally, for more information regarding this blog, please refer to the disclosure policy tab located above. Thank you.